Needs a build newer than 4.12.1. In the current development builds.
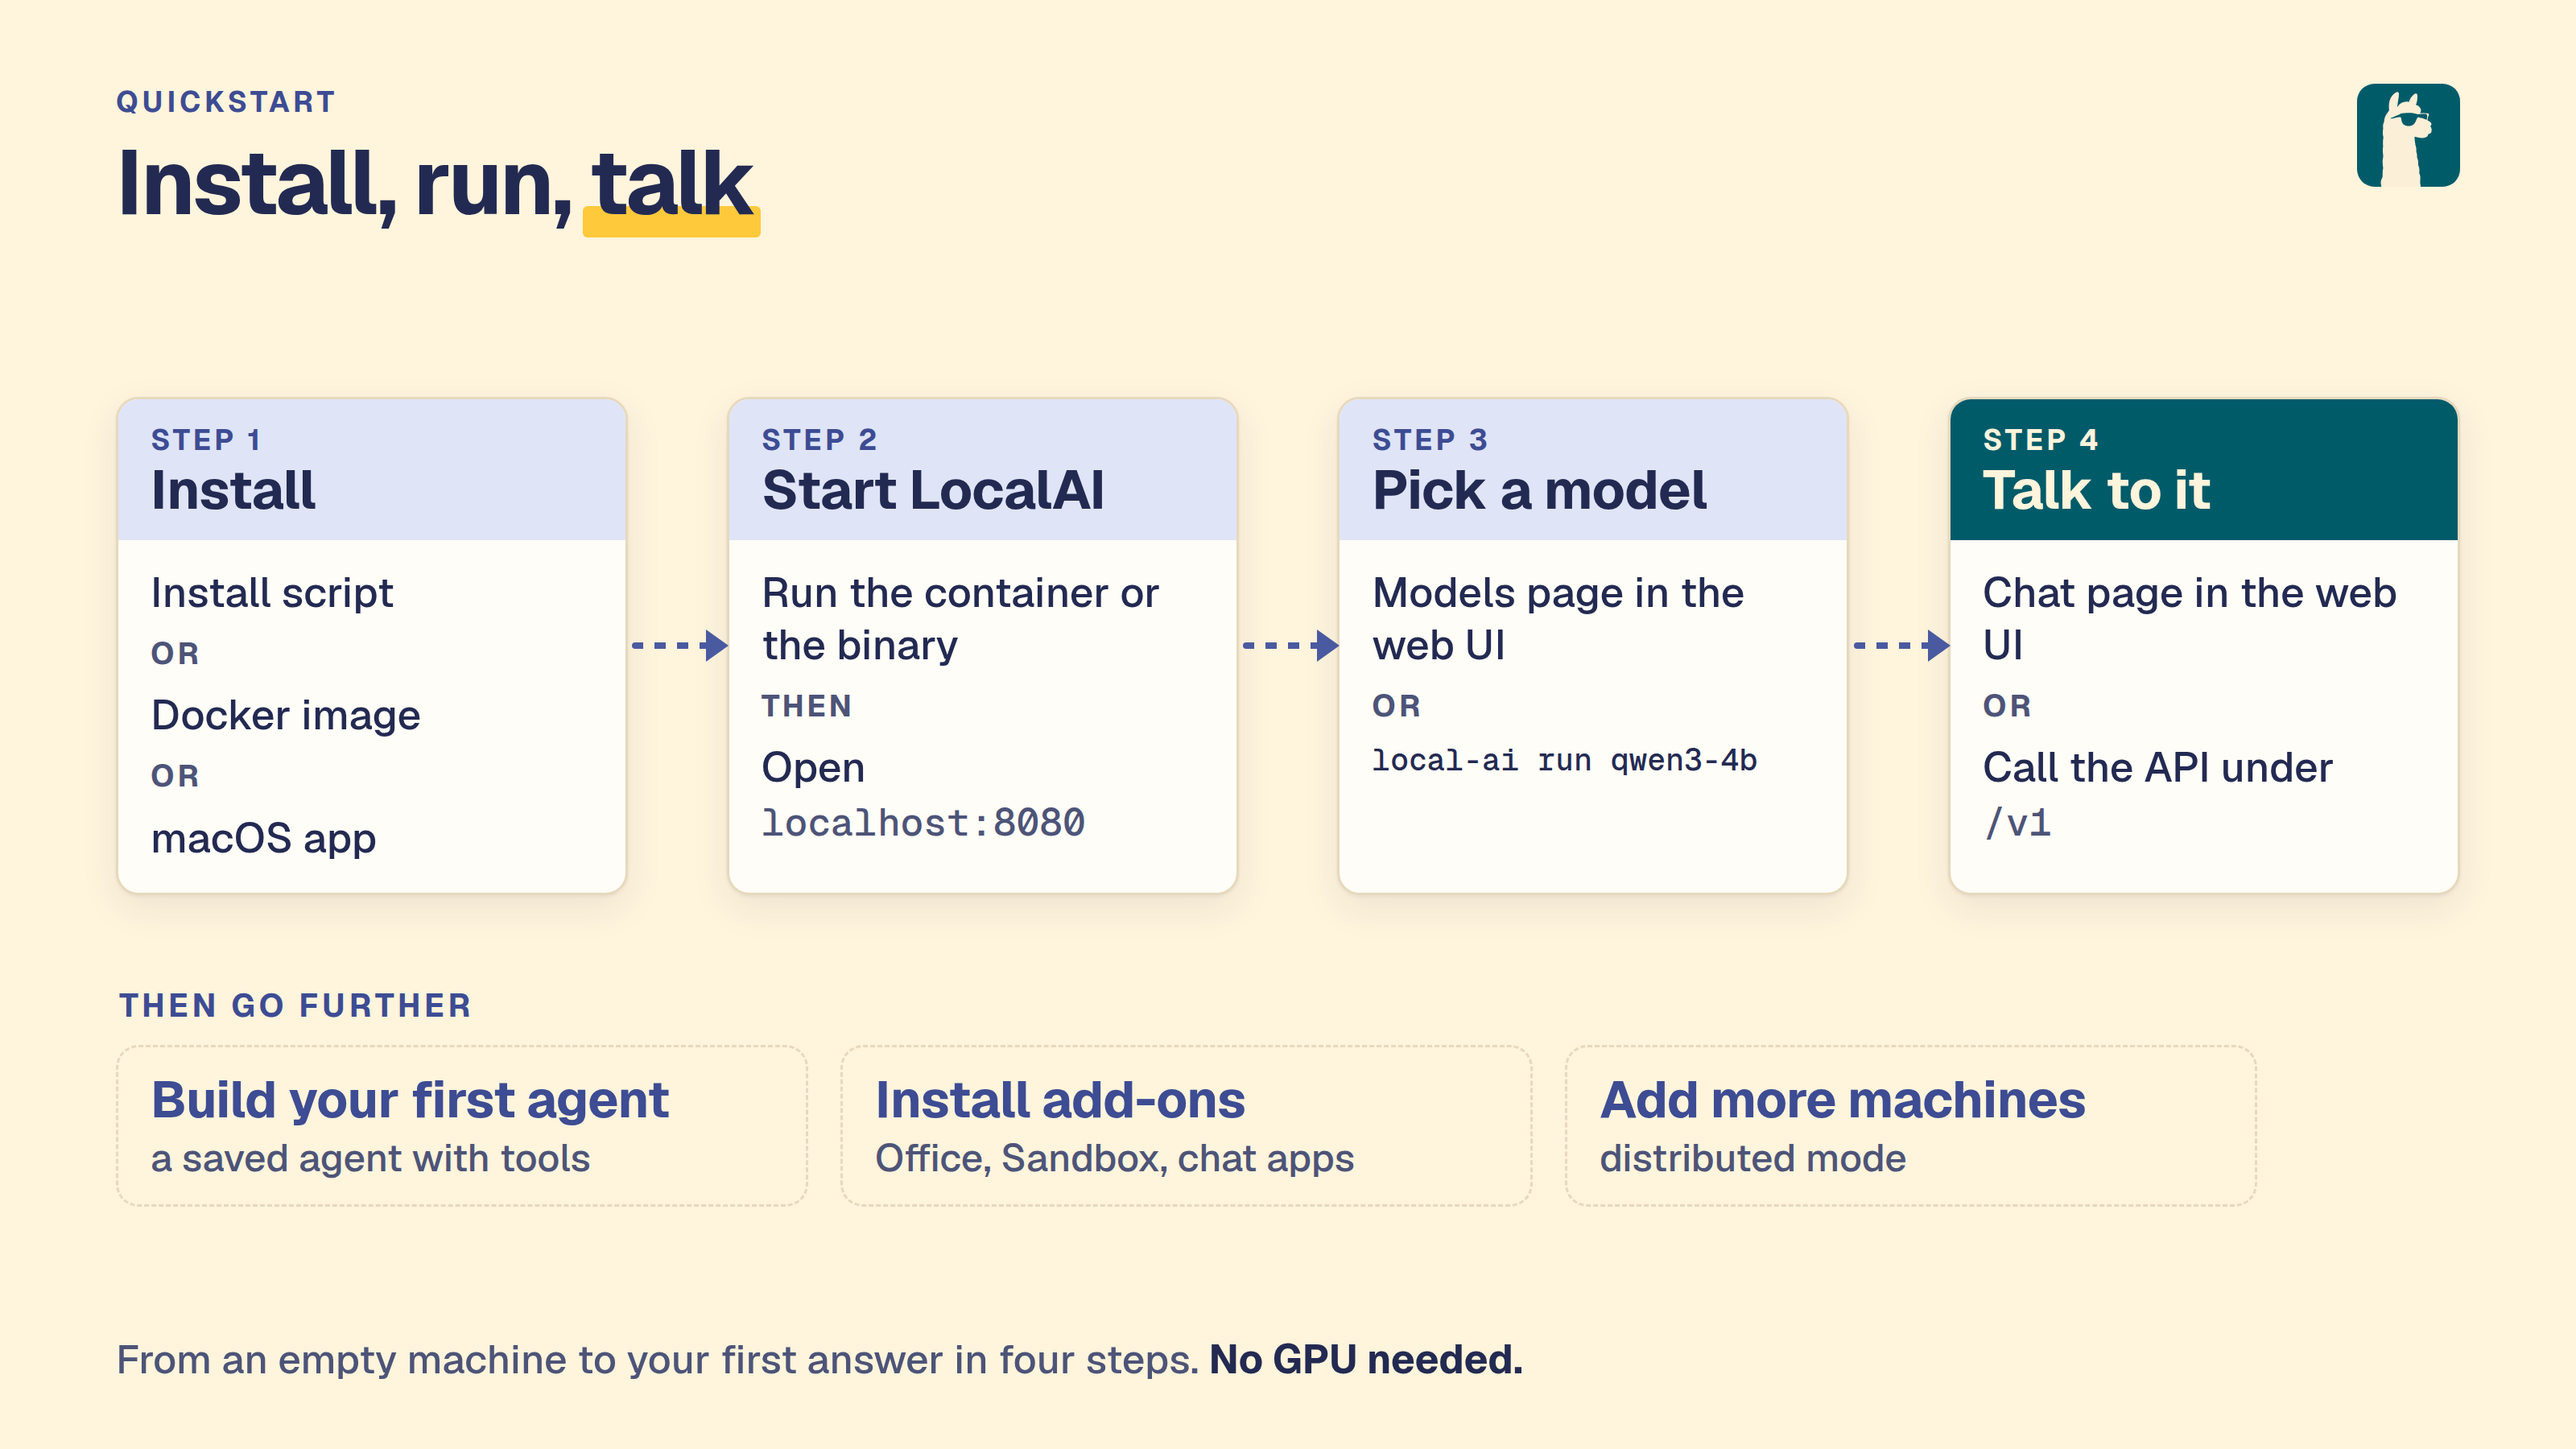
This section takes you from a fresh install to a working chat, a working API call and your first agent. Follow the pages in order the first time.
Tip
On Linux and macOS, install LocalAI with the script curl -sSL https://localai.io/install.sh | sh. Use Docker on Windows or when you prefer a container. See the install guide.
The path
Quickstart: start LocalAI, install a model and get a first chat reply in the web interface and from the API.
Install: every way to install LocalAI, one page per platform.
Set up models: install models from the gallery, Hugging Face, OCI images or local files.
Try it out: copy-paste examples for the OpenAI-compatible endpoints.
Customize a model: edit the model configuration and the prompt template.
Build your first agent: turn a model into a saved agent that a chat, a schedule or a bot can use.
The install script, the macOS app and the latest container image give version 4.12.1. The add-ons, Office, Sandbox, Pages and Team in these docs need a newer build.
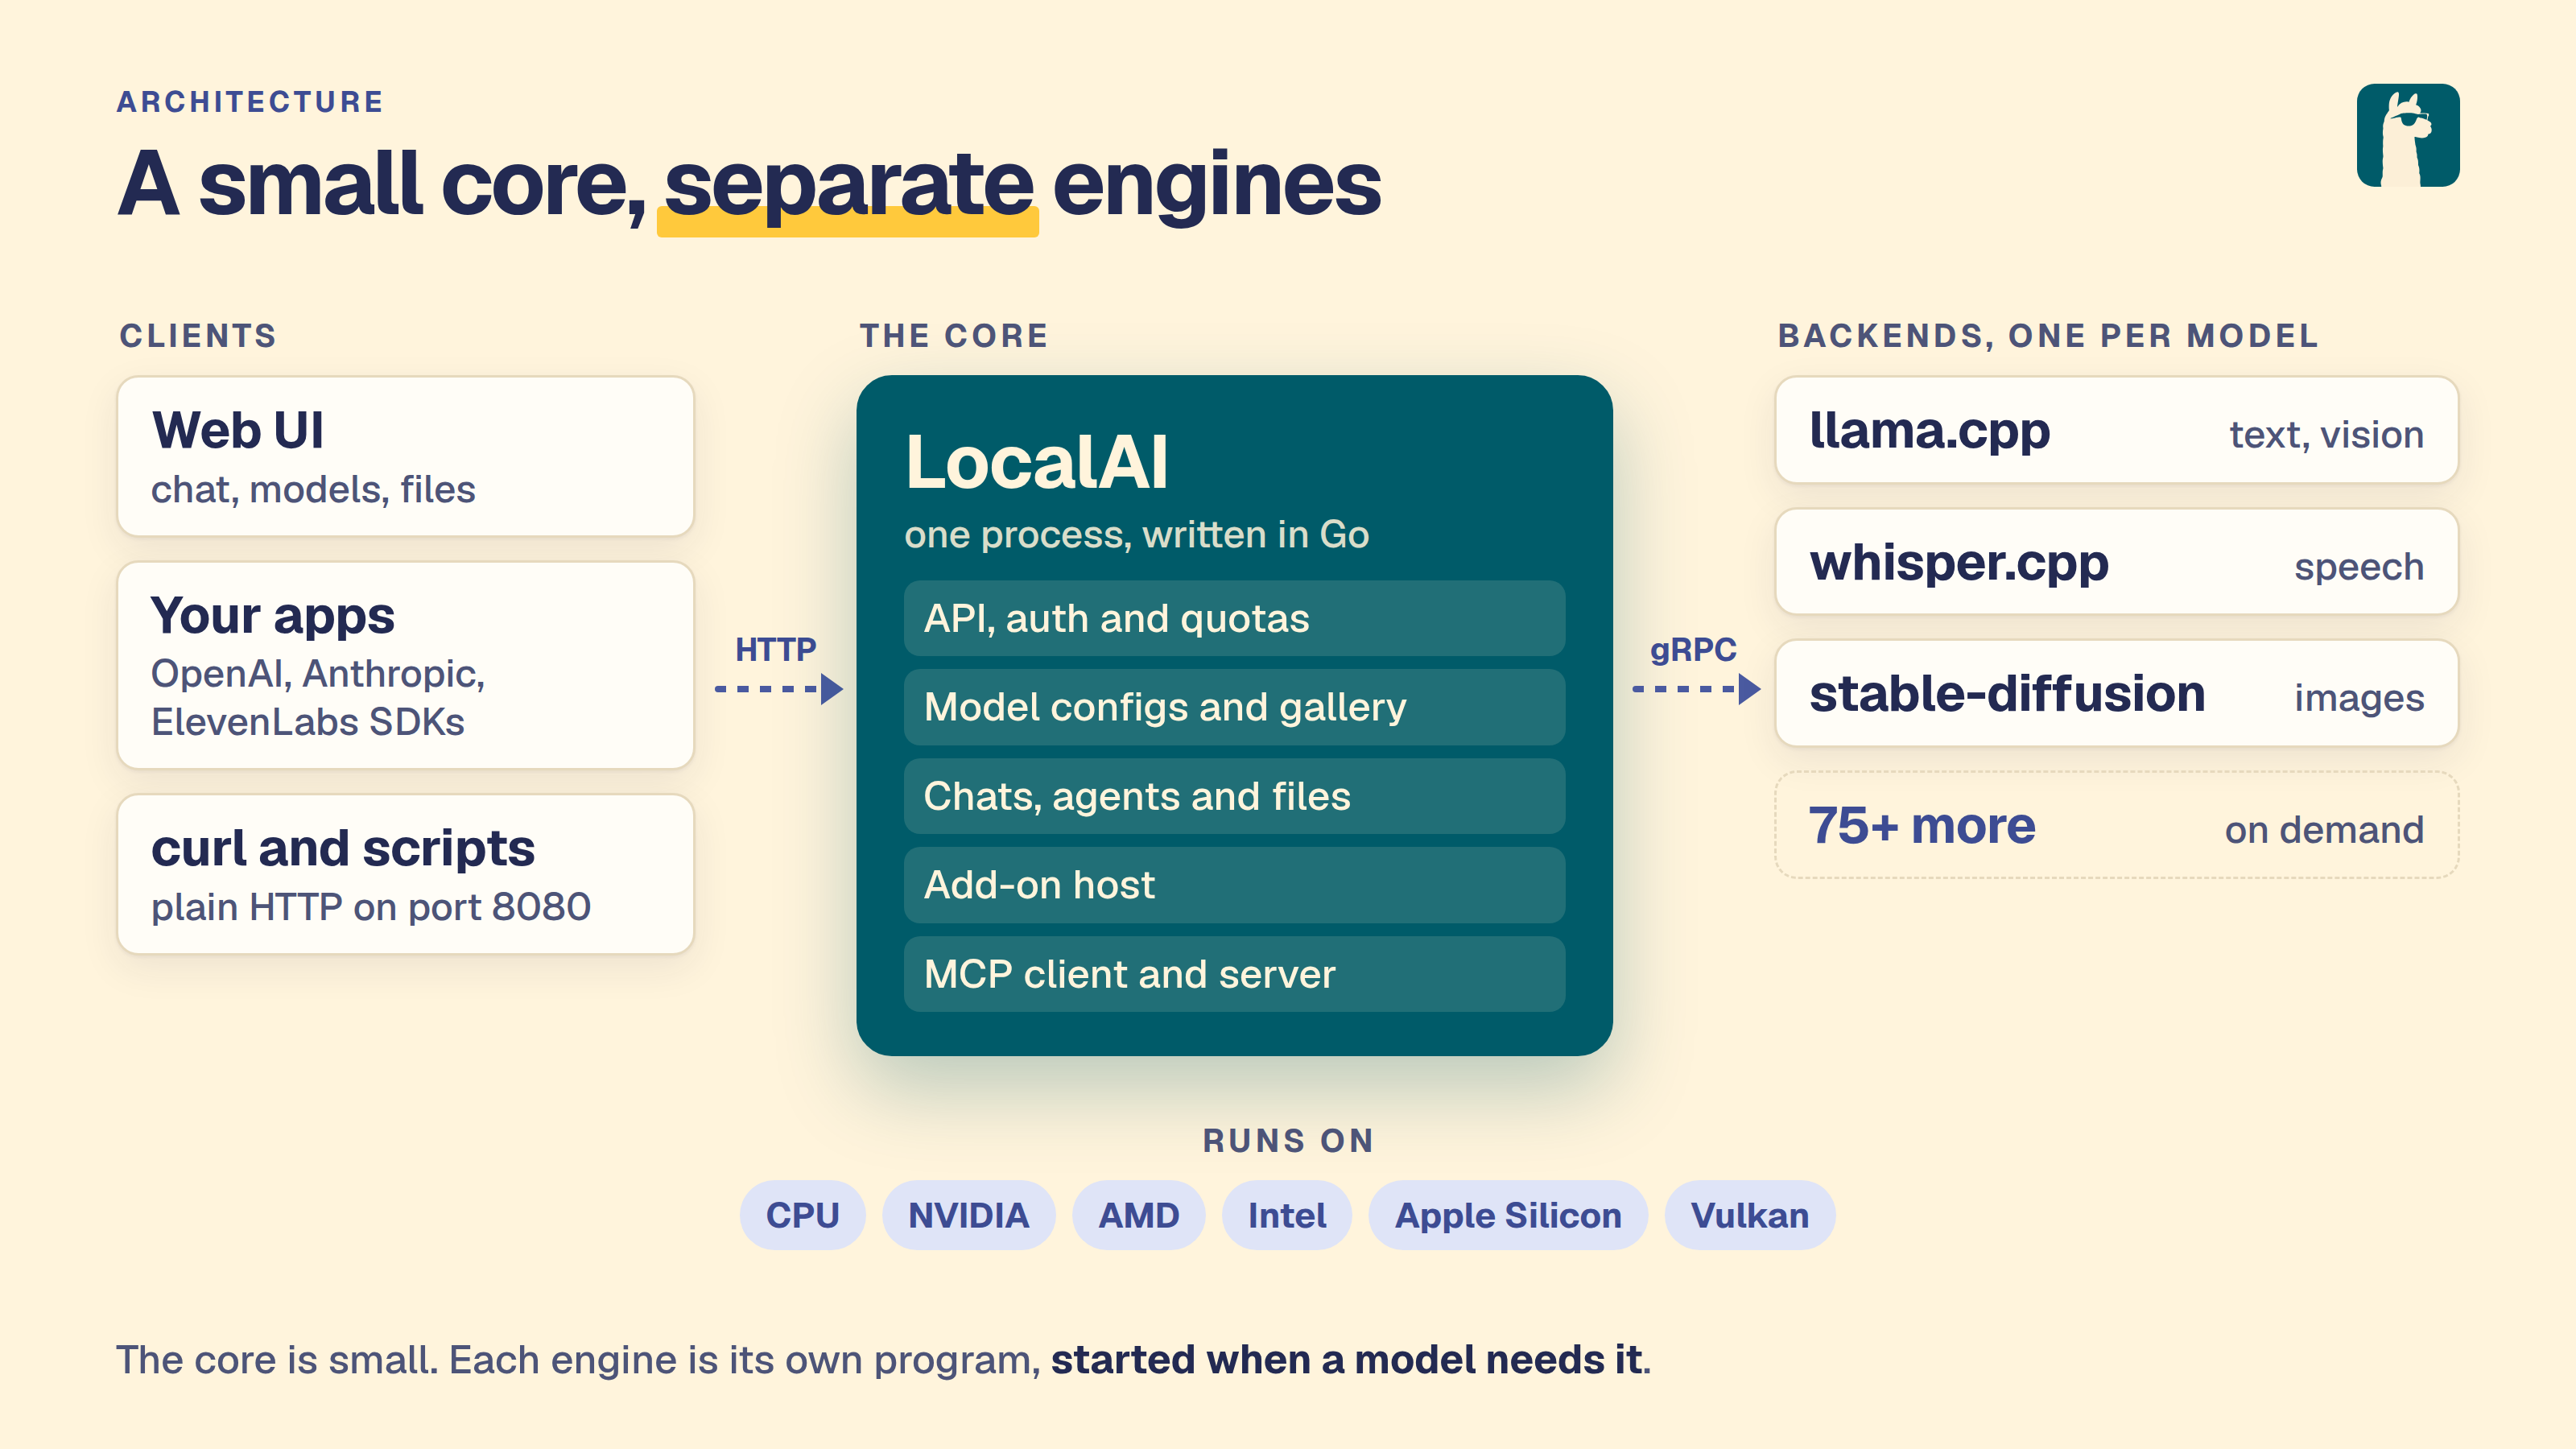
LocalAI is an AI server that runs on your own hardware. A small core speaks the OpenAI and Anthropic APIs. Each model backend is added only when you need it. Many existing clients work with it.
Why LocalAI
Self-hosted. The server, the models and your files stay on your machines. Features that call outside services, such as web search or Gmail, are opt-in.
Open source. MIT licence.
Any hardware. Laptops and servers, with or without a GPU.
Small core. Backends are separate. LocalAI installs a backend when a model needs it.
What is included
OpenAI-compatible API. Routes in the OpenAI, Anthropic and Open Responses formats.
Web interface. Chats, saved agents, files, model management, image generation and system monitoring.
Agents. Saved agents that use tools over MCP (Model Context Protocol), add-ons and your files.
Many modalities. Text, images, video, speech, sound, vision and embeddings. Each one runs on its own backend. See what models can do.
GPU support. LocalAI detects NVIDIA, AMD, Intel and Vulkan GPUs.
Distributed mode. Worker nodes, P2P federation and model sharding.
Add-ons. Separate programs that add tools, such as the Sandbox and Office documents.
Each backend is a gRPC service around an engine such as llama.cpp, vLLM, whisper.cpp, stable-diffusion or MLX. Backends are OCI images that run as separate processes. You can install, upgrade or remove one without touching the core. One can run on another machine. A fault in one does not stop the others.
The backend contract is a small gRPC interface. You can write your own backend in any language.
Get started
On Linux or macOS, install with the script:
curl -sSL https://localai.io/install.sh | sh
local-ai run qwen3-4b
Then open http://localhost:8080 to use the web interface. On Windows, or if you prefer a container, use Docker:
docker run -p 8080:8080 --name local-ai -ti localai/localai:latest
LocalAI is helped by the wider community of contributors. See the full contributors list.
License
LocalAI is MIT licensed.
Quickstart
Note
The install script, the macOS app and the latest container image give version 4.12.1. The add-ons, Office, Sandbox, Pages and Team in these docs need a newer build.
LocalAI is an open source server that speaks the OpenAI and Anthropic APIs. It runs on your hardware. This page takes you from nothing to a first chat reply.
Install and start LocalAI
On Linux, or on a Mac with Apple Silicon, run the install script, then start LocalAI with a model:
curl -sSL https://localai.io/install.sh | sh
local-ai run qwen3-4b
On Windows, on an Intel Mac, or when you prefer a container, use Docker instead:
docker run -p 8080:8080 --name local-ai -ti localai/localai:latest
On a Mac you can also use the macOS app. For all install methods, see the install guide.
You should see the log line LocalAI is started and running with the address :8080. The first run of local-ai run qwen3-4b downloads the model, so it takes longer.
For GPU acceleration in a container, use the image that matches your hardware:
Hardware
Docker image
CPU only
localai/localai:latest
NVIDIA, CUDA 12
localai/localai:latest-gpu-nvidia-cuda-12
NVIDIA, CUDA 13
localai/localai:latest-gpu-nvidia-cuda-13
AMD (ROCm)
localai/localai:latest-gpu-hipblas
Intel GPU
localai/localai:latest-gpu-intel
Vulkan
localai/localai:latest-gpu-vulkan
For NVIDIA GPUs, add --gpus all. For AMD, Intel and Vulkan, add the --device flags. See Container images for the full reference.
Chat in the web interface
Open http://localhost:8080 in your browser. The web interface lets you:
Chat with any installed model
Explore, install, and manage models from the Models page
Generate images, audio, and more
Create and manage AI agents with MCP tool support
Monitor system resources and loaded models
Configure settings including GPU acceleration
To get your first chat working:
Open Models → Explore and search for qwen3-4b. If you did not start LocalAI with local-ai run qwen3-4b, click Install on the qwen3-4b entry and wait for the download to finish. qwen3-4b is a small Qwen3 model for CPU. It also supports tool calling, so you can use it again in Build your first agent.
Open Chats, select qwen3-4b from the model list, type a message and send it.
You should see a reply within a few seconds. On a CPU, the first reply can take longer while the model loads.
To correct an earlier prompt or response without running the model again, hover
over the saved message and select Edit. Save updates that conversation’s
local history; Cancel discards the draft.
Download models from the CLI
When starting LocalAI (either via Docker or via CLI) you can specify as argument a list of models to install automatically before starting the API, for example:
local-ai run qwen3-4b
local-ai run huggingface://TheBloke/phi-2-GGUF/phi-2.Q8_0.gguf
local-ai run ollama://gemma:2b
local-ai run https://gist.githubusercontent.com/.../phi-2.yaml
local-ai run oci://localai/phi-2:latest
You can also manage models with the CLI:
local-ai models list # List available models in the gallerylocal-ai models install <name> # Install a model
Tip
Automatic Backend Detection: When you install models from the gallery or YAML files, LocalAI automatically detects your system’s GPU capabilities (NVIDIA, AMD, Intel) and downloads the appropriate backend. For advanced configuration options, see GPU Acceleration.
By default, LocalAI listens on port 8080 on all interfaces, and authentication is off. Protect the API before you expose it beyond your own machine. You have two options:
Simple API keys: Run with LOCALAI_API_KEY=your-key to gate access. API keys grant full admin access with no role separation.
User authentication: Run with LOCALAI_AUTH=true for multi-user support with admin and user roles, OAuth login, per-user API keys and usage tracking. See Authentication and authorization.
What next
There is much more to explore! LocalAI supports video generation, voice cloning, embeddings, image understanding, and more. Check out:
The install script, the macOS app and the latest container image give version 4.12.1. The add-ons, Office, Sandbox, Pages and Team in these docs need a newer build.
Start with the install script on Linux, or on a Mac with Apple Silicon. On Windows, on an Intel Mac, in a cluster, or when you want to keep LocalAI apart from the host, use a container. On a Mac you can also use the app.
You have
Use
Command or guide
Linux, or a Mac with Apple Silicon
Install script
curl -sSL https://localai.io/install.sh | sh
Windows (WSL2), an Intel Mac, a server, or a GPU image
The script downloads the release binary for your machine, checks it against the checksums of the release, and puts it on your PATH. It builds nothing. Running it twice changes nothing.
curl -sSL https://localai.io/install.sh | sh
local-ai run qwen3-4b
The API and the web interface are then at http://localhost:8080.
You can set these environment variables before the command:
Variable
Effect
LOCALAI_VERSION
Install a given release, for example v4.7.1. The default is the latest release.
INSTALL_DIR
Install into this folder. The default is /usr/local/bin, or ~/.local/bin when /usr/local/bin is not writable.
LOCALAI_FORCE
Set to 1 to install again when the same build is present.
LOCALAI_NO_SUDO
Set to 1 to never ask for sudo. LocalAI then installs into ~/.local/bin.
The script supports Linux and macOS on amd64 and arm64. There is no binary for Intel Macs. Use a container there. For a different install, see the other guides.
Container
docker run -p 8080:8080 --name local-ai -ti localai/localai:latest
Podman works the same way. For GPU images, see Containers.
macOS app
Download LocalAI.dmg, open it and move LocalAI to Applications. The DMG is signed and notarized. See macOS for the details.
Podman might not resolve short image names such as localai/localai:latest.
The Podman and Compose examples use the docker.io/ prefix to identify the
container registry explicitly.
Quick Start
The fastest way to get started is with the CPU image:
docker run -p 8080:8080 --name local-ai -ti localai/localai:latest
# Or with Podman:podman run -p 8080:8080 --name local-ai -ti docker.io/localai/localai:latest
This will:
Start LocalAI (you’ll need to install models separately)
Make the API available at http://localhost:8080
Image Types
LocalAI provides several image types to suit different needs. These images work with both Docker and Podman.
Standard Images
Standard images don’t include pre-configured models. Use these if you want to configure models manually.
CPU Image
docker run -ti --name local-ai -p 8080:8080 localai/localai:latest
# Or with Podman:podman run -ti --name local-ai -p 8080:8080 docker.io/localai/localai:latest
GPU Images
Choose the image that matches your hardware and installed drivers:
NVIDIA CUDA 12 is the compatibility choice for systems with CUDA 12 drivers. Use CUDA 13 when your NVIDIA driver and toolkit support CUDA 13.
AMD ROCm is for supported AMD GPUs, while Intel is for Intel GPUs with the required device runtime.
Jetson uses the L4T ARM64 image. Choose its CUDA 12 image for Jetson AGX Orin-class devices or CUDA 13 for DGX Spark.
Vulkan works across vendors and is the fallback when no matching CUDA, ROCm, or Intel image is available.
NVIDIA CUDA 13:
docker run -ti --name local-ai -p 8080:8080 --gpus all localai/localai:latest-gpu-nvidia-cuda-13
# Or with Podman:podman run -ti --name local-ai -p 8080:8080 --device nvidia.com/gpu=all docker.io/localai/localai:latest-gpu-nvidia-cuda-13
NVIDIA CUDA 12:
docker run -ti --name local-ai -p 8080:8080 --gpus all localai/localai:latest-gpu-nvidia-cuda-12
# Or with Podman:podman run -ti --name local-ai -p 8080:8080 --device nvidia.com/gpu=all docker.io/localai/localai:latest-gpu-nvidia-cuda-12
AMD GPU (ROCm):
docker run -ti --name local-ai -p 8080:8080 --device=/dev/kfd --device=/dev/dri --group-add=video localai/localai:latest-gpu-hipblas
# Or with Podman:podman run -ti --name local-ai -p 8080:8080 --device rocm.com/gpu=all docker.io/localai/localai:latest-gpu-hipblas
Intel GPU:
docker run -ti --name local-ai -p 8080:8080 localai/localai:latest-gpu-intel
# Or with Podman:podman run -ti --name local-ai -p 8080:8080 --device gpu.intel.com/all docker.io/localai/localai:latest-gpu-intel
Vulkan:
docker run -ti --name local-ai -p 8080:8080 localai/localai:latest-gpu-vulkan
# Or with Podman:podman run -ti --name local-ai -p 8080:8080 docker.io/localai/localai:latest-gpu-vulkan
NVIDIA Jetson (L4T ARM64):
CUDA 12 (for Nvidia AGX Orin and similar platforms):
docker run -ti --name local-ai -p 8080:8080 --runtime nvidia --gpus all localai/localai:latest-nvidia-l4t-arm64
CUDA 13 (for Nvidia DGX Spark):
docker run -ti --name local-ai -p 8080:8080 --runtime nvidia --gpus all localai/localai:latest-nvidia-l4t-arm64-cuda-13
Using Compose
The repository’s docker-compose.yaml installs phi-2-chat from the model gallery by default. Change its command list to select a different gallery model.
For a more manageable setup, especially with persistent volumes, use Docker Compose or Podman Compose:
Using CDI (Container Device Interface) - Recommended for NVIDIA Container Toolkit 1.14+
The CDI approach is recommended for newer versions of the NVIDIA Container Toolkit (1.14 and later). It provides better compatibility and is the future-proof method:
version:"3.9"services:api:image:docker.io/localai/localai:latest-gpu-nvidia-cuda-12# For CUDA 13, use: docker.io/localai/localai:latest-gpu-nvidia-cuda-13healthcheck:test:["CMD","curl","-f","http://localhost:8080/readyz"]# start_period, not timeout, is the knob for a slow first boot: startup# preload can download tens of GB before the API binds, and failures# inside the start period leave the container `starting` rather than# marking it unhealthy. timeout is a per-probe deadline.start_period:60minterval:1mtimeout:10sretries:3ports:- 8080:8080environment:- DEBUG=falsevolumes:- ./models:/models:cached# CDI driver configuration (recommended for NVIDIA Container Toolkit 1.14+)# This uses the nvidia.com/gpu resource APIdeploy:resources:reservations:devices:- driver:nvidia.com/gpucount:allcapabilities:[gpu]
Save this as compose.yaml and run:
docker compose up -d
# Or with Podman:podman-compose up -d
Using Legacy NVIDIA Driver - For Older NVIDIA Container Toolkit
If you are using an older version of the NVIDIA Container Toolkit (before 1.14), or need backward compatibility, use the legacy approach:
version:"3.9"services:api:image:docker.io/localai/localai:latest-gpu-nvidia-cuda-12# For CUDA 13, use: docker.io/localai/localai:latest-gpu-nvidia-cuda-13healthcheck:test:["CMD","curl","-f","http://localhost:8080/readyz"]# start_period, not timeout, is the knob for a slow first boot: startup# preload can download tens of GB before the API binds, and failures# inside the start period leave the container `starting` rather than# marking it unhealthy. timeout is a per-probe deadline.start_period:60minterval:1mtimeout:10sretries:3ports:- 8080:8080environment:- DEBUG=falsevolumes:- ./models:/models:cached# Legacy NVIDIA driver configuration (for older NVIDIA Container Toolkit)deploy:resources:reservations:devices:- driver:nvidiacount:1capabilities:[gpu]
Persistent data (collections, chat files, JSON stores when there is no database). Downloads are staged in /data/downloading until they are extracted
--data-path
$LOCALAI_DATA_PATH
Warning
Container files that are not stored in a volume are lost when the container is
recreated during an image upgrade. Mount all four paths if you want to preserve
installed models, backends, settings, and application data.
The host paths can be anywhere on persistent storage, but the container paths
must be exactly /models, /backends, /configuration, and /data. In
UnRAID and other container-template UIs, create one path mapping for each row
in the table above.
Backend OCI images contain symbolic links. When /backends is stored on a
filesystem that cannot create links, such as some CIFS/SMB mounts, LocalAI
materializes each link as a regular file so installation can complete. This can
use more disk space than a local filesystem. Prefer a Docker or Podman named
volume for /backends when possible.
The image starts as root only to run entrypoint.sh, which gives the data folders (/models, /backends, /configuration, /data, /tmp/generated) to the user localai (uid and gid 10001) and then runs LocalAI as that user. An add-on that runs commands in an isolated sandbox needs this, because it refuses to run as root. See the sandbox in the LocalAI container for the devices and permissions it needs.
Volumes from an older image are owned by root. The first start with this image changes their owner to 10001 (it logs this, and it can take a while on a large models folder). No manual step is needed.
LOCALAI_UID and LOCALAI_GID change the user. docker run --user or a Kubernetes runAsUser is respected, and the data folders must then be writable by that user.
LOCALAI_RUN_AS_ROOT=true keeps the old behaviour. Add-ons that run commands in a sandbox are then unavailable.
A bind mount whose owner cannot be changed (a read-only or network mount) must be made writable for uid 10001 on the storage side.
Next Steps
After installation:
Access the WebUI at http://localhost:8080
Check available models: curl http://localhost:8080/v1/models
For AMD: Ensure devices are accessible: ls -la /dev/kfd /dev/dri
NVIDIA Container fails to start with “Auto-detected mode as ’legacy’” error
If you encounter this error:
Error response from daemon: failed to create task for container: failed to create shim task: OCI runtime create failed: runc create failed: unable to start container process: error during container init: error running prestart hook #0: exit status 1, stdout: , stderr: Auto-detected mode as 'legacy'
nvidia-container-cli: requirement error: invalid expression
This indicates a Docker/NVIDIA Container Toolkit configuration issue. The container runtime’s prestart hook fails before LocalAI starts. This is not a LocalAI code bug.
Solutions:
Use CDI mode (recommended): Update your docker-compose.yaml to use the CDI driver configuration:
Upgrade NVIDIA Container Toolkit: Ensure you have version 1.14 or later, which has better CDI support.
Check NVIDIA Container Toolkit configuration: Run nvidia-container-cli --query-gpu to verify your installation is working correctly outside of containers.
Verify Docker GPU access: Test with docker run --rm --gpus all nvidia/cuda:12.0.0-base-ubuntu22.04 nvidia-smi
Models not downloading
Check internet connection
Verify disk space: df -h
Check container logs for errors: docker logs local-ai or podman logs local-ai
The quick-start examples above use the Docker Hub image names. Every image is published to both Docker Hub and Quay. The tables below map the Docker Hub tag to its Quay equivalent for each variant. Replace v4.12.1 with a released version to pin a specific build.
These images are compatible with Nvidia ARM64 devices with CUDA 12, such as the Jetson Nano, Jetson Xavier NX, and Jetson AGX Orin. For more information, see the Nvidia L4T guide.
You can also double-click the executable image in a file manager. Normal
AppImage mounting requires FUSE support (on Ubuntu 22.04, libfuse2). If FUSE
is unavailable, extract it into a writable directory and run the launcher:
This is the existing desktop/tray launcher, not the server bundled into an
image. First use needs internet access to download LocalAI. Models and backends
are downloaded separately. The launcher stores configuration in
~/.localai/launcher.json, runtime downloads in ~/.localai/bin, and default
models/backends under ~/.localai/. Fyne preferences use the user configuration
directory. These remain writable outside the read-only image. Keep your home
writable; replacing or deleting the AppImage does not delete your data.
The supported release target is x86_64 Ubuntu 22.04 or newer, with glibc
2.35+, OpenGL and X11 desktop libraries (XWayland on Wayland). A tray-enabled
desktop is recommended. This is not a static executable: other distributions
must provide compatible graphics libraries. ARM64 AppImages are not currently
published; use the server binaries below instead. Server/backend requirements
are separate from launcher requirements. Replace the AppImage manually to
update the launcher; there is no AppImage self-updater.
Download the binary for your architecture (amd64, arm64, etc.)
Make it executable:
chmod +x local-ai-*
Run LocalAI:
./local-ai-*
Run your first model
Starting the binary on its own gives you an empty server. To get a working chat right away, run LocalAI with a model name and it will download and serve it from the gallery:
./local-ai-* run qwen3-4b
Once it is ready, open the WebUI at http://localhost:8080 or send a request to the API:
For performance benchmarks with different backends like llama.cpp, visit this link.
Configuration
After installation, you can:
Access the WebUI at http://localhost:8080
Configure models in the models directory
Customize settings via environment variables or config files
Start LocalAI on demand with systemd
LocalAI accepts a single TCP listener passed through the systemd socket
activation protocol. This lets systemd listen on the public port and start
LocalAI only when the first client connects.
Create /etc/systemd/system/local-ai.socket:
[Unit]Description=LocalAI API socket[Socket]ListenStream=8080NoDelay=true[Install]WantedBy=sockets.target
Create the matching /etc/systemd/system/local-ai.service:
The first connection to port 8080 starts local-ai.service; systemd holds that
connection until LocalAI is ready to accept it. LOCALAI_ADDRESS and
--address are ignored while an inherited listener is present. LocalAI
rejects activation with multiple stream listeners so it cannot silently choose
the wrong endpoint.
For a Podman-managed container, configure Podman to preserve and pass the
systemd socket file descriptor into the container. The LocalAI process inside
the container consumes the same activation protocol.
Activation needs both LISTEN_PID and LISTEN_FDS. If only one of them is set,
LocalAI ignores them and binds --address as usual. A container engine started
from a socket-activated system unit can leak a bare LISTEN_PID into every
container it spawns, and that is not an activation attempt.
The install script, the macOS app and the latest container image give version 4.12.1. The add-ons, Office, Sandbox, Pages and Team in these docs need a newer build.
The easiest way to install LocalAI on macOS is using the DMG application.
Drag the LocalAI application to your Applications folder
Launch LocalAI from your Applications folder
First Launch
The app you installed is a small launcher that manages the LocalAI server for
you. On the first launch it offers to download and install the latest server
release; once that finishes, the server starts automatically and on every
following launch of the app.
The launcher lives in the menu bar (look for the LocalAI icon in the top
right of your screen) and does not open a window of its own. From the menu bar
icon you can start and stop the server, open the WebUI, check for updates, and
change settings, including turning off the automatic server start
(“Start LocalAI when the launcher opens” under Settings).
Once the server is running, the WebUI is available at
http://localhost:8080.
Verification
The LocalAI.dmg (and the app inside it) and the local-ai server binary are
signed with an Apple Developer ID and notarized by Apple, so they launch with no
quarantine prompt or workaround. To inspect the signature yourself:
Edit values.yaml before you install. The chart is maintained in the helm-charts repository. The chart repository is separate from the LocalAI release. Check its values.yaml for the image tag it uses.
Example manifests
You can also apply a plain deployment file from the examples repository:
LocalAI can be run on Nvidia ARM64 devices, such as the Jetson Nano, Jetson Xavier NX, Jetson AGX Orin, and Nvidia DGX Spark. The following instructions will guide you through building and using the LocalAI container for Nvidia ARM64 devices.
Platform Compatibility
CUDA 12 L4T images: Compatible with Nvidia AGX Orin and similar platforms (Jetson Nano, Jetson Xavier NX, Jetson AGX Xavier)
CUDA 13 L4T images: Compatible with Nvidia DGX Spark
Run the LocalAI container on Nvidia ARM64 devices using the following commands, where /data/models is the directory containing the models:
CUDA 12 (for AGX Orin and similar platforms)
docker run -e DEBUG=true -p 8080:8080 -v /data/models:/models -ti --restart=always --name local-ai --runtime nvidia --gpus all quay.io/go-skynet/local-ai:latest-nvidia-l4t-arm64
CUDA 13 (for DGX Spark)
docker run -e DEBUG=true -p 8080:8080 -v /data/models:/models -ti --restart=always --name local-ai --runtime nvidia --gpus all quay.io/go-skynet/local-ai:latest-nvidia-l4t-arm64-cuda-13
Note: /data/models is the directory containing the models. You can replace it with the directory containing your models.
GPU reporting in distributed mode
If you run a worker on a Jetson, DGX Spark (GB10), or Thor and the Nodes
page in the frontend shows the node as fully used, check two things:
NVIDIA_DRIVER_CAPABILITIES must include utility so nvidia-smi /
NVML work inside the container. With --gpus all alone (or
--runtime nvidia without extra flags) only compute is wired in on
some driver versions. Add -e NVIDIA_DRIVER_CAPABILITIES=compute,utility
to your docker run. For Docker Compose with driver: nvidia, use
capabilities: [gpu, compute, utility] on the device reservation.
Include compute for CUDA libraries such as libcuda.so.1; utility
alone only provides monitoring libraries and tools.
Pass --init to docker run (or init: true in compose) so the
container has a proper PID 1 reaper - otherwise short-lived child
processes like nvidia-smi can intermittently fail with
waitid: no child processes.
On unified-memory devices LocalAI auto-detects the SoC via
/sys/devices/soc0/{family,soc_id} and reports system RAM as VRAM, so
nvidia-smi is not strictly required for VRAM metrics. See
Distributed Mode → NVIDIA GPU support
for full context.
Try it out
Once LocalAI is installed, you can start it (either by using docker, or the cli, or the systemd service).
By default the LocalAI WebUI should be accessible from http://localhost:8080. You can also use 3rd party projects to interact with LocalAI as you would use OpenAI (see also Integrations ).
After installation, install new models by navigating the model gallery, or by using the local-ai CLI.
Tip
To install models with the WebUI, see the Models section.
With the CLI you can list the models with local-ai models list and install them with local-ai models install <model-name>.
You can also run models manually by copying files into the models directory.
You can test chat models from the CLI without keeping a separate curl command around:
# Terminal 1local-ai run
# Terminal 2local-ai chat --model qwen3-4b
local-ai chat connects to a running LocalAI server and opens the built-in terminal agent. It is more than a chat prompt: it can read your files and run commands on your machine, so the first time it wants to do something that changes state it stops and asks you to approve the call. Reads and searches run without asking. Press Esc or Ctrl+C to end the session. Esc is a key of the full-screen interface: in the plain --cli mode, leave with Ctrl+C, Ctrl+D, or by typing exit.
Use /models to list installed models, /model <name> to switch models while keeping the conversation, and /compact to summarize the history so far when the context fills up. The full picture is on the Terminal agent page.
If the server exposes exactly one model, LocalAI uses that model automatically:
# Terminal 1local-ai run qwen3-4b
# Terminal 2local-ai chat
When more than one model is configured, the agent asks you to pick one and remembers your answer, or you can pass --model with the installed model name. Use --endpoint to connect to a non-default server, for example local-ai chat --endpoint http://127.0.0.1:8081 --model qwen3-4b.
You can also test out the API endpoints using curl. A few examples are listed below.
Note
Each example assumes you have already installed the model it names. The chat and function-calling examples below use qwen3-4b (install it from the Models page or with local-ai run qwen3-4b). The other examples name a model for the task they show (gpt-4-vision-preview for vision, tts-1 for text to speech, whisper-1 for transcription, text-embedding-ada-002 for embeddings); replace each with the name of a model you have installed for that task.
LocalAI supports the Open Responses API specification with support for background processing, streaming, and advanced features. Open Responses documentation.
curl http://localhost:8080/v1/responses \
-H "Content-Type: application/json"\
-d '{
"model": "gpt-4",
"input": "Say this is a test!",
"max_output_tokens": 1024,
"temperature": 0.7
}'
For background processing:
curl http://localhost:8080/v1/responses \
-H "Content-Type: application/json"\
-d '{
"model": "gpt-4",
"input": "Generate a long story",
"max_output_tokens": 4096,
"background": true
}'
curl http://localhost:8080/v1/audio/speech \
-H "Content-Type: application/json"\
-d '{
"model": "tts-1",
"input": "The quick brown fox jumped over the lazy dog.",
"voice": "alloy"
}'\
--output speech.mp3
Get a vector representation of a given input that can be easily consumed by machine learning models and algorithms. OpenAI Embeddings.
curl http://localhost:8080/embeddings \
-X POST -H "Content-Type: application/json"\
-d '{
"input": "Your text string goes here",
"model": "text-embedding-ada-002"
}'
Tip
Don’t use the model file as model in the request unless you want to handle the prompt template for yourself.
Use the installed model’s own name as the model value, the same way you would pass a model name to OpenAI. For instance qwen3-4b for chat, or gpt-4-vision-preview for a vision model you have installed under that name.
Customizing the Model
A model configuration file sets the prompt template and the default settings of a model. It uses the LocalAI YAML format. For the syntax, see Advanced usage. The file can be on the local file system, or at a URL such as a GitHub Gist.
LocalAI can be initiated using either its container image or binary, with a command that includes URLs of model config files or utilizes a shorthand format (like huggingface:// or github://), which is then expanded into complete URLs.
The configuration can also be set via an environment variable. For instance:
name:phi-2context_size:2048f16:truethreads:11gpu_layers:90mmap:trueparameters:# Reference any HF model or a local file heremodel:huggingface://TheBloke/phi-2-GGUF/phi-2.Q8_0.gguftemperature:0.2top_k:40top_p:0.95template:chat:&template| Instruct: {{.Input}}
Output:# Modify the prompt template here ^^^ as per your requirementscompletion:*template
Then, launch LocalAI using your gist’s URL:
## Important! Substitute with your gist's URL!docker run -p 8080:8080 localai/localai:v4.12.1 https://gist.githubusercontent.com/xxxx/phi-2.yaml
Next Steps
Visit the advanced section for more insights on prompt templates and configuration files.
Needs a build newer than 4.12.1. In the current development builds.
A saved agent is a set of instructions and exact lists of what a chat may use. It ships inside LocalAI and is on by default. If LocalAI runs and a model is installed, you have everything you need.
Before you start: install a tool-calling model
An agent that uses tools needs a model that can call them. Open Models, install a model that lists tool calling, and check that it answers a plain chat first.
Make the agent
Open Agents in the sidebar.
Choose New agent. A short wizard opens with four steps: Purpose, Abilities, Where it works and Review. The bar at the top takes you back to an earlier step, and the summary beside it shows what the agent will be.
In Purpose, start from a template or write your own. Give it a name and the instructions it should always follow, for example: Answer in French. Cite the file you used. Only the name and the instructions are required. The model is the one you pick in each chat, unless you choose a fixed one.
Optional: in Abilities, pick a level (Look only, Assistant or Full) or leave it: the agent then starts with the default tools. Under Files, choose No files, All my files (the default), or Only these folders and pick a folder, for example /Projects/Acme, with Can read or Can read and change. You can add up to eight folders, each with its own access. Chats with the agent then see only those folders and their own chat folder, not the rest of your files. See Folders of an agent. Fine-tune individual tools holds every tool switch.
Optional: in Where it works, mark the chat apps and the tools and services you want. The step lists what your add-ons declare, and the add-ons you can still install. Marking an app does not connect it.
In Review, check the summary and choose Create agent. If you marked apps, the agent’s page opens with a Finish setup card: one row for each app with what it needs and one button. A row is done when the server has the connection. Hide removes the card.
If you skip every optional step, the agent is the same as one made with only a name and instructions. To edit a saved agent, open it and choose Edit: that page keeps the full editor.
Talk to it
On the Agents page, choose Chat on the agent’s row and write a message. The chat uses the agent’s model when it has one. If you remove something the agent lists, for example by deleting a collection, the chat still starts without it and tells the model what is missing.
Let it work by itself
Open Triggers and make a schedule, for example weekdays 09:00, with the agent and a prompt. Each run is an ordinary chat of yours, and the result arrives in your Inbox. Add a Telegram connector to talk to the agent from your phone.
If your agent will not run
No model. An agent without a model needs one when you start the chat. A trigger or a connector needs an agent that names a model.
A tool is missing. The chat lists what was unavailable at the start of the turn. Check that the MCP server is configured on the model, the add-on is enabled, and the collection or skill still exists.
A server of the model is unreachable. An MCP server that does not answer makes its tools time out. Open the model’s mcp: configuration and test the server.
Folder missing. The agent’s folder was deleted, or it was imported without a folder that exists here. The agent does not start until you restore the folder from the Trash or choose another one in Files.
A trigger did not start. Open it on the Triggers page: it shows why a run was skipped or failed.