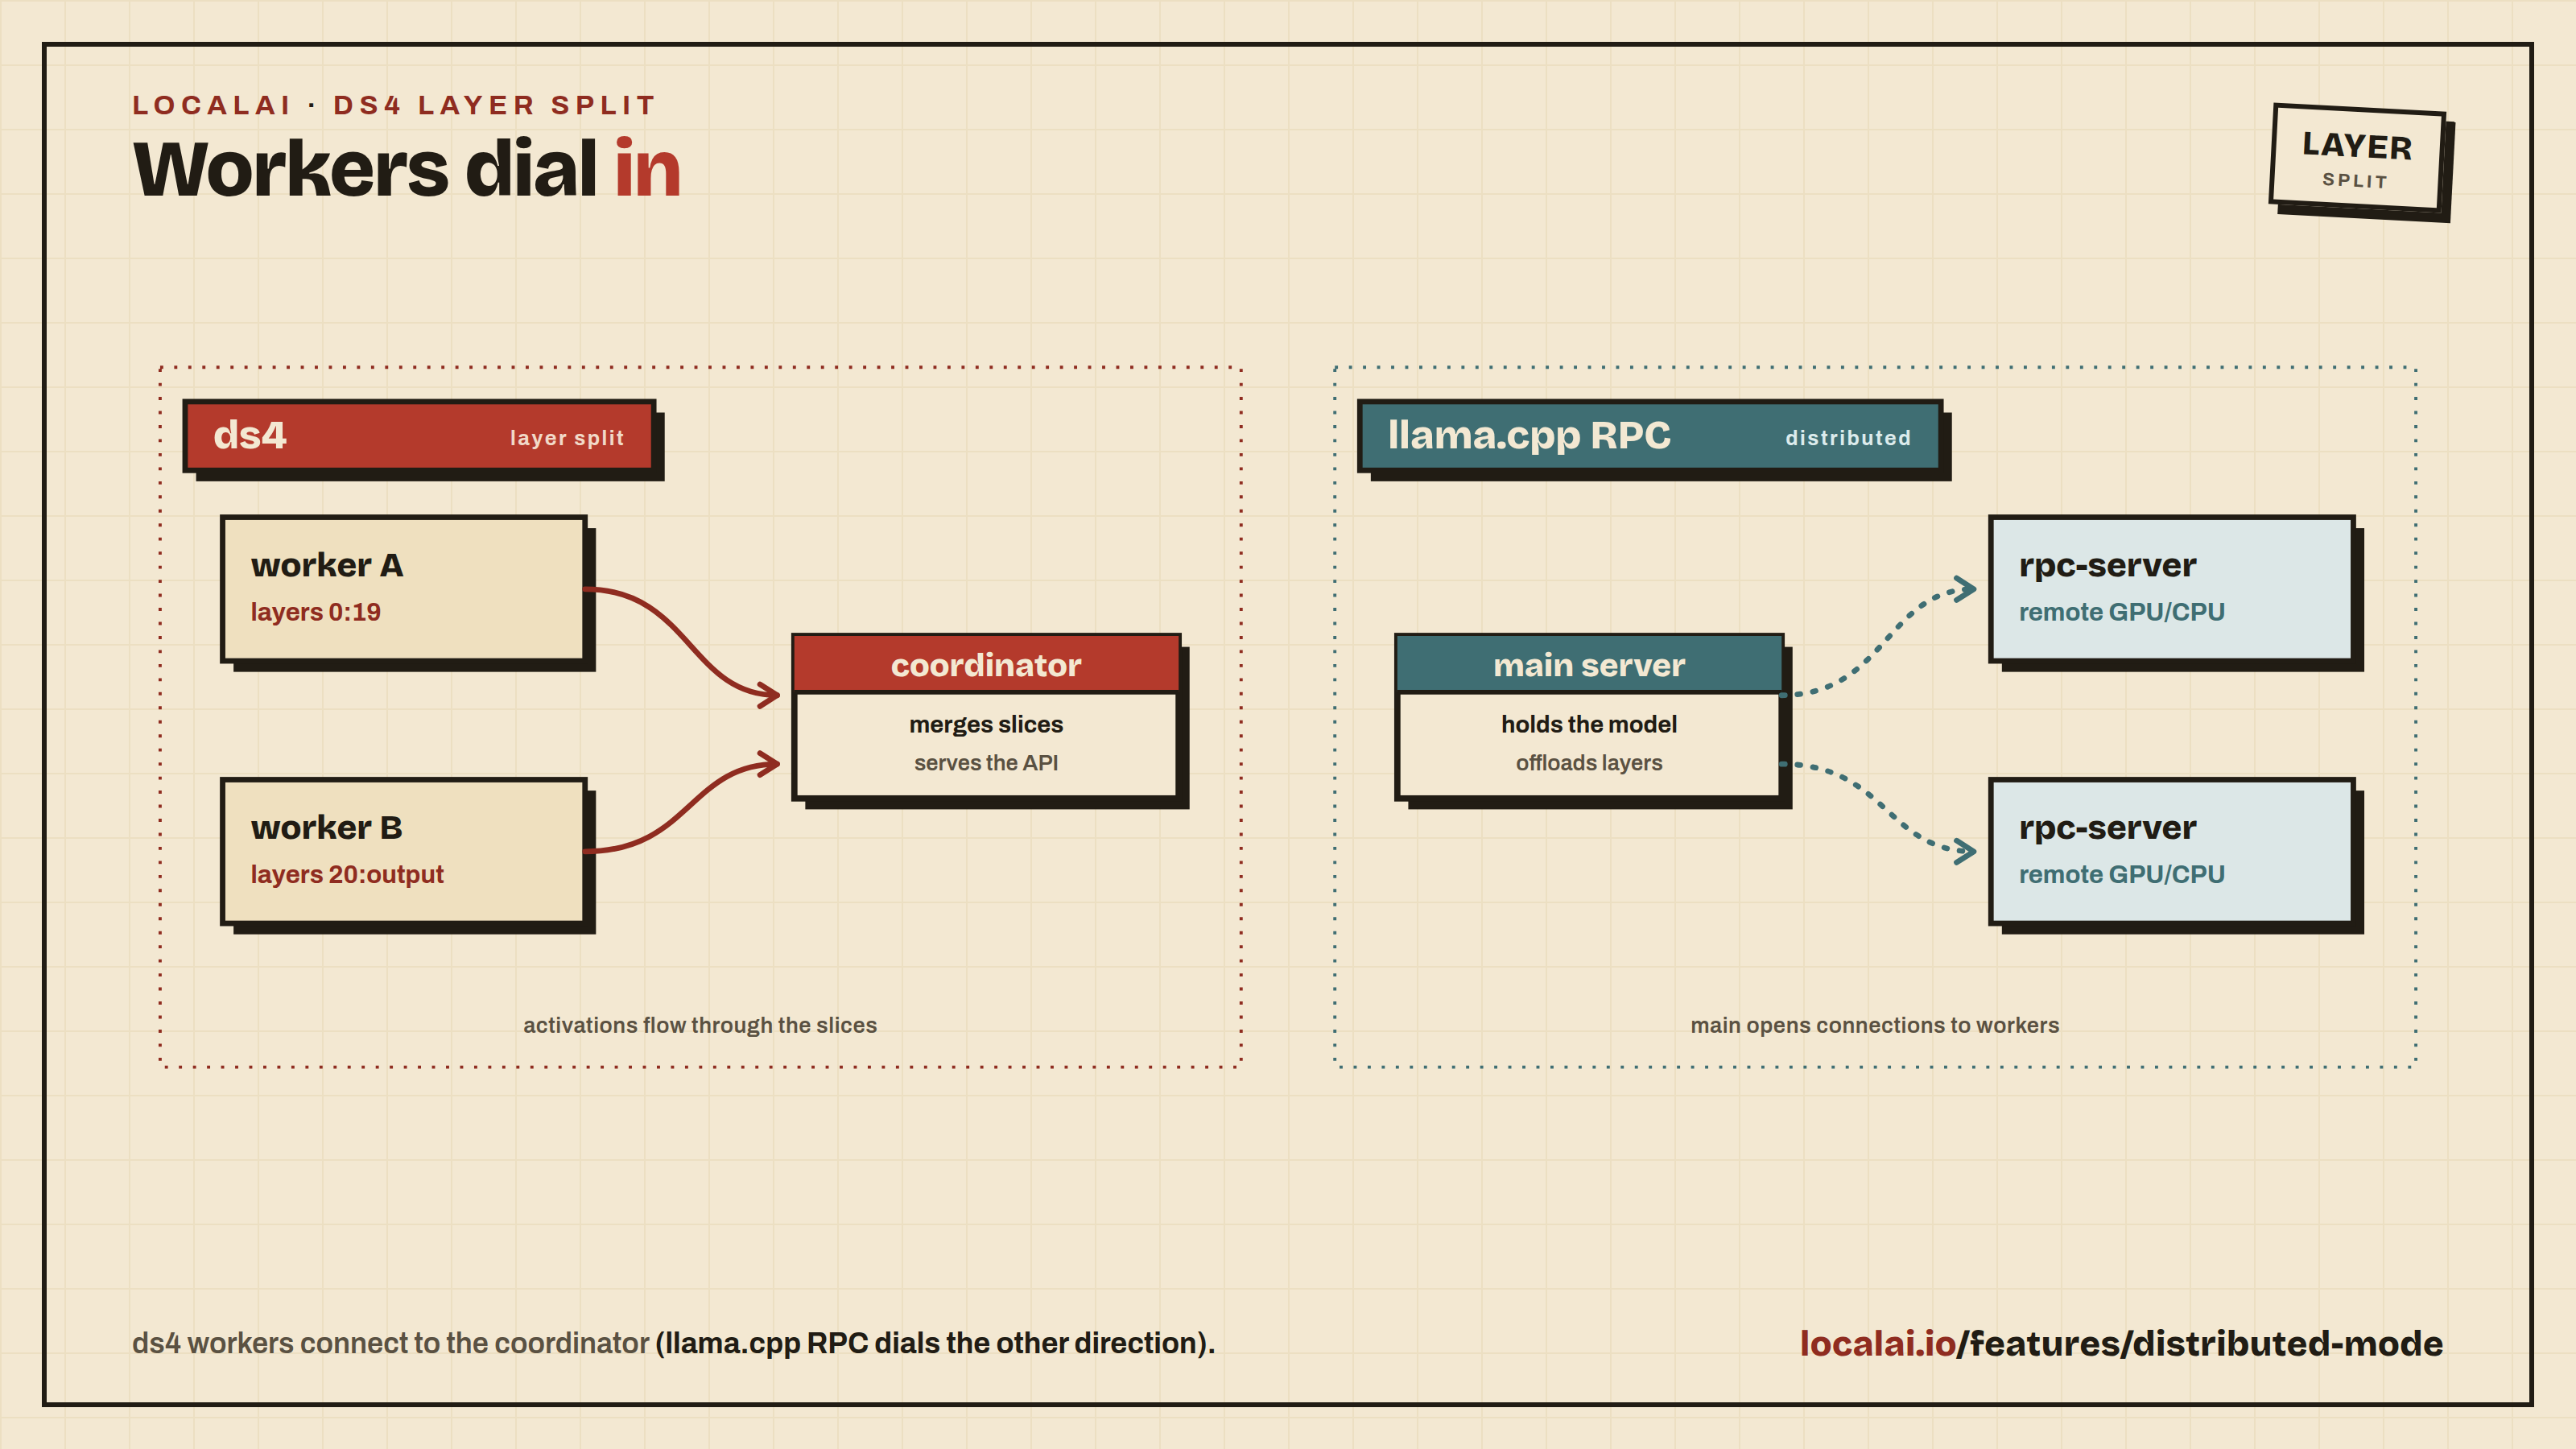
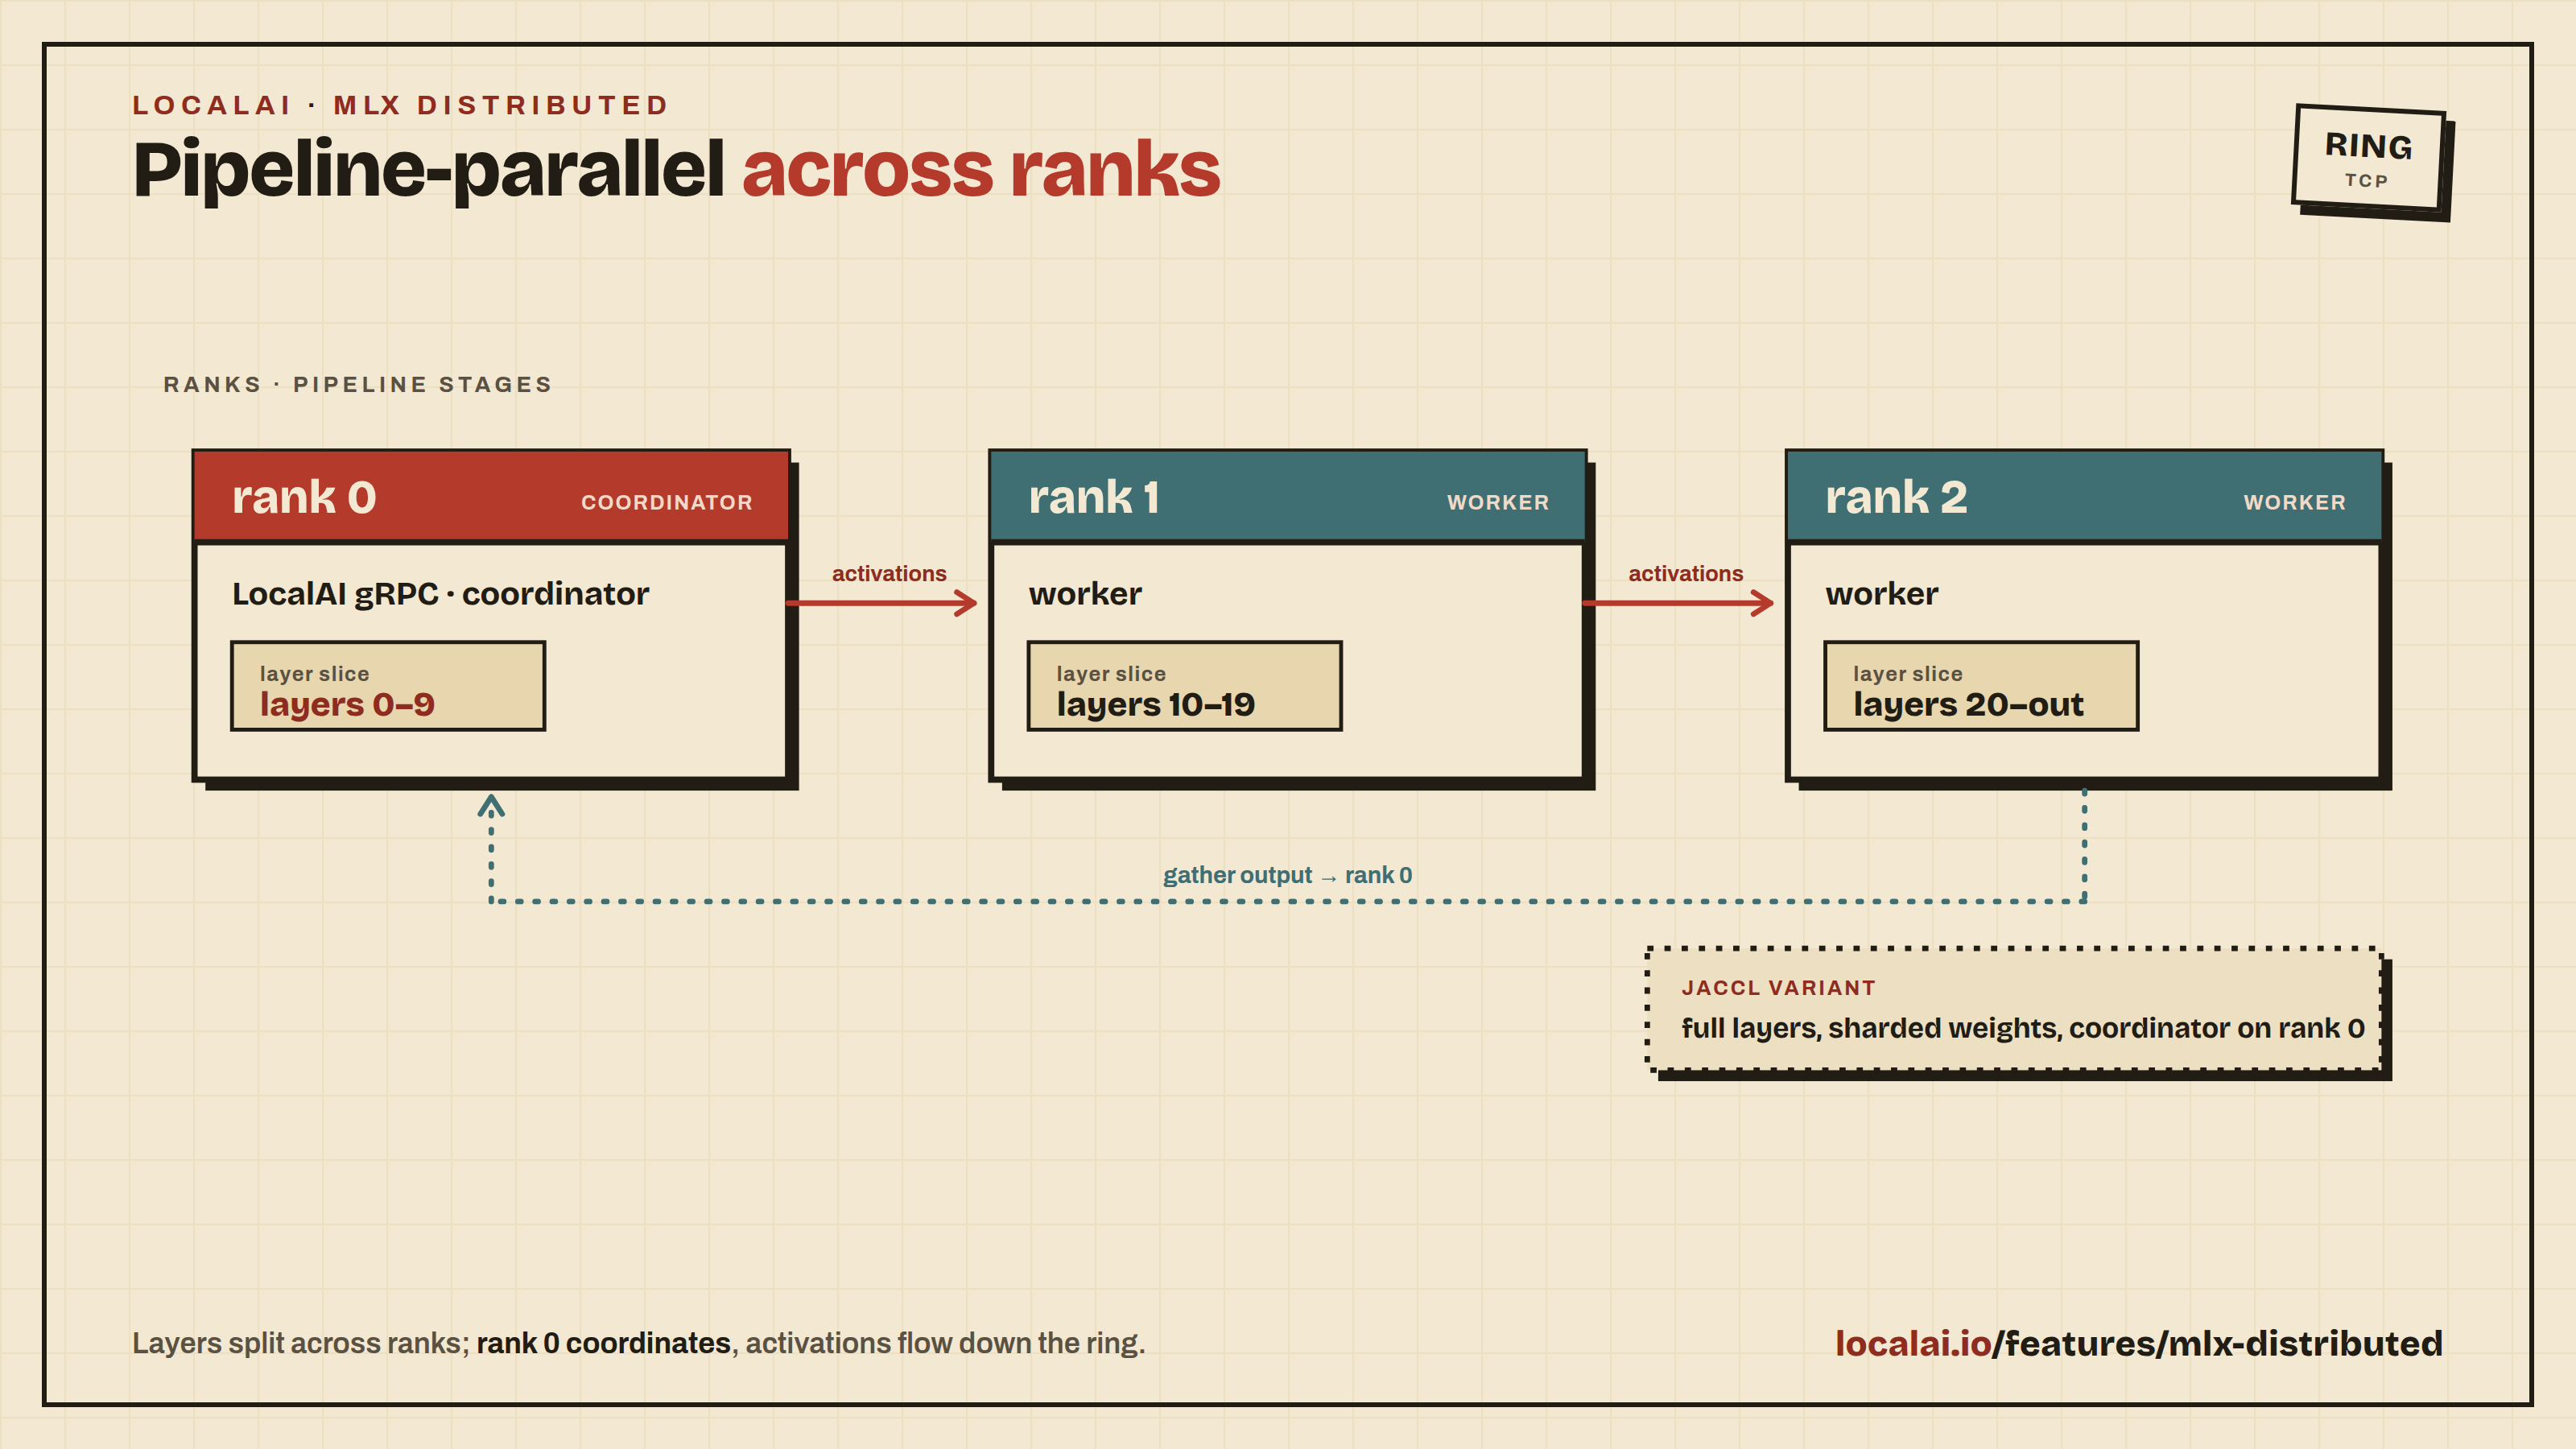
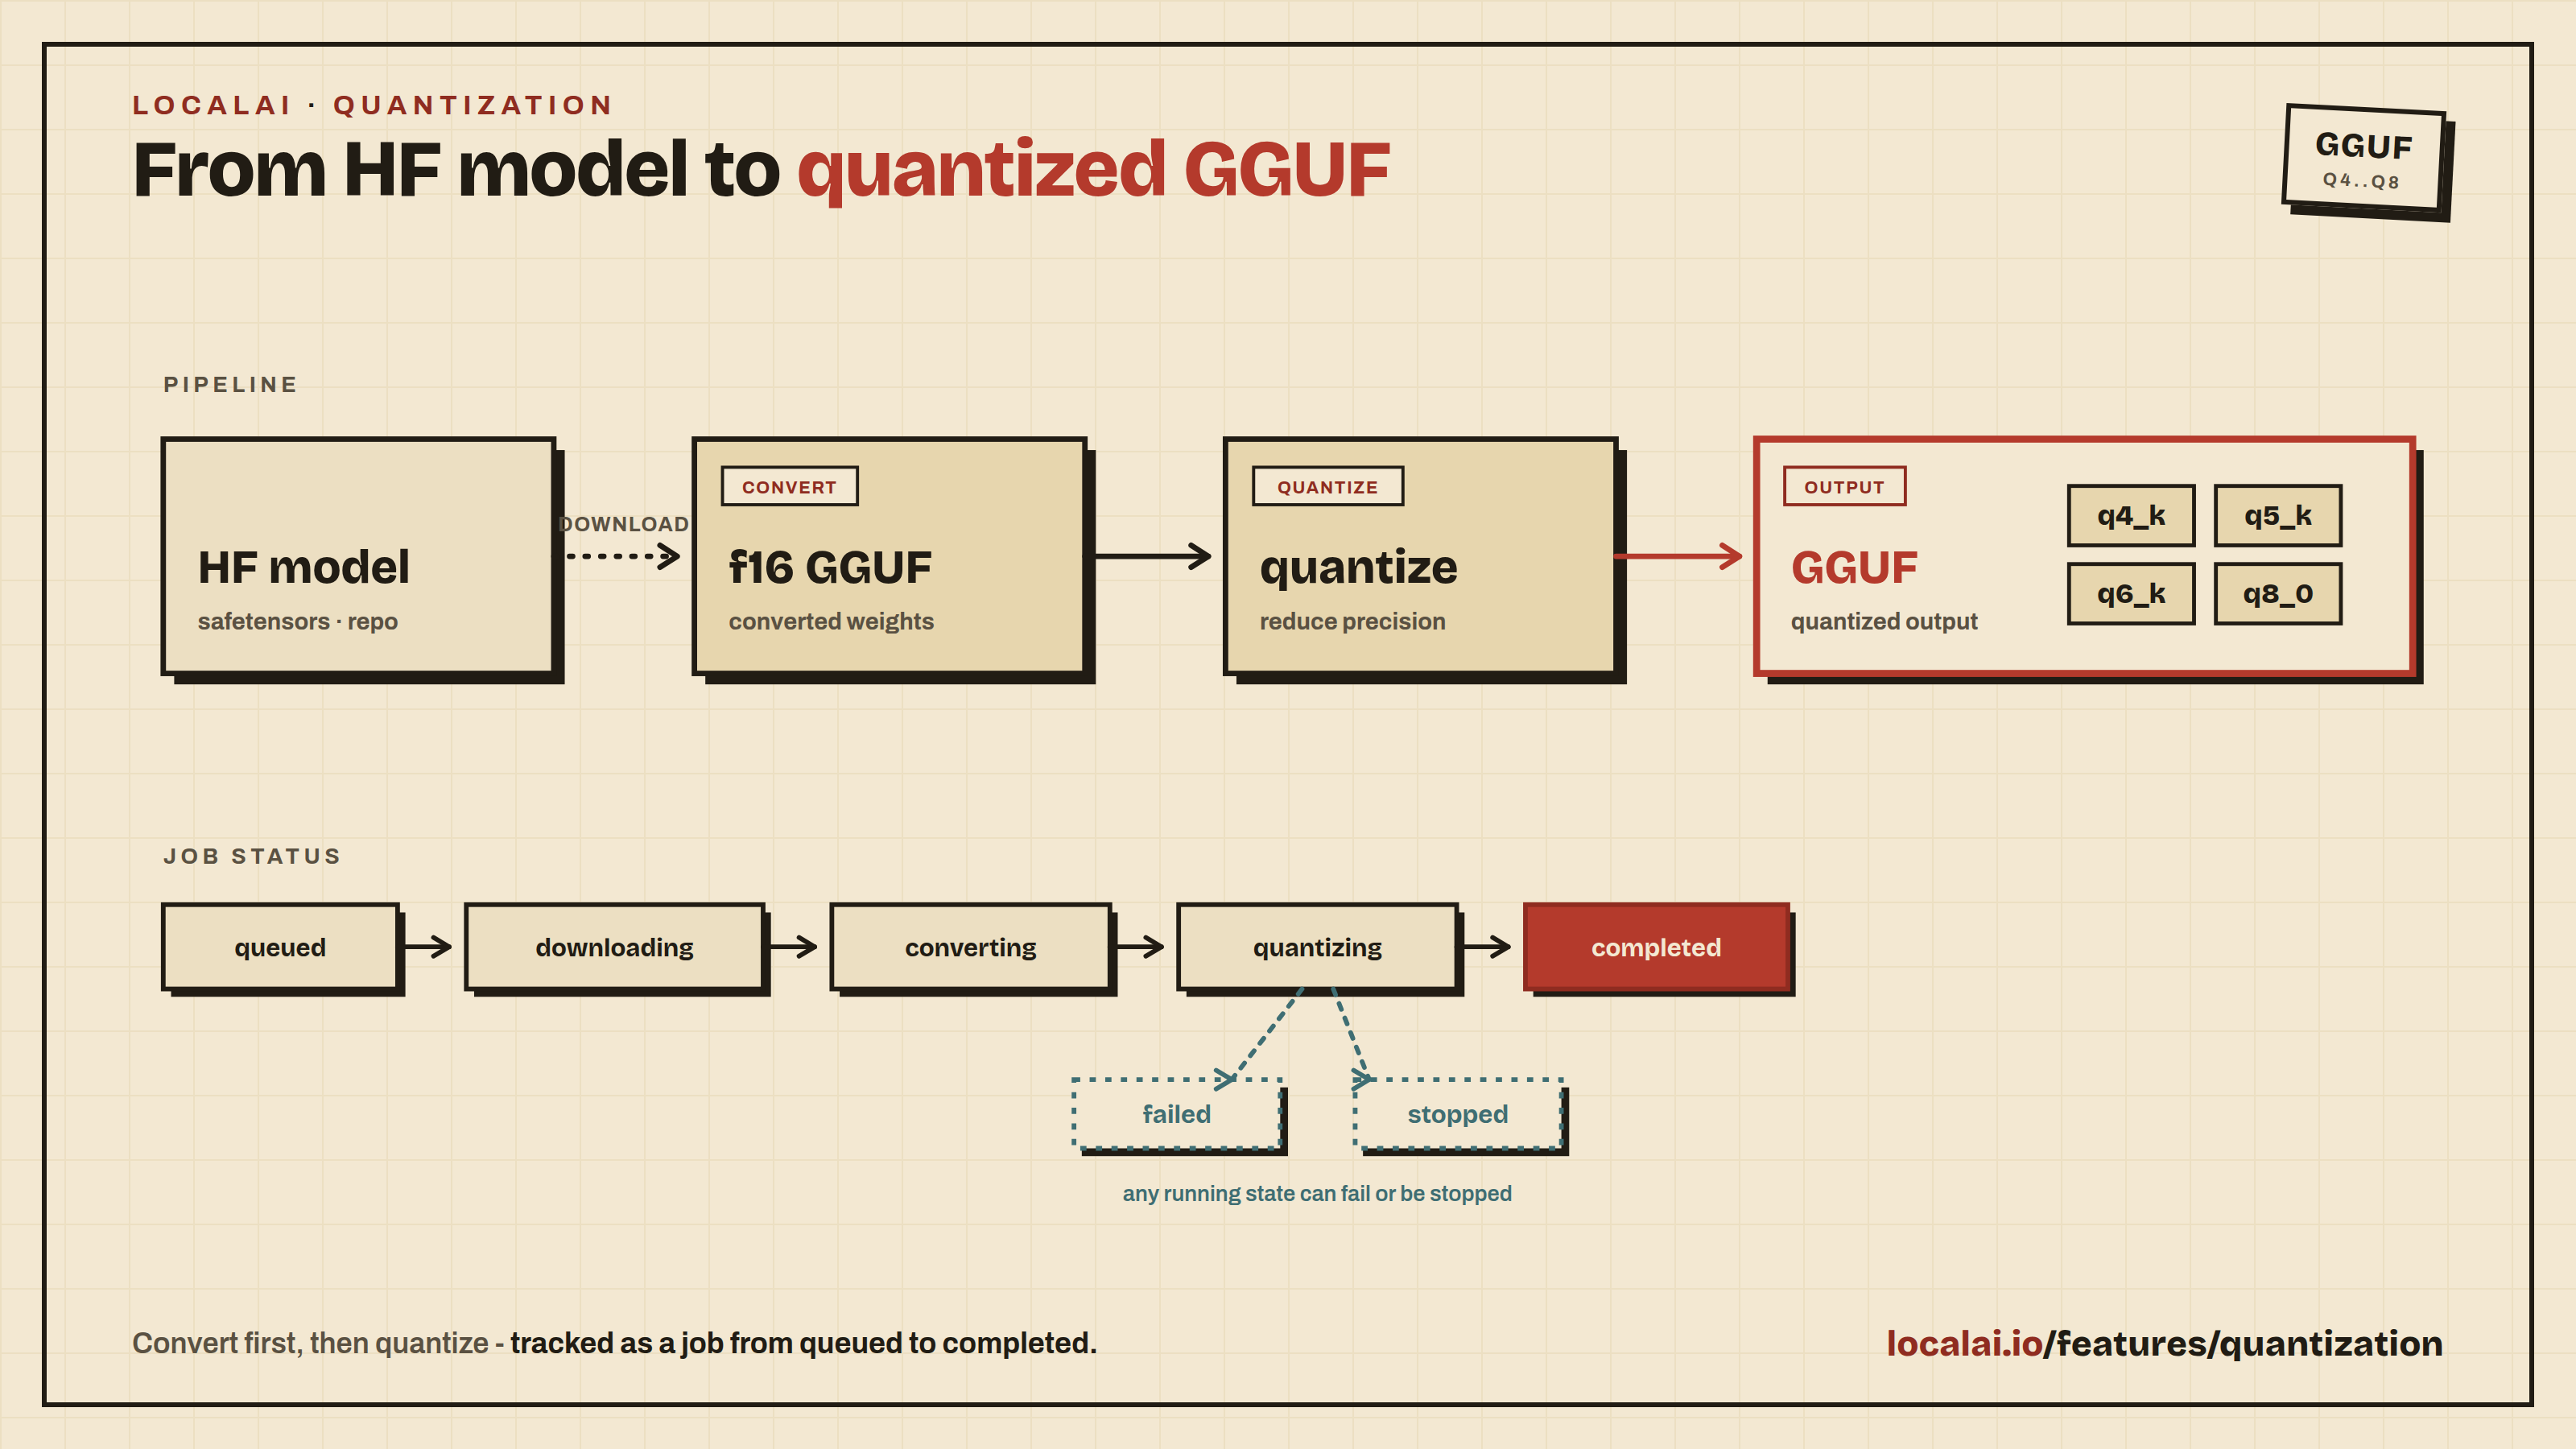
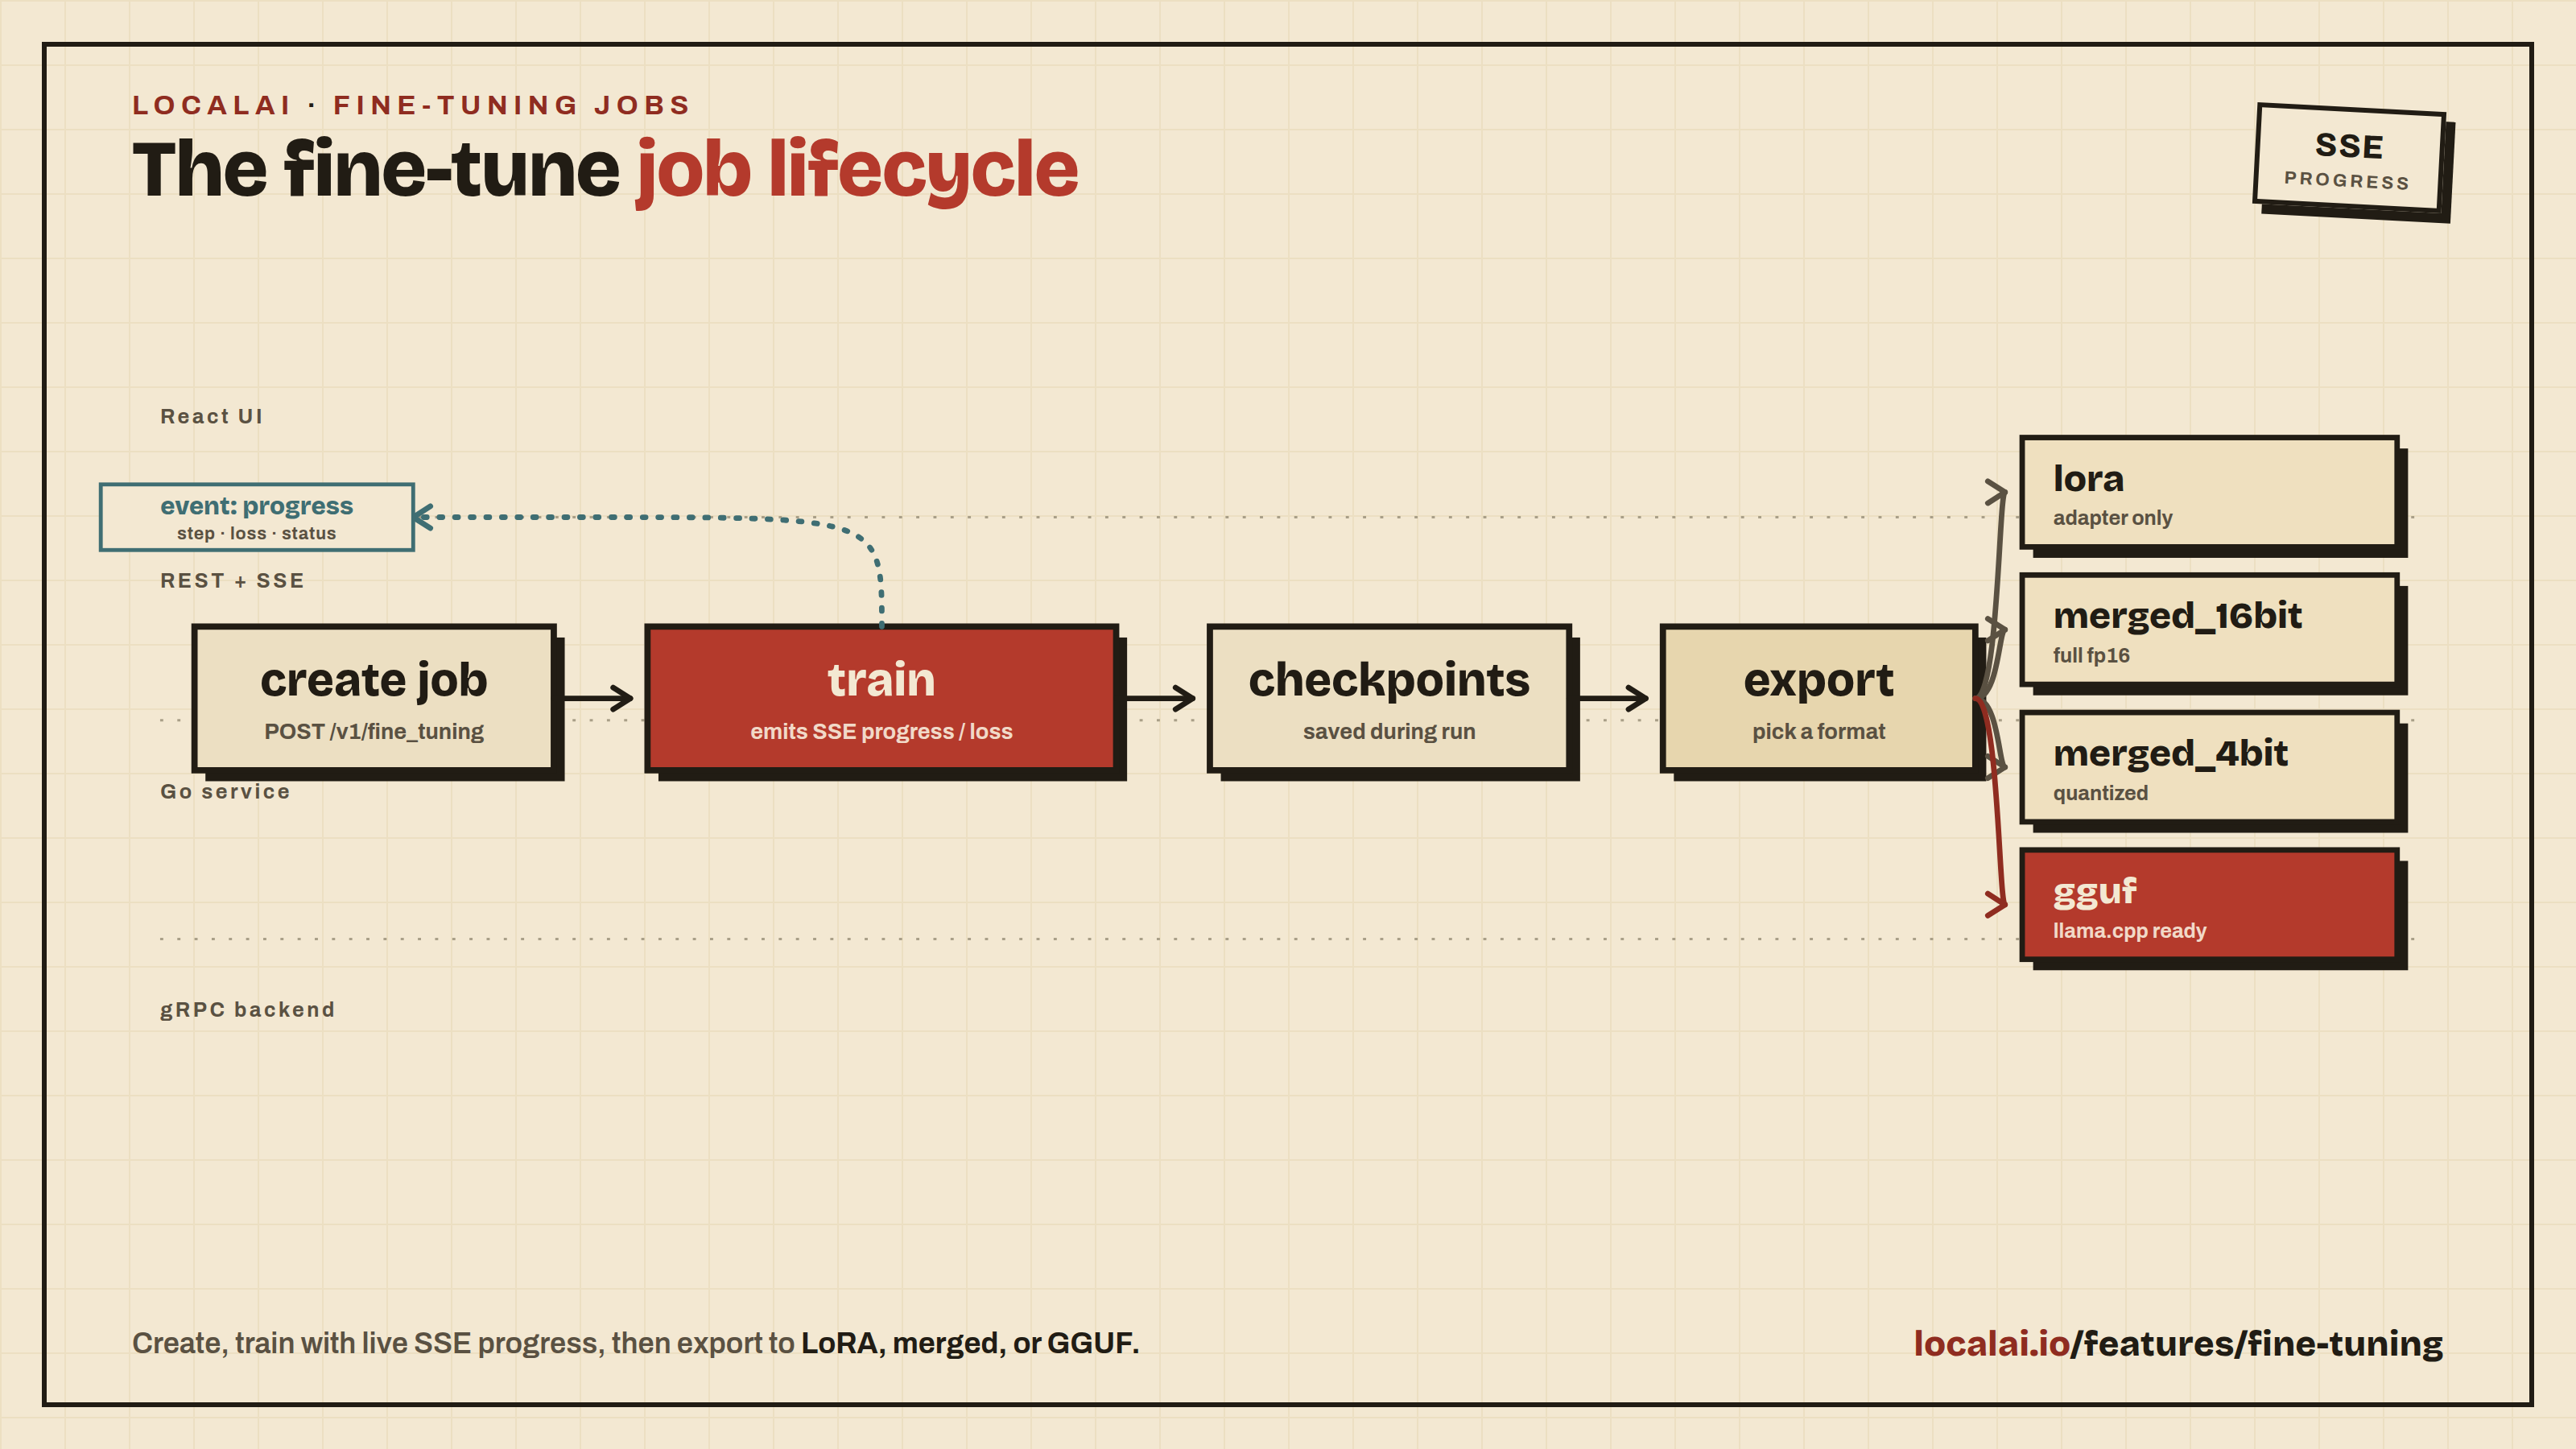
LocalAI provides a comprehensive set of features for running AI models locally. The pages in this section are grouped by capability, and the left navigation is ordered to match these groups.
Text
Text Generation - Generate text with GPT-compatible models using various backends.
For operator-facing runtime, proxy, and monitoring concerns (middleware, cloud and MITM proxies, backend monitor), see the Operations section.
Getting Started
To start using these features, make sure you have LocalAI installed and have downloaded some models. Then explore the feature pages above to learn how to use each capability.
Subsections of Features
Text Generation (GPT)
LocalAI supports generating text with GPT with llama.cpp and other backends (such as rwkv.cpp as ) see also the Model compatibility for an up-to-date list of the supported model families.
Note:
You can also specify the model name as part of the OpenAI token.
If only one model is available, the API will use it for all the requests.
For example, to generate a chat completion, you can send a POST request to the /v1/chat/completions endpoint with the instruction as the request body:
curl http://localhost:8080/v1/chat/completions -H "Content-Type: application/json" -d '{
  "model": "ggml-koala-7b-model-q4_0-r2.bin",
  "messages": [{"role": "user", "content": "Say this is a test!"}],
  "temperature": 0.7
}'
Available additional parameters: top_p, top_k, max_tokens
Reasoning models return their thinking in the reasoning field. When a model reasons and calls a tool in the same turn, see Interleaved Thinking with Tool Calls.
To generate a completion, you can send a POST request to the /v1/completions endpoint with the instruction as per the request body:
curl http://localhost:8080/v1/completions -H "Content-Type: application/json" -d '{
  "model": "ggml-koala-7b-model-q4_0-r2.bin",
  "prompt": "A long time ago in a galaxy far, far away",
  "temperature": 0.7
}'
Available additional parameters: top_p, top_k, max_tokens
List models
You can list all the models available with:
curl http://localhost:8080/v1/models
Anthropic Messages API
LocalAI supports the Anthropic Messages API, which is compatible with Claude clients. This endpoint provides a structured way to send messages and receive responses, with support for tools, streaming, and multimodal content.
Streaming responses use Server-Sent Events (SSE) format with event types: message_start, content_block_start, content_block_delta, content_block_stop, message_delta, and message_stop.
LocalAI supports the Open Responses API specification, which provides a standardized interface for AI model interactions with support for background processing, streaming, tool calling, and advanced features like reasoning.
Use the GET endpoint to retrieve background responses:
# Get response by IDcurl http://localhost:8080/v1/responses/resp_abc123
# Resume streaming with query parameterscurl "http://localhost:8080/v1/responses/resp_abc123?stream=true&starting_after=10"
Canceling Background Responses
Cancel a background response that’s still in progress:
curl -X POST http://localhost:8080/v1/responses/resp_abc123/cancel
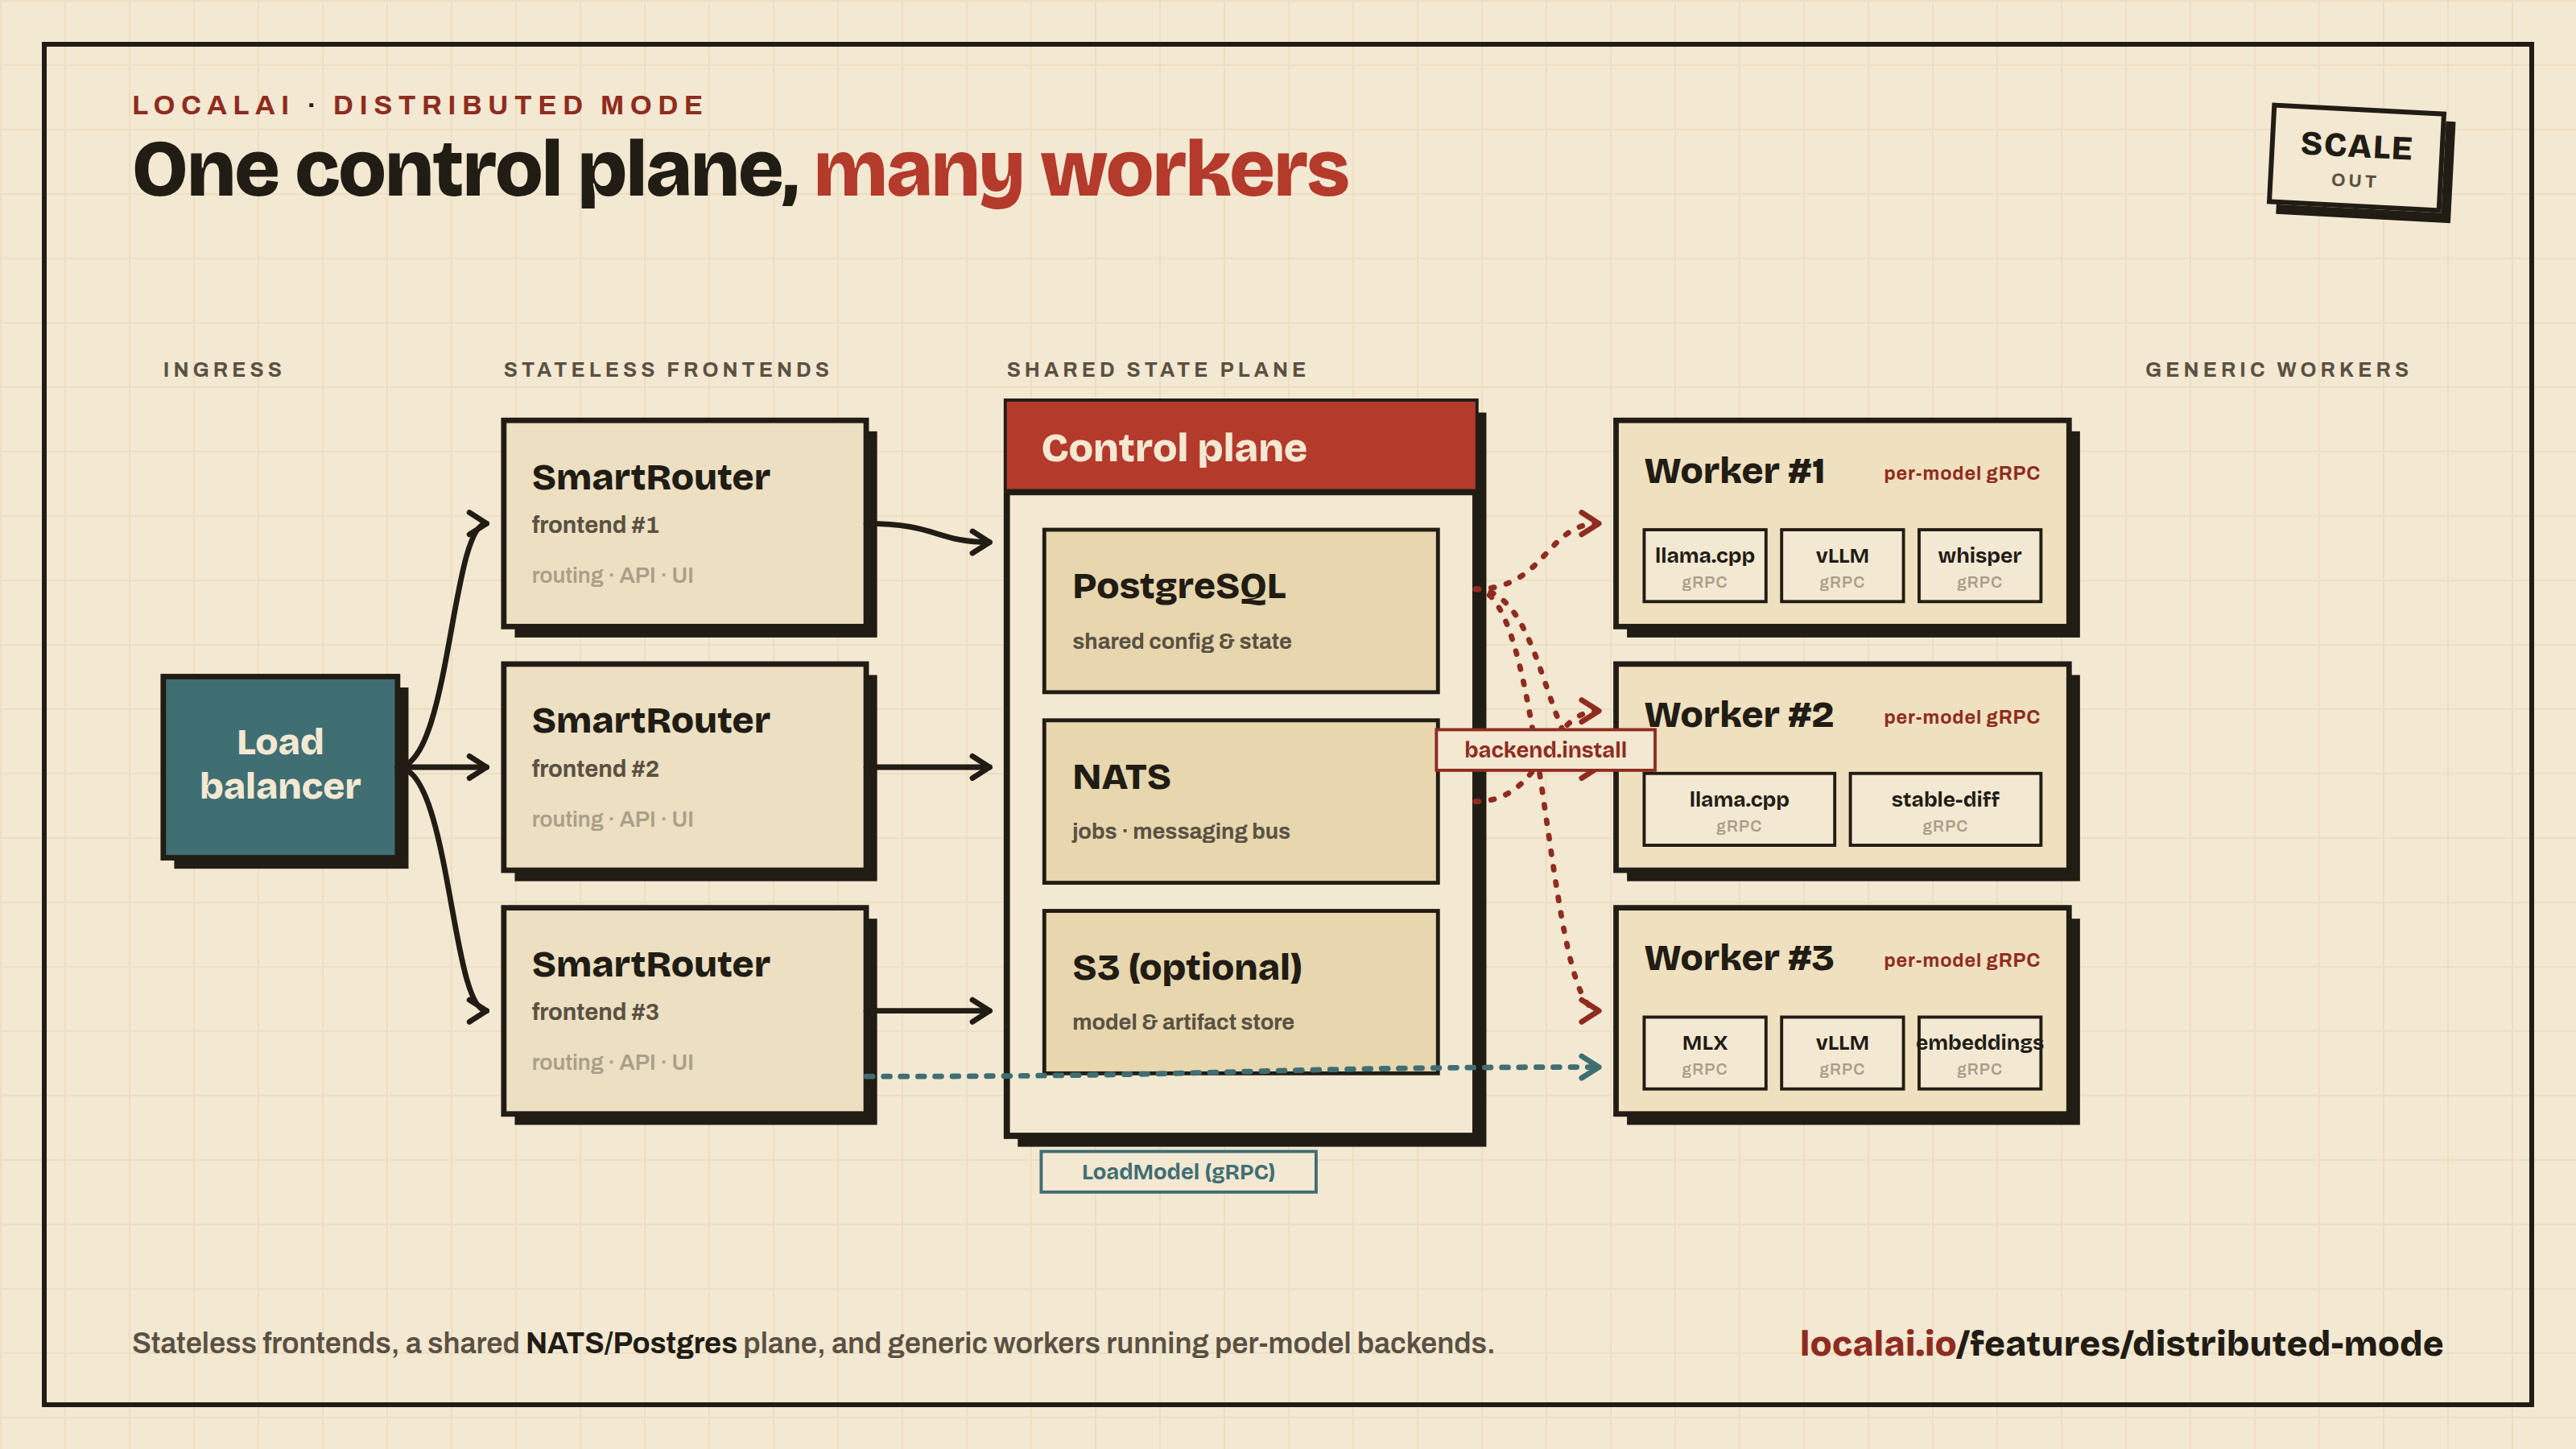
Multiple Replicas (Distributed Mode)
In distributed mode LocalAI replicates response metadata across frontend
replicas, so retrieval, previous_response_id chaining and cancellation work
regardless of which replica the load balancer picks:
GET /v1/responses/{id} returns the response from any replica.
POST /v1/responses/{id}/cancel is delegated over NATS to the replica that is
actually generating, so generation really stops. If that replica is gone, the
response is reported as cancelled without blocking.
Streaming resume (?stream=true) is served only by the replica that created
the response. The event buffer lives in that process’s memory and is not
replicated. A resume request that reaches another replica returns HTTP 409
naming the owning replica instead of silently returning a truncated stream.
Poll the response instead, or route resume requests with session affinity.
Tool Calling
Open Responses API supports function calling with tools:
curl http://localhost:8080/v1/responses \
-H "Content-Type: application/json"\
-d '{
"model": "ggml-koala-7b-model-q4_0-r2.bin",
"input": "What is the weather in San Francisco?",
"tools": [
{
"type": "function",
"name": "get_weather",
"description": "Get the current weather",
"parameters": {
"type": "object",
"properties": {
"location": {
"type": "string",
"description": "The city and state"
}
},
"required": ["location"]
}
}
],
"tool_choice": "auto",
"max_output_tokens": 1024
}'
Reasoning Configuration
Configure reasoning effort and summary style:
curl http://localhost:8080/v1/responses \
-H "Content-Type: application/json"\
-d '{
"model": "ggml-koala-7b-model-q4_0-r2.bin",
"input": "Solve this complex problem step by step",
"reasoning": {
"effort": "high",
"summary": "detailed"
},
"max_output_tokens": 2048
}'
RWKV support is available through llama.cpp (see below)
llama.cpp
llama.cpp is a popular port of Facebook’s LLaMA model in C/C++.
Note
The ggml file format has been deprecated. If you are using ggml models and you are configuring your model with a YAML file, specify, use a LocalAI version older than v2.25.0. For gguf models, use the llama backend. The go backend is deprecated as well but still available as go-llama.
Features
The llama.cpp model supports the following features:
Prompt templates are useful for models that are fine-tuned towards a specific prompt.
Automatic setup
LocalAI supports model galleries which are indexes of models. For instance, the huggingface gallery contains a large curated index of models from the huggingface model hub for ggml or gguf models.
For instance, if you have the galleries enabled and LocalAI already running, you can just start chatting with models in huggingface by running:
curl http://localhost:8080/v1/chat/completions -H "Content-Type: application/json" -d '{
     "model": "TheBloke/WizardLM-13B-V1.2-GGML/wizardlm-13b-v1.2.ggmlv3.q2_K.bin",
     "messages": [{"role": "user", "content": "Say this is a test!"}],
     "temperature": 0.1
   }'
LocalAI will automatically download and configure the model in the model directory.
Models can be also preloaded or downloaded on demand. To learn about model galleries, check out the model gallery documentation.
YAML configuration
To use the llama.cpp backend, specify llama-cpp as the backend in the YAML file:
name: llamabackend: llama-cppparameters:
# Relative to the models pathmodel: file.gguf
Backend Options
The llama.cpp backend supports additional configuration options that can be specified in the options field of your model YAML configuration. These options allow fine-tuning of the backend behavior:
Option
Type
Description
Example
use_jinja or jinja
boolean
Enable Jinja2 template processing for chat templates. When enabled, the backend uses Jinja2-based chat templates from the model for formatting messages.
use_jinja:true
context_shift
boolean
Enable context shifting, which allows the model to dynamically adjust context window usage.
context_shift:true
cache_ram
integer
Size budget in MiB for the server-side prompt cache (a host-RAM store of idle slot KV states that’s reloaded on a prompt-prefix hit, see upstream PR #16391). Default: -1 (no limit). 0 disables the prompt cache entirely. Together with kv_unified and cache_idle_slots this is what makes a repeated system prompt skip prefill on subsequent calls.
cache_ram:4096
parallel or n_parallel
integer
Enable parallel request processing. When set to a value greater than 1, enables continuous batching for handling multiple requests concurrently.
parallel:4
grpc_servers or rpc_servers
string
Comma-separated list of gRPC server addresses for distributed inference. Allows distributing workload across multiple llama.cpp workers.
grpc_servers:localhost:50051,localhost:50052
fit_params or fit
boolean
Enable auto-adjustment of model/context parameters to fit available device memory. Default: true.
fit_params:true
fit_params_target or fit_target
integer
Target margin per device in MiB when using fit_params. Default: 1024 (1GB).
fit_target:2048
fit_params_min_ctx or fit_ctx
integer
Minimum context size that can be set by fit_params. Default: 4096.
fit_ctx:2048
n_cache_reuse or cache_reuse
integer
Minimum chunk size to attempt reusing from the cache via KV shifting. Default: 0 (disabled).
cache_reuse:256
slot_prompt_similarity or sps
float
How much the prompt of a request must match the prompt of a slot to use that slot. Default: 0.1. Set to 0 to disable.
sps:0.5
swa_full
boolean
Use full-size SWA (Sliding Window Attention) cache. Default: false.
swa_full:true
cont_batching or continuous_batching
boolean
Enable continuous batching for handling multiple sequences. Default: true.
cont_batching:true
check_tensors
boolean
Validate tensor data for invalid values during model loading. Default: false.
check_tensors:true
warmup
boolean
Enable warmup run after model loading. Default: true.
warmup:false
no_op_offload
boolean
Disable offloading host tensor operations to device. Default: false.
no_op_offload:true
device or devices
string
Select the llama.cpp backend devices to use. Repeat the option or pass a comma-separated list; unlisted devices are excluded. Use the names reported by llama-server --list-devices / --list-devices.
devices:CUDA1,CUDA2,CUDA3
kv_unified or unified_kv
boolean
Use a single unified KV buffer shared across all sequences. Default: true (LocalAI override; upstream defaults to false but auto-enables it when slot count is auto). Required for cache_idle_slots to work: without it the server force-disables idle-slot saving at init, and the prompt cache is never written across requests.
kv_unified:false
cache_idle_slots or idle_slots_cache
boolean
On a new task, save the previous slot’s KV state into the prompt cache (and clear the slot) so a later request with the same prefix can warm-load it. Default: true. Auto-disabled by the server if kv_unified=false or cache_ram=0.
cache_idle_slots:false
n_ctx_checkpoints or ctx_checkpoints
integer
Maximum number of context checkpoints per slot (used for partial-prefix recovery, e.g. SWA). Default: 32.
ctx_checkpoints:16
checkpoint_min_step or checkpoint_min_spacing (aliases: checkpoint_every_nt, checkpoint_every_n_tokens)
integer
Minimum spacing in tokens between context checkpoints. 0 disables the minimum-spacing gate. Default: 256. (Renamed upstream from checkpoint_every_nt; semantics shifted from a fixed cadence to a minimum spacing.)
checkpoint_min_step:1024
split_mode or sm
string
How to split the model across multiple GPUs: none (single GPU only), layer (default - split layers and KV across GPUs), row (split rows across GPUs), tensor (experimental tensor parallelism, requires flash_attention: true, manually set context_size, and a llama.cpp build that includes #19378; it historically also required KV-cache quantization to be disabled, but #23792 lifts that restriction so cache_type_k/cache_type_v quantization can be combined with tensor parallelism on builds that include it).
Note: The parallel option can also be set via the LLAMACPP_PARALLEL environment variable, and grpc_servers can be set via the LLAMACPP_GRPC_SERVERS environment variable. Options specified in the YAML file take precedence over environment variables.
Hardware auto-tuning (and how to override it)
On a detected GPU, LocalAI fills a few performance-relevant defaults the model config leaves unset - a larger physical batch on NVIDIA Blackwell, and a VRAM-scaled parallel slot count for concurrent serving. Both are gated on per-device VRAM at the model’s context: when a large context already fills a single card (e.g. a 27B model with a 200k context across 2×16 GiB), the batch boost and the extra parallel slots are suppressed so they can’t tip the tighter GPU into CUDA out-of-memory.
Anything you set explicitly in the model YAML always wins, so to pin a value just set it (e.g. batch: 512 or options: ["parallel:1"]). The effective values are logged at INFO when a model loads (effective runtime tuning …). To turn the hardware auto-tuning off entirely and run llama.cpp’s stock behavior, set:
LOCALAI_DISABLE_HARDWARE_DEFAULTS=true
Server-side prompt cache (repeated system prompts)
Agents, coding assistants, and Anthropic/OpenAI-compatible CLIs typically resend the same large system prompt on every turn. The llama.cpp server can short-circuit prefill for the matching prefix by stashing idle slot KV states in host RAM and reloading them on a hit. Three settings interact:
Setting
Default
Role
cache_ram:N
-1 (no limit)
Allocates the host-side prompt cache. 0 disables it.
kv_unified:true
true
Single unified KV buffer (prerequisite for idle-slot saving).
cache_idle_slots:true
true
Persists the idle slot’s KV into the prompt cache on task switch.
All three are on by default since LocalAI v4.3, so the prompt cache works out of the box for the common single-slot setup. If you’re on an older release, or you’ve explicitly disabled one of them, add the following to recover the behaviour:
options:
  - cache_ram:4096       # or -1 for no limit
  - kv_unified:true
  - cache_idle_slots:true
Set cache_ram:0 to opt out of the prompt cache entirely (saves host RAM at the cost of re-prefilling repeated prompts).
ik_llama.cpp is a hard fork of llama.cpp by Iwan Kawrakow that focuses on superior CPU and hybrid GPU/CPU performance. It ships additional quantization types (IQK quants), custom quantization mixes, Multi-head Latent Attention (MLA) for DeepSeek models, and fine-grained tensor offload controls - particularly useful for running very large models on commodity CPU hardware.
Note
The ik-llama-cpp backend requires a CPU with AVX2 support. The IQK kernels are not compatible with older CPUs.
Features
The ik-llama-cpp backend supports the following features:
IQK quantization types for better CPU inference performance
Multimodal models (via clip/llava)
Setup
The backend is distributed as a separate container image and can be installed from the LocalAI backend gallery, or specified directly in a model configuration. GGUF models loaded with this backend benefit from ik_llama.cpp’s optimized CPU kernels - especially useful for MoE models and large quantized models that would otherwise be GPU-bound.
YAML configuration
To use the ik-llama-cpp backend, specify it as the backend in the YAML file:
name: my-modelbackend: ik-llama-cppparameters:
# Relative to the models pathmodel: file.gguf
The aliases ik-llama and ik_llama are also accepted.
turboquant (llama.cpp fork with TurboQuant KV-cache)
llama-cpp-turboquant is a llama.cpp fork that adds the TurboQuant KV-cache quantization scheme. It reuses the upstream llama.cpp codebase and ships as a drop-in alternative backend inside LocalAI, sharing the same gRPC server sources as the stock llama-cpp backend - so any GGUF model that runs on llama-cpp also runs on turboquant.
You would pick turboquant when you want smaller KV-cache memory pressure (longer contexts on the same VRAM) or to experiment with the fork’s quantized KV representations on top of the standard cache_type_k / cache_type_v knobs already supported by upstream llama.cpp.
Features
Drop-in GGUF compatibility with upstream llama.cpp.
TurboQuant KV-cache quantization (see fork README for the current set of accepted cache_type_k / cache_type_v values).
Same feature surface as the llama-cpp backend: text generation, embeddings, tool calls, multimodal via mmproj.
Available on CPU (AVX/AVX2/AVX512/fallback), NVIDIA CUDA 12/13, AMD ROCm/HIP, Intel SYCL f32/f16, Vulkan, and NVIDIA L4T.
Setup
turboquant ships as a separate container image in the LocalAI backend gallery. Install it like any other backend:
local-ai backends install turboquant
Or pick a specific flavor for your hardware (example tags: cpu-turboquant, cuda12-turboquant, cuda13-turboquant, rocm-turboquant, intel-sycl-f16-turboquant, vulkan-turboquant).
YAML configuration
To run a model with turboquant, set the backend in your model YAML and optionally pick quantized KV-cache types:
name: my-modelbackend: turboquantparameters:
# Relative to the models pathmodel: file.gguf# Use TurboQuant's own KV-cache quantization schemes. The fork accepts# the standard llama.cpp types (f16, f32, q8_0, q4_0, q4_1, q5_0, q5_1)# and adds three TurboQuant-specific ones: turbo2, turbo3, turbo4.# turbo3 / turbo4 auto-enable flash_attention (required for turbo K/V)# and offer progressively more aggressive compression.cache_type_k: turbo3cache_type_v: turbo3context_size: 8192
The cache_type_k / cache_type_v fields map to llama.cpp’s -ctk / -ctv flags. The stock llama-cpp backend only accepts the standard llama.cpp types - to use turbo2 / turbo3 / turbo4 you need this turboquant backend, which is where the fork’s TurboQuant code paths actually take effect. Pick q8_0 here and you’re just running stock llama.cpp KV quantization; pick turbo* and you’re running TurboQuant.
The backend will automatically download the required files in order to run the model.
Usage
Use the completions endpoint by specifying the vllm backend:
curl http://localhost:8080/v1/completions -H "Content-Type: application/json" -d '{
   "model": "vllm",
   "prompt": "Hello, my name is",
   "temperature": 0.1, "top_p": 0.1
 }'
Passing arbitrary vLLM options with engine_args
A subset of AsyncEngineArgs is exposed as typed YAML fields
(tensor_parallel_size, gpu_memory_utilization, quantization,
max_model_len, dtype, trust_remote_code, enforce_eager, …).
Anything else can be passed through the generic engine_args: map.
Keys are forwarded verbatim to vLLM’s engine; unknown keys fail at load
time with the closest valid name as a hint. Nested maps materialise
into vLLM’s nested config dataclasses (SpeculativeConfig,
KVTransferConfig, CompilationConfig, …).
Speculative decoding (DFlash, ngram, eagle, deepseek_mtp, …) is
configured this way:
method picks the algorithm, the remaining keys are method-specific.
Drafters from z-lab are paired with
specific target models; pick the one that matches your target. The
drafter loads in its native precision regardless of the target’s
quantization: setting.
Another example - picking a non-default attention backend (e.g. on
hardware where the default cutlass kernels aren’t supported):
engine_args:
  attention_backend: TRITON_ATTN
Multi-node data parallelism
engine_args.data_parallel_size > 1 combined with the
local-ai p2p-worker vllm follower lets a single model span multiple
GPU nodes. See vLLM Multi-Node (Data-Parallel)
for the head/follower configuration and a worked Kimi-K2.6 example.
SGLang
SGLang is a fast serving
framework for LLMs and VLMs with a focus on prefix caching, speculative
decoding, and multi-modal generation. LocalAI ships a gRPC backend that
wraps SGLang’s async Engine, including its native function-call and
reasoning parsers.
The backend will pull the model from HuggingFace on first load.
Passing arbitrary SGLang options with engine_args
The same engine_args: map that the vLLM backend accepts is also
honoured by the SGLang backend. Keys are validated against
ServerArgs
SGLang’s central configuration dataclass - and forwarded verbatim to
Engine(**kwargs). Unknown keys fail at load time with the closest
valid name as a hint. Unlike vLLM, ServerArgs is flat: speculative
decoding fields are top-level (speculative_algorithm,
speculative_draft_model_path, etc.) rather than nested under a
speculative_config: dict.
The typed YAML fields shared with vLLM are mapped to their SGLang
equivalents (gpu_memory_utilization → mem_fraction_static,
enforce_eager → disable_cuda_graph, tensor_parallel_size →
tp_size, max_model_len → context_length). Anything else,
including all speculative-decoding flags, goes under engine_args:.
Speculative decoding: Gemma 4 with Multi-Token Prediction
Google publishes paired “assistant” drafters for every Gemma 4 size.
The drafters use Multi-Token Prediction (MTP) to propose several
candidate tokens per target step, which SGLang then verifies in
parallel. Flags below are transcribed verbatim from the
SGLang Gemma 4 cookbook.
For consumer GPUs in the 16-24 GB range, use E4B (8 B total /
4 B effective parameters):
For smaller cards (8-12 GB), drop to E2B (5 B total / 2 B effective)
by swapping the model paths to google/gemma-4-E2B-it and
google/gemma-4-E2B-it-assistant; the rest of the flags stay the same.
NEXTN is normalised to EAGLE inside ServerArgs.__post_init__, so
either value works - the cookbook uses NEXTN. mem_fraction_static
is the share of GPU memory SGLang reserves for the model + KV pool;
0.85 is the cookbook’s default and adapts to whatever single GPU the
backend is running on.
The 31 B dense and 26 B-A4B MoE Gemma 4 variants exist in the same
cookbook but require --tp-size 2, so they’re not in the gallery as
single-GPU recipes.
SGLang version requirement. Gemma 4 support landed in SGLang via
PR #21952. The
LocalAI sglang backend pins a release that includes it; if you’ve
overridden the pin to an older version, this recipe will fail with a
“model architecture not recognised” error at load time.
Other speculative algorithms
speculative_algorithm: also accepts EAGLE/EAGLE3 (paired with an
EAGLE-style draft head), DFLASH (block-diffusion drafters from
z-lab for the Qwen3 family), STANDALONE
(a smaller draft LLM verifying a larger target), and NGRAM (no draft
model - pure prefix-history speculation). See SGLang’s
speculative-decoding docs
for the full algorithm matrix.
Tool calling and reasoning parsers
SGLang’s native parsers stream tool_calls and reasoning_content
inside ChatDelta - the LocalAI Python backend wires them up
per-request rather than via engine_args:. Pick a parser by name:
The full list of registered parsers lives in sglang.srt.function_call
and sglang.srt.parser.reasoning_parser.
Transformers
Transformers is a State-of-the-art Machine Learning library for PyTorch, TensorFlow, and JAX.
LocalAI has a built-in integration with Transformers, and it can be used to run models.
This is an extra backend - in the container images (the extra images already contains python dependencies for Transformers) is already available and there is nothing to do for the setup.
Setup
Create a YAML file for the model you want to use with transformers.
To setup a model, you need to just specify the model name in the YAML config file:
The backend will automatically download the required files in order to run the model.
Parameters
Type
Type
Description
AutoModelForCausalLM
AutoModelForCausalLM is a model that can be used to generate sequences. Use it for NVIDIA CUDA and Intel GPU with Intel Extensions for Pytorch acceleration
OVModelForCausalLM
for Intel CPU/GPU/NPU OpenVINO Text Generation models
OVModelForFeatureExtraction
for Intel CPU/GPU/NPU OpenVINO Embedding acceleration
N/A
Defaults to AutoModel
OVModelForCausalLM requires OpenVINO IR Text Generation models from Hugging face
OVModelForFeatureExtraction works with any Safetensors Transformer Feature Extraction model from Huggingface (Embedding Model)
Please note that streaming is currently not implemented in AutoModelForCausalLM for Intel GPU.
AMD GPU support is not implemented.
Although AMD CPU is not officially supported by OpenVINO there are reports that it works: YMMV.
Embeddings
Use embeddings: true if the model is an embedding model
Inference device selection
Transformer backend tries to automatically select the best device for inference, anyway you can override the decision manually overriding with the main_gpu parameter.
Inference Engine
Applicable Values
CUDA
cuda, cuda.X where X is the GPU device like in nvidia-smi -L output
OpenVINO
Any applicable value from Inference Modes like AUTO,CPU,GPU,NPU,MULTI,HETERO
Example for CUDA:
main_gpu: cuda.0
Example for OpenVINO:
main_gpu: AUTO:-CPU
This parameter applies to both Text Generation and Feature Extraction (i.e. Embeddings) models.
Inference Precision
Transformer backend automatically select the fastest applicable inference precision according to the device support.
CUDA backend can manually enable bfloat16 if your hardware support it with the following parameter:
f16: true
Quantization
Quantization
Description
bnb_8bit
8-bit quantization
bnb_4bit
4-bit quantization
xpu_8bit
8-bit quantization for Intel XPUs
xpu_4bit
4-bit quantization for Intel XPUs
Trust Remote Code
Some models like Microsoft Phi-3 requires external code than what is provided by the transformer library.
By default it is disabled for security.
It can be manually enabled with:
trust_remote_code: true
Maximum Context Size
Maximum context size in bytes can be specified with the parameter: context_size. Do not use values higher than what your model support.
Usage example:
context_size: 8192
Auto Prompt Template
Usually chat template is defined by the model author in the tokenizer_config.json file.
To enable it use the use_tokenizer_template: true parameter in the template section.
Usage example:
template:
  use_tokenizer_template: true
Custom Stop Words
Stopwords are usually defined in tokenizer_config.json file.
They can be overridden with the stopwords parameter in case of need like in llama3-Instruct model.
Usage example:
stopwords:
- "<|eot_id|>"
- "<|end_of_text|>"
Usage
Use the completions endpoint by specifying the transformers model:
curl http://localhost:8080/v1/completions -H "Content-Type: application/json" -d '{
   "model": "transformers",
   "prompt": "Hello, my name is",
   "temperature": 0.1, "top_p": 0.1
 }'
Examples
OpenVINO
A model configuration file for openvion and starling model:
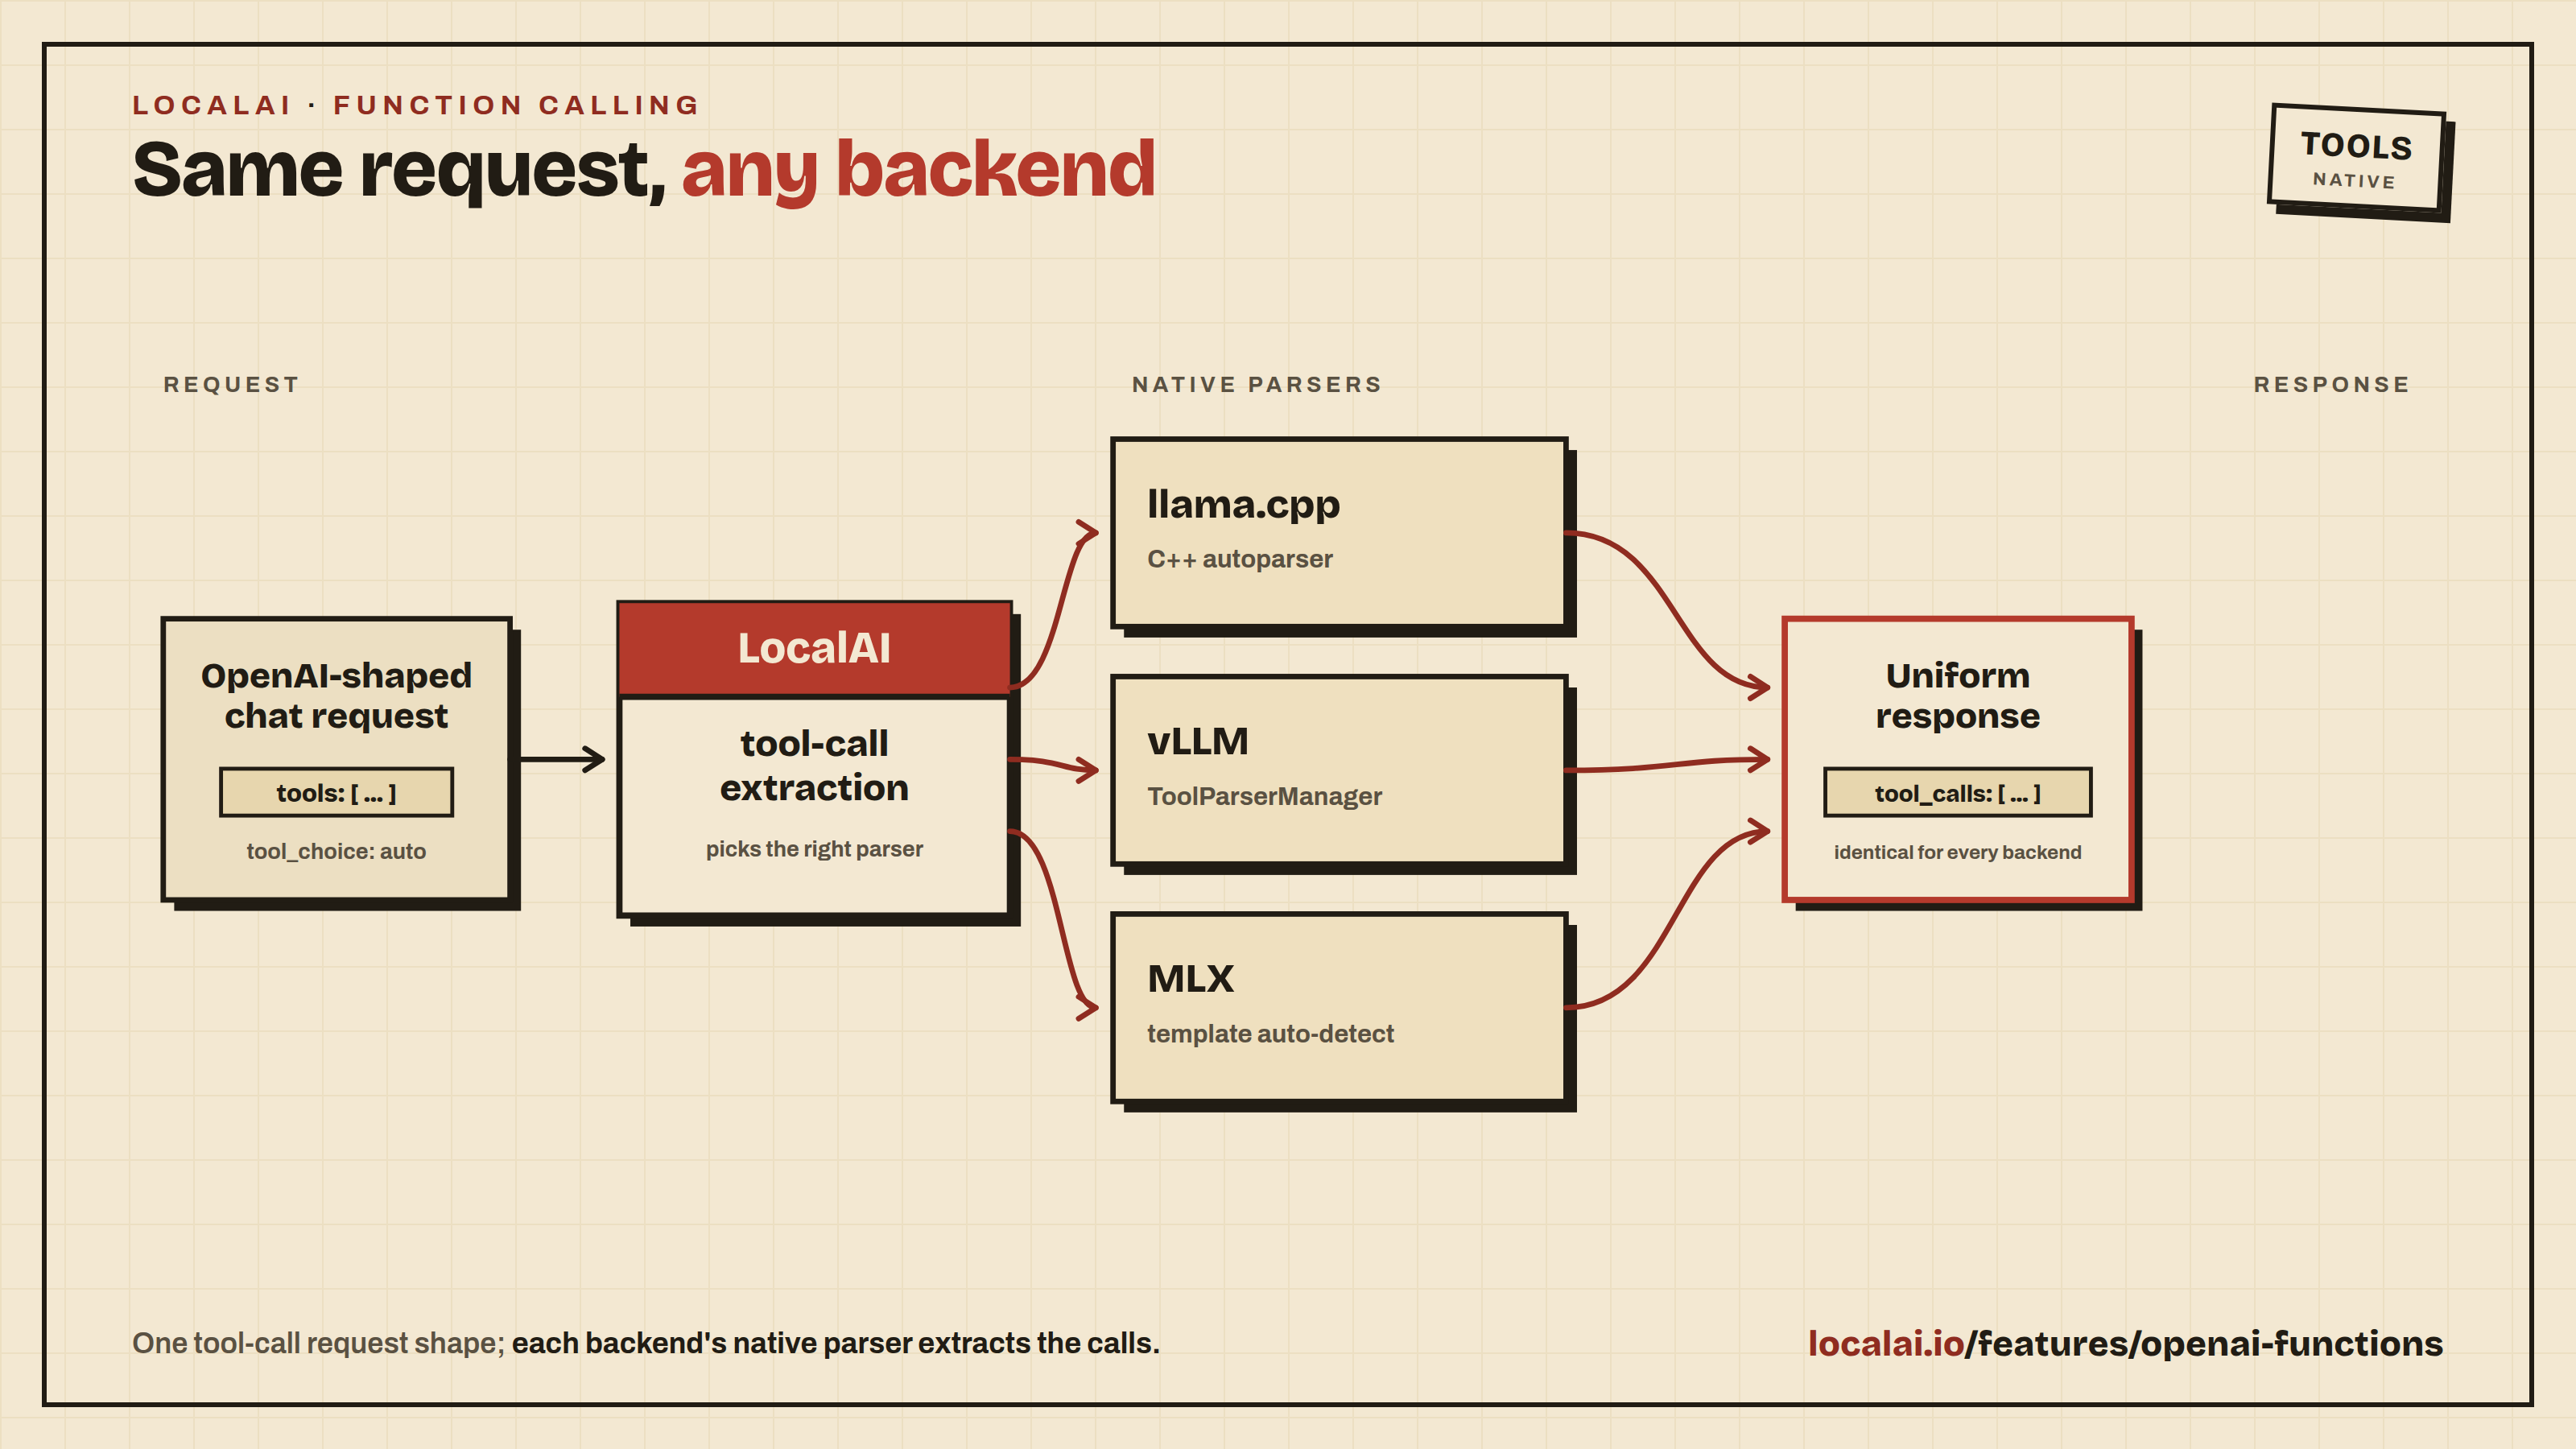
LocalAI supports running the OpenAI functions and tools API across multiple backends. The OpenAI request shape is the same regardless of which backend runs your model - LocalAI is responsible for extracting structured tool calls from the model’s output before returning the response.
LocalAI also supports JSON mode out of the box on llama.cpp-compatible models.
💡 Check out LocalAGI for an example on how to use LocalAI functions.
Supported backends
Backend
How tool calls are extracted
llama.cpp
C++ incremental parser; any ggml/gguf model works out of the box, no configuration needed
vllm
vLLM’s native ToolParserManager - select a parser with tool_parser:<name> in the model options. Auto-set by the gallery importer for known families
vllm-omni
Same as vLLM
mlx
mlx_lm.tool_parsers - auto-detected from the chat template, no configuration needed
mlx-vlm
mlx_vlm.tool_parsers (with fallback to mlx-lm parsers) - auto-detected from the chat template, no configuration needed
Reasoning content (<think>...</think> blocks from DeepSeek R1, Qwen3, Gemma 4, etc.) is returned in the OpenAI reasoning_content field on the same backends. When a model both reasons and calls a tool in the same turn, see Interleaved Thinking with Tool Calls for how the reasoning survives the tool-result round trip.
Setup
llama.cpp
No configuration required - the autoparser detects the tool call format for any ggml/gguf model that was trained with tool support.
vLLM / vLLM Omni
The parser must be specified explicitly because vLLM itself doesn’t auto-detect one. Pass it via the model options:
When you import a vLLM model through the LocalAI gallery, the importer looks up the model family and pre-fills tool_parser: and reasoning_parser: for you - you only need to override them for non-standard model names.
Available tool parsers include hermes, llama3_json, llama4_pythonic, mistral, qwen3_xml, deepseek_v3, granite4, kimi_k2, glm45, and more. Available reasoning parsers include deepseek_r1, qwen3, mistral, gemma4, granite. See the upstream vLLM documentation for the full list.
MLX / MLX-VLM
MLX backends auto-detect the right tool parser by inspecting the model’s chat template - you don’t need to set anything. Just load an MLX-quantized model that was trained with tool support:
The gallery importer will still append tool_parser: and reasoning_parser: entries to the YAML for visibility and consistency with the other backends, but those are informational - the runtime auto-detection in the MLX backend ignores them and uses the parser matched to the chat template.
The functions calls maps automatically to grammars which are currently supported only by llama.cpp, however, it is possible to turn off the use of grammars, and extract tool arguments from the LLM responses, by specifying in the YAML file no_grammar and a regex to map the response from the LLM:
name: model_nameparameters:
# Model file namemodel: model/namefunction:
# set to true to not use grammarsno_grammar: true# set one or more regexes used to extract the function tool arguments from the LLM responseresponse_regex:
- "(?P<function>\w+)\s*\((?P<arguments>.*)\)"
The response regex have to be a regex with named parameters to allow to scan the function name and the arguments. For instance, consider:
(?P<function>\w+)\s*\((?P<arguments>.*)\)
will catch
function_name({ "foo": "bar"})
Parallel tools calls
This feature is experimental and has to be configured in the YAML of the model by enabling function.parallel_calls:
name: gpt-3.5-turboparameters:
# Model file namemodel: ggml-openllama.bintop_p: 80top_k: 0.9temperature: 0.1function:
# set to true to allow the model to call multiple functions in parallelparallel_calls: true
Use functions with grammar
It is possible to also specify the full function signature (for debugging, or to use with other clients).
The chat endpoint accepts the grammar_json_functions additional parameter which takes a JSON schema object.
Grammars and function tools can be used as well in conjunction with vision APIs:
 curl http://localhost:8080/v1/chat/completions -H "Content-Type: application/json" -d '{
     "model": "llava", "grammar": "root ::= (\"yes\" | \"no\")",
     "messages": [{"role": "user", "content": [{"type":"text", "text": "Is there some grass in the image?"}, {"type": "image_url", "image_url": {"url": "https://upload.wikimedia.org/wikipedia/commons/thumb/d/dd/Gfp-wisconsin-madison-the-nature-boardwalk.jpg/2560px-Gfp-wisconsin-madison-the-nature-boardwalk.jpg" }}], "temperature": 0.9}]}'
💡 Examples
A full e2e example with docker-compose is available here.
Constrained Grammars
Overview
The chat endpoint supports the grammar parameter, which allows users to specify a grammar in Backus-Naur Form (BNF). This feature enables the Large Language Model (LLM) to generate outputs adhering to a user-defined schema, such as JSON, YAML, or any other format that can be defined using BNF. For more details about BNF, see Backus-Naur Form on Wikipedia.
Note
Compatibility Notice: This feature is only supported by models that use the llama.cpp backend. For a complete list of compatible models, refer to the Model Compatibility page. For technical details, see the related pull requests: PR #1773 and PR #1887.
Setup
To use this feature, follow the installation and setup instructions on the LocalAI Functions page. Ensure that your local setup meets all the prerequisites specified for the llama.cpp backend.
💡 Usage Example
The following example demonstrates how to use the grammar parameter to constrain the model’s output to either “yes” or “no”. This can be particularly useful in scenarios where the response format needs to be strictly controlled.
In this example, the grammar parameter is set to a simple choice between “yes” and “no”, ensuring that the model’s response adheres strictly to one of these options regardless of the context.
Example: JSON Output Constraint
You can also use grammars to enforce JSON output format:
curl http://localhost:8080/v1/chat/completions -H "Content-Type: application/json" -d '{
  "model": "gpt-4",
  "messages": [{"role": "user", "content": "Generate a person object with name and age"}],
  "grammar": "root ::= \"{\" \"\\\"name\\\":\" string \",\\\"age\\\":\" number \"}\"\nstring ::= \"\\\"\" [a-z]+ \"\\\"\"\nnumber ::= [0-9]+"
}'
Reasoning models can “think” before they answer. When such a model also calls a tool, the useful behaviour is for the thinking and the tool call to travel together, and for that thinking to survive the tool-result round trip. LocalAI calls this interleaved thinking: a single assistant turn carries both reasoning and tool_calls, and the client hands the reasoning back on the next turn so the model’s chain of thought is not lost when the tool result is appended.
This matters because a tool-calling loop is multi-turn. The model reasons, asks for a tool, your client runs the tool, and then you call the model again with the tool result. Without interleaved thinking the reasoning produced in the first turn is discarded, and the model has to reconstruct its plan from scratch. With it, the reasoning is echoed back and the model continues where it left off.
An assistant turn that both reasons and calls a tool returns the two fields side by side:
reasoning holds the model’s thinking.
tool_calls holds the structured calls.
finish_reason is tool_calls.
Your client runs the tool, then sends the conversation back with:
the original assistant message (including its reasoning and tool_calls), and
a tool role message carrying the tool result.
LocalAI reads the returned reasoning back into the model’s context so the chain is continuous.
Field naming
OpenAI chat completions (/v1/chat/completions): the response carries reasoning alongside tool_calls. On inbound assistant messages LocalAI now also accepts reasoning_content as an alias for reasoning. This alias exists because several clients (vLLM, DeepSeek, and cogito) emit the field under the name reasoning_content; either name is accepted and mapped to the same internal field.
Anthropic Messages (/v1/messages): reasoning is carried as thinking content blocks. On the local path LocalAI emits a thinking block before the tool_use block, and reads inbound thinking blocks back into reasoning. Because local models produce no cryptographic signature, LocalAI attaches a synthetic opaque signature to the emitted block, and does not validate the signature on inbound blocks. The thinking block is only emitted when the request opts in with the thinking parameter:
{
  "model": "your-reasoning-model",
  "max_tokens": 1024,
  "thinking": { "type": "enabled" },
  "messages": [
    { "role": "user", "content": "What is the weather in Rome?" }
  ]
}
Enabling reasoning per backend
Interleaved thinking requires the backend to separate the model’s thinking from its final answer. How you turn that on depends on the backend.
llama.cpp
Set the reasoning_format model option. Accepted values: none, auto, deepseek, deepseek-legacy. auto lets the backend pick based on the model’s chat template; deepseek and deepseek-legacy force the DeepSeek-style <think>...</think> extraction.
Set the reasoning_parser model option to vLLM’s native reasoning parser for the model family. LocalAI also ships an auto-configuration hook (core/config/hooks_vllm.go) that sets the reasoning parser and the tool-call parser together for known families, so for gallery-imported vLLM models this is often configured for you.
Request a chat completion with a tool defined and a prompt that requires the model to reason before acting:
curl http://localhost:8080/v1/chat/completions -H "Content-Type: application/json" -d '{
  "model": "your-reasoning-model",
  "messages": [
    { "role": "user", "content": "What is the weather in Rome?" }
  ],
  "tools": [
    {
      "type": "function",
      "function": {
        "name": "get_weather",
        "description": "Get the current weather for a city",
        "parameters": {
          "type": "object",
          "properties": {
            "city": { "type": "string" }
          },
          "required": ["city"]
        }
      }
    }
  ]
}'
The response message carries both the reasoning and the tool call, and finish_reason is tool_calls:
{
  "choices": [
    {
      "finish_reason": "tool_calls",
      "message": {
        "role": "assistant",
        "content": "",
        "reasoning": "Okay, the user is asking about the weather in Rome... I need to call get_weather with city Rome.",
        "tool_calls": [
          {
            "id": "call_abc123",
            "type": "function",
            "function": {
              "name": "get_weather",
              "arguments": "{\"city\":\"Rome\"}"
            }
          }
        ]
      }
    }
  ]
}
To continue, run get_weather, then send the conversation back with the assistant message (keeping its reasoning and tool_calls) followed by a tool message holding the result. LocalAI feeds the returned reasoning back into context so the model resumes its chain of thought.
Known limitations
Streaming Anthropic thinking blocks. In streaming mode, a thinking block is currently emitted only on the tool-call path that goes through the llama.cpp C++ autoparser. A plain streaming text-only turn, or a tool turn resolved through the inline token path, does not stream a thinking block. The equivalent non-streaming request does return one. Non-streaming emits thinking on all branches; only the streaming path has this gap.
Upstream llama.cpp leak on newest hybrid models. On the newest hybrid reasoning models (Qwen3.5 / Qwen3.6) there is an upstream llama.cpp bug where tool calls can leak into reasoning_content instead of being parsed into tool_calls. This is tracked upstream at ggml-org/llama.cpp discussion #23351.
Reasoning budget vs the tool call. If a reasoning model’s thinking exhausts the output budget (max_tokens) before it emits the tool call, no tool call is produced. Give the model enough max_tokens to cover both the reasoning and the call. In this case LocalAI reports finish_reason: "length".
Model Aliases
A model alias is a model name that redirects all traffic to another
configured model. Declare gpt-4 as an alias of my-llama-3 and every client
calling gpt-4 is served by my-llama-3 with no client reconfiguration: the
clients keep their existing model name while you control what answers them on
the server side.
Declaring an alias
Create a minimal config file in your models directory:
name: gpt-4alias: my-llama-3
That is the whole config: a name (the alias clients call) and an alias key
(the target that actually serves the request).
Rules and behavior
The target (my-llama-3) must be an existing, non-alias, enabled model. You
cannot point an alias at a missing model, a disabled model, or another alias
(no chains).
Aliases are 1:1. One alias maps to exactly one target.
The target can be swapped live by editing the config file, calling the API,
using the UI, or asking the assistant. No restart is required.
Both gpt-4 and my-llama-3 appear in GET /v1/models.
Responses echo the requested alias: a call to gpt-4 returns gpt-4 in the
response model field, not the target name.
Usage accounting records both sides: requested gpt-4, served my-llama-3.
Aliases work for every modality (chat, embeddings, audio, images, and so on).
Managing aliases
You can create, swap, and remove aliases from any of the management surfaces.
Web UI
Open Add Model and pick the Alias / Routing template, then set a name
and a target. To re-point an existing alias, edit it and change the target.
REST API
Create: POST /models/import
Swap the target: PATCH /api/models/config-json/:name
List all aliases: GET /api/aliases
Delete: POST /models/delete/:name
Assistant and MCP
The LocalAI Assistant (and the MCP server) expose the same operations as tools:
set_alias, list_aliases, and delete_model.
Note
You cannot turn an existing real model into an alias. If you run set_alias
(or PATCH /api/models/config-json/:name) against a name that is already a real,
non-alias model, the request is rejected. An alias is a pure redirect, so it
must not carry a backend or parameters.model; a real model does, and merging
an alias onto it produces an invalid config that validation refuses with
alias config ... must not set backend or parameters.model. This is intentional:
it stops a stray set_alias call from clobbering a model that is serving.
To add an alias, point a new name at the target instead of reusing an
existing model’s name. Re-pointing an existing alias at a different target
is fully supported and is the live-swap path: the alias config has no backend of
its own, so swapping its target stays a valid pure redirect.
Limits
Aliases are a static 1:1 redirect. For classifier-based or load-balanced
selection across several downstream models, use the intelligent router in the
Middleware feature instead.
LocalAI exposes a set of discovery endpoints that let external agents, coding assistants, and automation tools programmatically learn what the instance can do and how to control it - without reading documentation ahead of time.
Quick start
# 1. Discover what's availablecurl http://localhost:8080/.well-known/localai.json
# 2. Browse instruction areascurl http://localhost:8080/api/instructions
# 3. Get an API guide for a specific instructioncurl http://localhost:8080/api/instructions/config-management
Well-Known Discovery Endpoint
GET /.well-known/localai.json
Returns the instance version, all available endpoint URLs (flat and categorized), and runtime capabilities.
The capabilities object reflects the current runtime configuration - for example, mcp is only true if MCP is enabled, and agents is true only if the agent pool is running.
Instructions API
Instructions are curated groups of related API endpoints. Each instruction maps to one or more Swagger tags and provides a focused, LLM-readable guide.
List all instructions
GET /api/instructions
curl http://localhost:8080/api/instructions
Returns a compact list of instruction areas:
{
"instructions": [
{
"name": "chat-inference",
"description": "OpenAI-compatible chat completions, text completions, and embeddings",
"tags": ["inference", "embeddings"],
"url": "/api/instructions/chat-inference" },
{
"name": "config-management",
"description": "Discover, read, and modify model configuration fields with VRAM estimation",
"tags": ["config"],
"url": "/api/instructions/config-management" }
],
"hint": "Fetch GET {url} for a markdown API guide. Add ?format=json for a raw OpenAPI fragment."}
Available instructions:
Instruction
Description
chat-inference
Chat completions, text completions, embeddings (OpenAI-compatible)
An additive, LocalAI-specific superset of /v1/models. It returns the same set of models but enriches each entry with the capabilities the model supports and the input/output modalities it accepts and produces. Use it to decide, before sending a request, whether a given model can take an image, audio, or video attachment directly - or whether the input needs converting/transcribing first.
Because it is purely additive, clients that only understand /v1/models keep working unchanged; they simply never call this route.
capabilities - canonical usecase strings (e.g. chat, vision, transcript, tts, embeddings, image, video) plus the modifiers tools and thinking.
input_modalities / output_modalities - the subsets of {text, image, audio, video} the model accepts and produces. LocalAI combines usecase-based inference, backend settings such as vLLM limit_mm_per_prompt, and explicit model-level known_input_modalities / known_output_modalities. The explicit fields cover distinctions a usecase cannot express, such as a video model that also accepts speech.
The same query parameters as /v1/models are honored (filter, excludeConfigured), and the same per-user model allowlist is applied when authentication is enabled.
Configuration Management APIs
These endpoints let agents discover model configuration fields, read current settings, modify them, and estimate VRAM usage.
Config metadata
GET /api/models/config-metadata
Returns structured metadata for all model configuration fields, organized by section. Each field includes its YAML path, Go type, UI type, label, description, default value, validation constraints, and available options.
# All fieldscurl http://localhost:8080/api/models/config-metadata
# Filter by sectioncurl http://localhost:8080/api/models/config-metadata?section=parameters
Autocomplete values
GET /api/models/config-metadata/autocomplete/:provider
Returns runtime values for dynamic fields. Providers include backends, models, models:chat, models:tts, models:transcript, models:vad.
# List available backendscurl http://localhost:8080/api/models/config-metadata/autocomplete/backends
# List chat-capable modelscurl http://localhost:8080/api/models/config-metadata/autocomplete/models:chat
{
"sizeBytes": 4368438272,
"sizeDisplay": "4.4 GB",
"vramBytes": 6123456789,
"vramDisplay": "6.1 GB",
"context_note": "Estimate used default context_size=8192. The model's trained maximum context is 131072; VRAM usage will be higher at larger context sizes.",
"model_max_context": 131072}
Optional parameters: gpu_layers (number of layers to offload, 0 = all), kv_quant_bits (KV cache quantization, 0 = fp16).
Integration guide
A recommended workflow for agent/tool builders:
Discover: Fetch /.well-known/localai.json to learn available endpoints and capabilities
Browse instructions: Fetch /api/instructions for an overview of instruction areas
Deep dive: Fetch /api/instructions/:name for a markdown API guide on a specific area
Explore config: Use /api/models/config-metadata to understand configuration fields
Interact: Use the standard OpenAI-compatible endpoints for inference, and the config management endpoints for runtime tuning
Swagger UI
The full interactive API documentation is available at /swagger/index.html. All annotated endpoints can be explored and tested directly from the browser.
Agents
LocalAI includes a built-in agent platform powered by LocalAGI. Agents are autonomous AI entities that can reason, use tools, maintain memory, and interact with external services, all running locally as part of the LocalAI process.
LocalAGI is embedded in LocalAI. There is nothing separate to install or run.
Info
Looking for something else? LocalAI has three related agentic features that are easy to confuse:
Agents (this page): autonomous agents you build that reason, use tools, and act on their own. Start here if you want to create an agent.
LocalAI Assistant (/features/localai-assistant/): an admin chat modality for administering LocalAI itself (install models, manage backends) by chatting.
MCP (/features/mcp/): a way to give a model external tools through the Model Context Protocol.
Tip
New to agents? The Build your first agent walkthrough takes you from an empty Agents page to an agent that answers a message and uses one tool.
Overview
The agent system provides:
Autonomous agents with configurable goals, personalities, and capabilities
Tool/Action support - agents can execute actions (web search, code execution, API calls, etc.)
Knowledge base (RAG) - per-agent collections with document upload, chunking, and semantic search
Skills system - reusable skill definitions that agents can leverage, with git-based skill repositories
SSE streaming - real-time chat with agents via Server-Sent Events
Import/Export - share agent configurations as JSON files
Web UI - full management interface for creating, editing, chatting with, and monitoring agents
Getting Started
Agents are enabled by default. To disable them, set:
LOCALAI_DISABLE_AGENTS=true
Creating an Agent
Navigate to the Agents page in the web UI
Click Create Agent or import one from the Agent Hub
Configure the agent’s name, model, system prompt, and actions
Save and start chatting
Importing an Agent
You can import agent configurations from JSON files:
Download an agent configuration from the Agent Hub or export one from another LocalAI instance
On the Agents page, click Import
Select the JSON file - you’ll be taken to the edit form to review and adjust the configuration before saving
Click Create Agent to finalize the import
Configuration
Environment Variables
All agent-related settings can be configured via environment variables:
Variable
Default
Description
LOCALAI_DISABLE_AGENTS
false
Disable the agent pool feature entirely
LOCALAI_AGENT_POOL_API_URL
(self-referencing)
Default API URL for agents. By default, agents call back into LocalAI’s own API (http://127.0.0.1:<port>). Set this to point agents to an external LLM provider.
LOCALAI_AGENT_POOL_API_KEY
(LocalAI key)
Default API key for agents. Defaults to the first LocalAI API key. Set this when using an external provider.
LOCALAI_AGENT_POOL_DEFAULT_MODEL
(empty)
Default LLM model for new agents
LOCALAI_AGENT_POOL_MULTIMODAL_MODEL
(empty)
Default multimodal (vision) model for agents
LOCALAI_AGENT_POOL_TRANSCRIPTION_MODEL
(empty)
Default transcription (speech-to-text) model for agents
LOCALAI_AGENT_POOL_TRANSCRIPTION_LANGUAGE
(empty)
Default transcription language for agents
LOCALAI_AGENT_POOL_TTS_MODEL
(empty)
Default TTS (text-to-speech) model for agents
LOCALAI_AGENT_POOL_STATE_DIR
(data path)
Directory for persisting agent state. Defaults to LOCALAI_DATA_PATH if set, otherwise falls back to LOCALAI_CONFIG_DIR
LOCALAI_AGENT_POOL_TIMEOUT
5m
Default timeout for agent operations
LOCALAI_AGENT_POOL_ENABLE_SKILLS
false
Enable the skills service
LOCALAI_AGENT_POOL_VECTOR_ENGINE
chromem
Vector engine for knowledge base (chromem or postgres)
LOCALAI_AGENT_POOL_EMBEDDING_MODEL
granite-embedding-107m-multilingual
Embedding model for knowledge base
LOCALAI_AGENT_POOL_CUSTOM_ACTIONS_DIR
(empty)
Directory for custom action plugins
LOCALAI_AGENT_POOL_DATABASE_URL
(empty)
PostgreSQL connection string for collections (required when vector engine is postgres)
LOCALAI_AGENT_POOL_MAX_CHUNKING_SIZE
400
Maximum chunk size for document ingestion
LOCALAI_AGENT_POOL_CHUNK_OVERLAP
0
Overlap between document chunks
LOCALAI_AGENT_POOL_ENABLE_LOGS
false
Enable detailed agent logging
LOCALAI_AGENT_POOL_COLLECTION_DB_PATH
(empty)
Custom path for the collections database
LOCALAI_AGENT_HUB_URL
https://agenthub.localai.io
URL for the Agent Hub (shown in the UI)
Knowledge Base Storage
By default, the knowledge base uses chromem - an in-process vector store that requires no external dependencies. For production deployments with larger knowledge bases, you can switch to PostgreSQL with pgvector support:
The PostgreSQL image quay.io/mudler/localrecall:v0.5.2-postgresql is pre-configured with pgvector and ready to use.
Connection safety timeouts (PostgreSQL only)
The embedded vector store sets per-connection timeouts so a single stuck or corrupt index can never hold a lock indefinitely and stall every other collection operation. Safe defaults are applied automatically - you only need to set these to override them:
Variable
Default
Description
POSTGRES_LOCK_TIMEOUT
30s
Bounds how long a statement waits to acquire a lock, so queued statements fail fast instead of piling up. Set 0/off to disable.
POSTGRES_IDLE_IN_TRANSACTION_TIMEOUT
300s
Reaps abandoned transactions that would otherwise pin locks. Set 0/off to disable.
POSTGRES_STATEMENT_TIMEOUT
(unset)
Bounds total statement runtime, auto-aborting a wedged query. Off by default since a large vector index build can exceed any fixed limit; index builds are exempted, so it is safe to enable.
These are read directly from the LocalAI process environment by the embedded store (the same as DATABASE_URL and HYBRID_SEARCH_*).
Each agent has its own configuration that controls its behavior. Key settings include:
Name - unique identifier for the agent
Model - the LLM model the agent uses for reasoning
System Prompt - defines the agent’s personality and instructions
Actions - tools the agent can use (web search, code execution, etc.). See the /features/agent-actions/ for the full catalog of built-in actions and how to configure each one.
MCP Servers - Model Context Protocol servers for additional tool access
The pool-level defaults (API URL, API key, models) can be set via environment variables. Individual agents can further override these in their configuration, allowing them to use different LLM providers (OpenAI, other LocalAI instances, etc.) on a per-agent basis.
Skills
Skills are reusable instruction sets (a name, a description, and the skill’s content, optionally with attached resource files) that an agent can draw on while it works. They can be authored directly or imported from git-based skill repositories, so a set of skills can be shared across agents and machines.
Warning
Skills are disabled by default. The skills service only runs when you start LocalAI with LOCALAI_AGENT_POOL_ENABLE_SKILLS=true. With the default LOCALAI_AGENT_POOL_ENABLE_SKILLS=false, the Skills UI and the /api/agents/skills endpoints are inactive, and an imported agent that expects a skill will not find it.
Enable skills
Start LocalAI with the skills service turned on:
LOCALAI_AGENT_POOL_ENABLE_SKILLS=true local-ai run
In Docker, add the same variable to the container environment.
Create a skill
With skills enabled, open the Agents section in the web interface and go to the Skills area. Create a skill by giving it:
a name (used to reference the skill),
a description (what the skill is for),
the skill content (the instructions the agent follows when the skill applies),
optionally, resource files the skill needs.
The same operation is available over REST:
curl http://localhost:8080/api/agents/skills \
-H "Content-Type: application/json"\
-d '{
"name": "changelog-writer",
"description": "Write a release changelog from a list of merged PRs",
"content": "When asked for a changelog, group the PRs by type (feature, fix, docs) and write one concise bullet per PR."
}'
You can also import a skill archive with POST /api/agents/skills/import, or add a git skill repository so its skills are pulled in.
Use a skill
Once a skill exists and the skills service is enabled, agents can use it as part of their reasoning. List the skills currently available with:
curl http://localhost:8080/api/agents/skills
If a skill you expect is missing, confirm LocalAI was started with LOCALAI_AGENT_POOL_ENABLE_SKILLS=true.
API Endpoints
All agent endpoints are grouped under /api/agents/:
Agent Management
Method
Path
Description
GET
/api/agents
List all agents with status
POST
/api/agents
Create a new agent
GET
/api/agents/:name
Get agent info
PUT
/api/agents/:name
Update agent configuration
DELETE
/api/agents/:name
Delete an agent
GET
/api/agents/:name/config
Get agent configuration
PUT
/api/agents/:name/pause
Pause an agent
PUT
/api/agents/:name/resume
Resume a paused agent
GET
/api/agents/:name/status
Get agent status and observables
POST
/api/agents/:name/chat
Send a message to an agent
GET
/api/agents/:name/sse
SSE stream for real-time agent events
GET
/api/agents/:name/export
Export agent configuration as JSON
POST
/api/agents/import
Import an agent from JSON
GET
/api/agents/:name/files?path=...
Serve a generated file from the outputs directory
GET
/api/agents/config/metadata
Get dynamic config form metadata (includes outputsDir)
Skills
Method
Path
Description
GET
/api/agents/skills
List all skills
POST
/api/agents/skills
Create a new skill
GET
/api/agents/skills/:name
Get a skill
PUT
/api/agents/skills/:name
Update a skill
DELETE
/api/agents/skills/:name
Delete a skill
GET
/api/agents/skills/search
Search skills
GET
/api/agents/skills/export/*
Export a skill
POST
/api/agents/skills/import
Import a skill
Collections (Knowledge Base)
Method
Path
Description
GET
/api/agents/collections
List collections
POST
/api/agents/collections
Create a collection
POST
/api/agents/collections/:name/upload
Upload a document
GET
/api/agents/collections/:name/entries
List entries
POST
/api/agents/collections/:name/search
Search a collection
POST
/api/agents/collections/:name/reset
Reset a collection
Actions
Method
Path
Description
GET
/api/agents/actions
List available actions
POST
/api/agents/actions/:name/definition
Get action definition
POST
/api/agents/actions/:name/run
Execute an action
Using Agents via the Responses API
Agents can be used programmatically via the standard /v1/responses endpoint (OpenAI Responses API). Simply use the agent name as the model field:
curl -X POST http://localhost:8080/v1/responses \
-H "Content-Type: application/json"\
-d '{
"model": "my-agent",
"input": "What is the weather today?"
}'
You can also send structured message arrays as input:
curl -X POST http://localhost:8080/v1/responses \
-H "Content-Type: application/json"\
-d '{
"model": "my-agent",
"input": [
{"role": "user", "content": "Summarize the latest news about AI"}
]
}'
When the model name matches an agent, the request is routed to the agent pool. If no agent matches, it falls through to the normal model-based inference pipeline.
Chat with SSE Streaming
For real-time streaming responses, use the chat endpoint with SSE:
Send a message to an agent:
curl -X POST http://localhost:8080/api/agents/my-agent/chat \
-H "Content-Type: application/json"\
-d '{"message": "What is the weather today?"}'
json_message_status - processing status updates (processing / completed)
status - system messages (reasoning steps, action results)
json_error - error notifications
Generated Files and Outputs
Some agent actions (image generation, PDF creation, audio synthesis) produce files. These files are automatically managed by LocalAI through a confined outputs directory.
How It Works
Actions generate files to their configured outputDir (which can be any path on the filesystem)
After each agent response, LocalAI automatically copies generated files into {stateDir}/outputs/
The file-serving endpoint (/api/agents/:name/files?path=...) only serves files from this outputs directory
File paths in agent response metadata are rewritten to point to the copied files
This design ensures that:
Actions can write files to any directory they need
The file-serving endpoint is confined to a single trusted directory - no arbitrary filesystem access
Symlink traversal is blocked via filepath.EvalSymlinks validation
Accessing Generated Files
Use the file-serving endpoint to retrieve files produced by agent actions:
The path parameter must point to a file inside the outputs directory. Requests for files outside this directory are rejected with 403 Forbidden.
Metadata in SSE Messages
When an agent action produces files, the SSE json_message event includes a metadata field with the generated resources:
{
"id": "msg-123-agent",
"sender": "agent",
"content": "Here is the image you requested.",
"metadata": {
"images_url": ["http://localhost:8080/api/agents/my-agent/files?path=..."],
"pdf_paths": ["/path/to/outputs/document.pdf"],
"songs_paths": ["/path/to/outputs/song.mp3"]
},
"timestamp": "2025-01-01T00:00:00Z"}
The web UI uses this metadata to display inline resource cards (images, PDFs, audio players) and to open files in the canvas panel.
Configuration
The outputs directory is created at {stateDir}/outputs/ where stateDir defaults to LOCALAI_AGENT_POOL_STATE_DIR (or LOCALAI_DATA_PATH / LOCALAI_CONFIG_DIR as fallbacks). You can query the current outputs directory path via:
This returns a JSON object including the outputsDir field.
Architecture
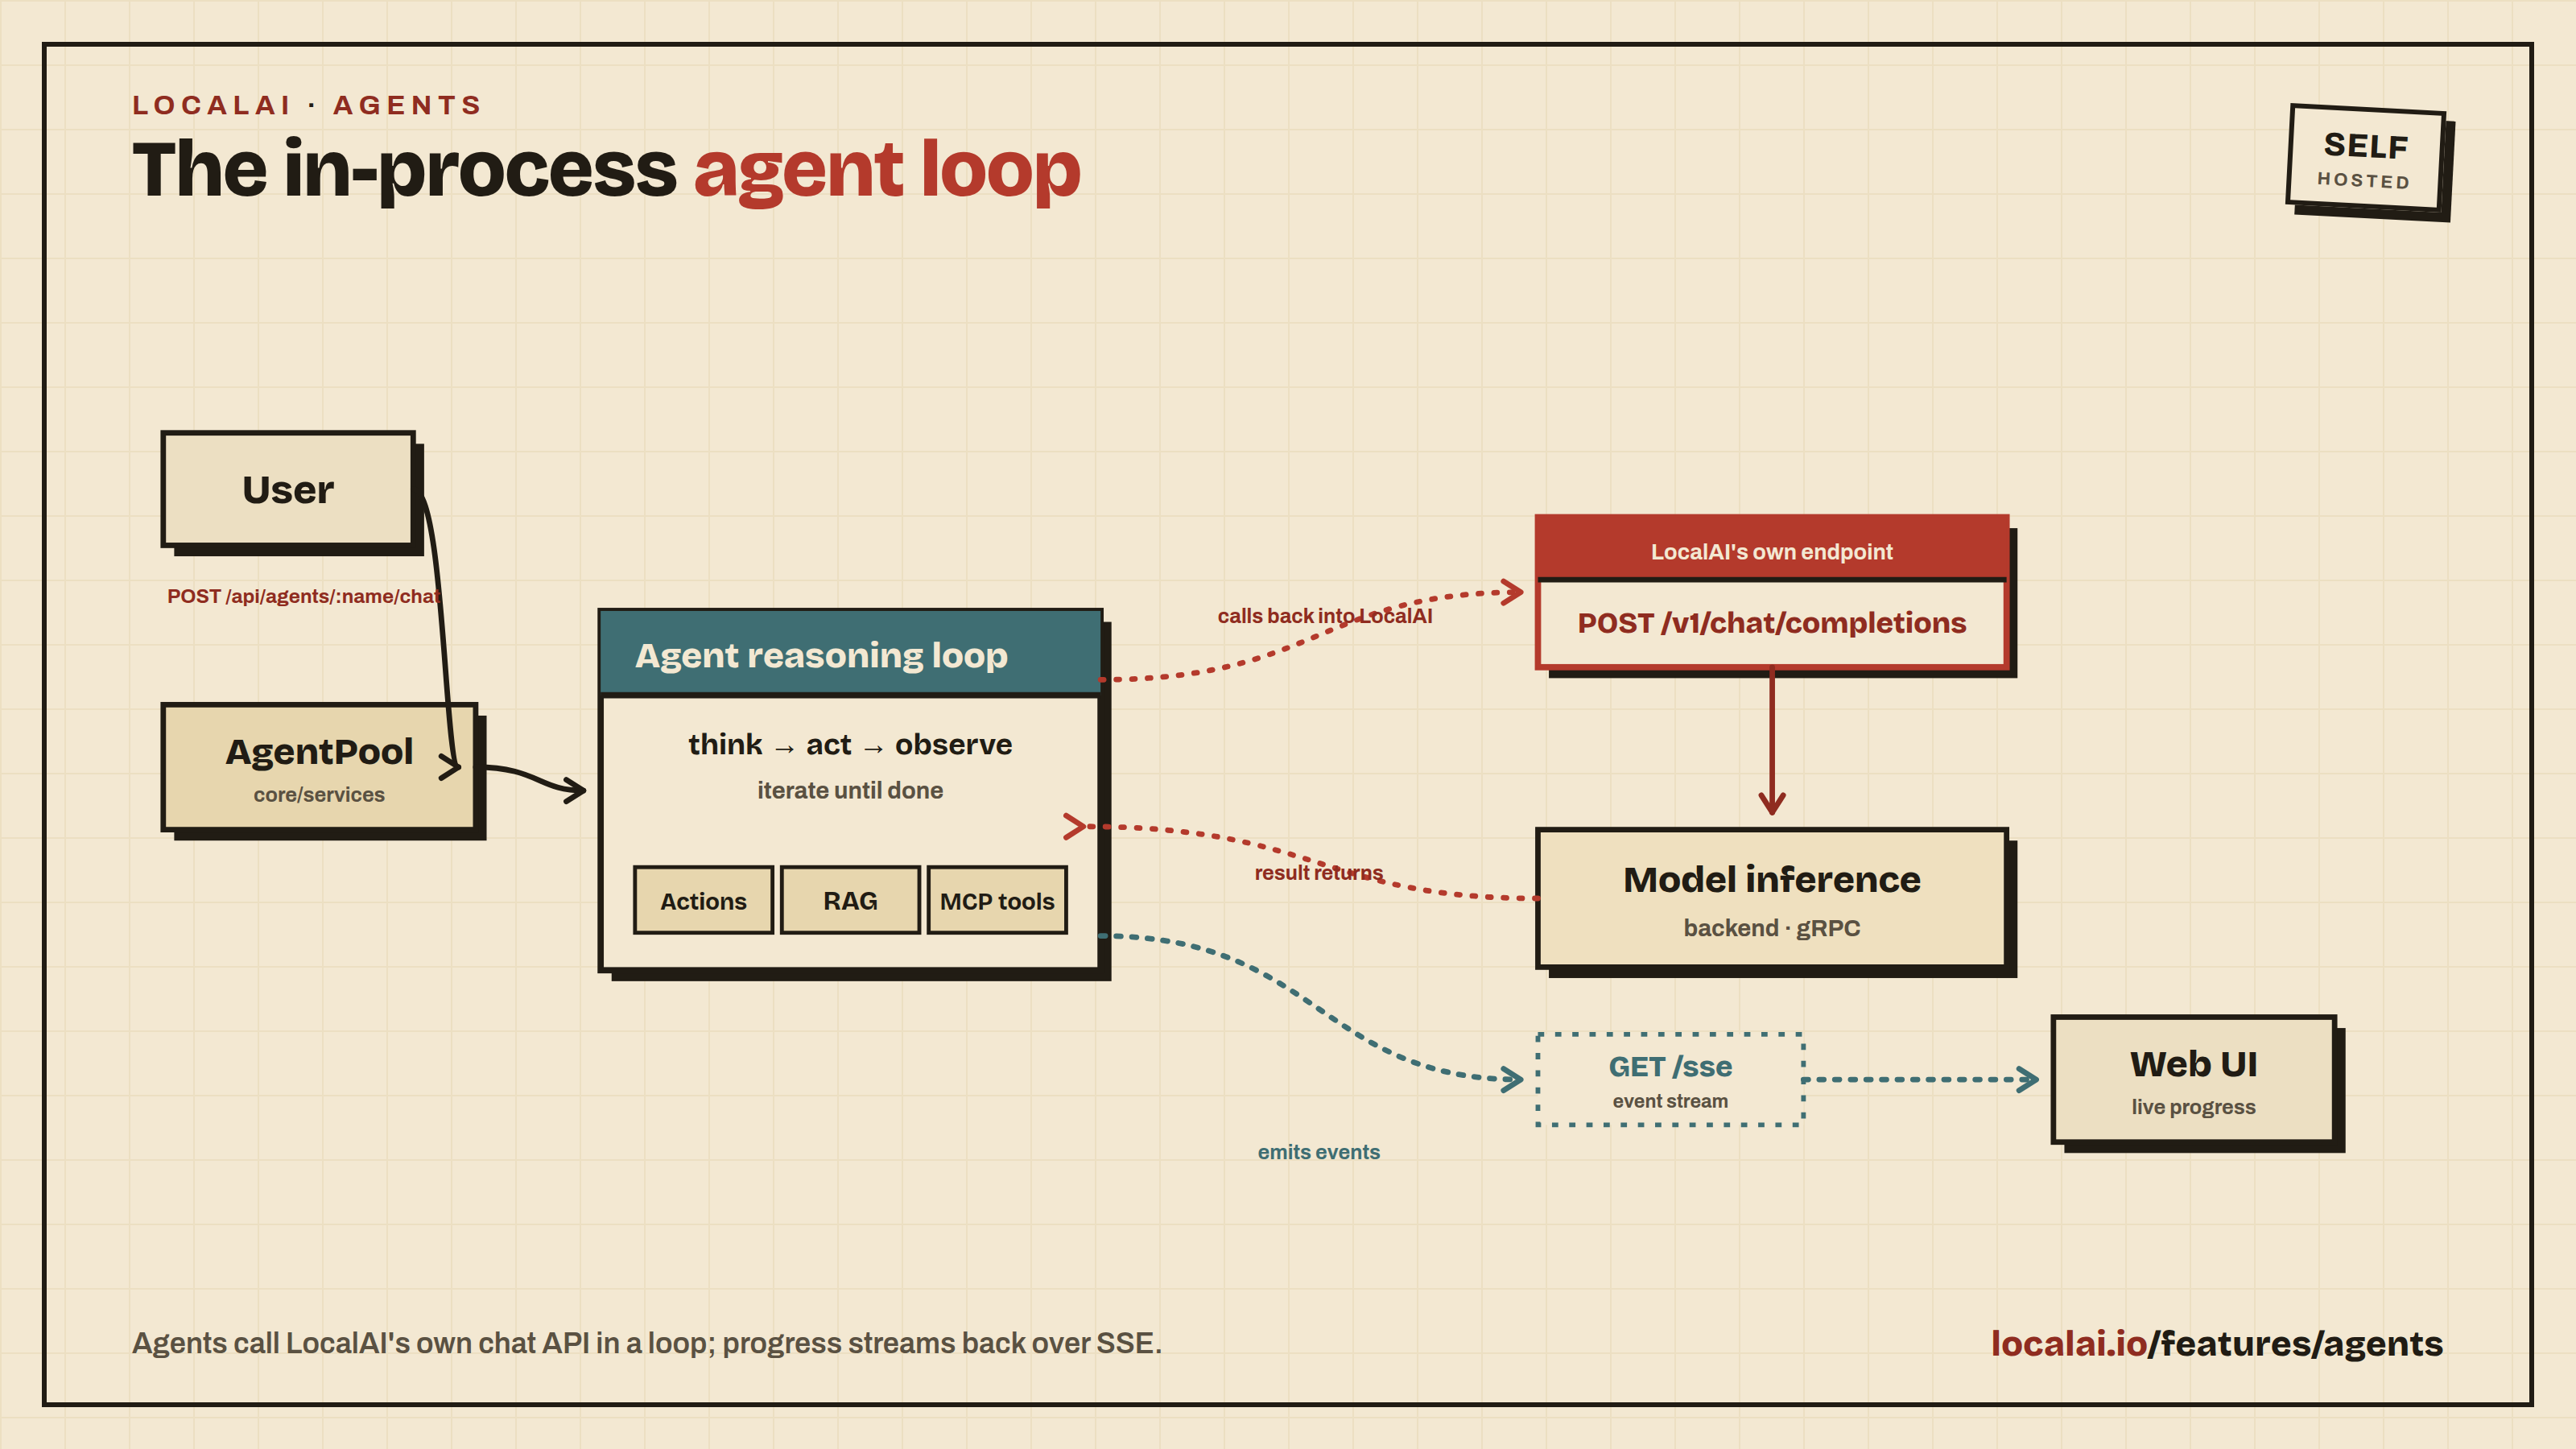
Agents run in-process within LocalAI. By default, each agent calls back into LocalAI’s own API (http://127.0.0.1:<port>/v1/chat/completions) for LLM inference. This means:
No external dependencies - everything runs in a single binary
Agents use the same models loaded in LocalAI
Per-agent overrides allow pointing individual agents to external providers
Agent state is persisted to disk and restored on restart
User → POST /api/agents/:name/chat → LocalAI
  → AgentPool → Agent reasoning loop
    → POST /v1/chat/completions (self-referencing)
      → LocalAI model inference → response
        → SSE events → GET /api/agents/:name/sse → UI
Agent actions
Actions are the tools an agent can call while it reasons: search the web, open a browser, read or write a GitHub repository, generate an image, remember a fact, and so on. This page lists the actions that ship with LocalAI (through the embedded LocalAGI library) and explains how to enable one on an agent.
For an end-to-end first run, see /getting-started/first-agent/. For the agent platform overview, see /features/agents/.
Enabling an action on an agent
Actions are attached per agent, not globally.
In the web UI: open the Agents page, edit an agent, and add actions in its configuration. Each action exposes its own configuration fields (for example an API token or a target repository) that you fill in when you add it.
In an agent config (JSON): an agent’s exported configuration lists its enabled actions and their settings, so an imported agent carries its actions with it.
Some actions need credentials or external configuration to work (a GitHub token, SMTP server details, a Telegram bot token). An action that is enabled but missing its required configuration will fail at call time, not when you add it. If an imported agent will not run, a missing action credential is one of the things to check (see the checklist in /getting-started/first-agent/).
Discovering the current catalog at runtime
The set of built-in actions is served by the API, so it always reflects the version you are running:
curl http://localhost:8080/api/agents/actions
This returns the list of available action names. Two related endpoints describe and run a single action:
POST /api/agents/actions/{name}/definition returns the action’s parameter/configuration schema (send a JSON body with an optional config object).
POST /api/agents/actions/{name}/run executes the action directly (JSON body with config and params), which is useful for testing an action’s configuration outside an agent conversation.
Custom actions
You can add your own actions without rebuilding LocalAI by pointing it at a directory of custom action definitions:
LOCALAI_AGENT_POOL_CUSTOM_ACTIONS_DIR=/path/to/custom-actions local-ai run
Actions found in that directory become available to agents alongside the built-in ones.
Built-in actions
The actions below ship with LocalAI. The exact catalog can change between releases, so treat GET /api/agents/actions (and the Agents UI action picker) as the source of truth for the version you are running.
Web and knowledge
Action
What it does
Typically requires
search
Web search.
Search provider configuration.
browse
Browse a web page (fetch and read its content).
None.
scraper
Scrape structured content from a page.
None.
wikipedia
Look up an article on Wikipedia.
None.
Content generation
Action
What it does
Typically requires
generate_image
Generate an image (through LocalAI’s own image endpoint).
An installed image-generation model.
generate_song
Generate audio/music.
An installed audio-generation model.
generate_pdf
Produce a PDF document.
None.
Memory
Action
What it does
Typically requires
add_to_memory
Store a fact in the agent’s memory.
Agent memory/knowledge base enabled.
list_memory
List stored memories.
Agent memory enabled.
search_memory
Search stored memories.
Agent memory enabled.
remove_from_memory
Remove a stored memory.
Agent memory enabled.
Reminders
Action
What it does
Typically requires
set_reminder
Set a reminder.
None.
list_reminders
List reminders.
None.
remove_reminder
Remove a reminder.
None.
Messaging and notifications
Action
What it does
Typically requires
send-mail
Send an email.
SMTP server and credentials.
send-telegram-message
Send a Telegram message.
A Telegram bot token.
twitter-post
Post to X/Twitter.
X/Twitter API credentials.
webhook
Call an outbound webhook.
The target webhook URL.
GitHub
All GitHub actions authenticate with a GitHub token and (for most) a target owner/repository.
LocalAI now supports the Model Context Protocol (MCP), enabling powerful agentic capabilities by connecting AI models to external tools and services. This feature allows your LocalAI models to interact with various MCP servers, providing access to real-time data, APIs, and specialized tools.
Info
Looking for something else? LocalAI has three related agentic features that are easy to confuse:
MCP (this page): a way to give a model external tools through the Model Context Protocol.
Agents (/features/agents/): autonomous agents you build that reason, use tools, and act on their own.
LocalAI Assistant (/features/localai-assistant/): an admin chat modality for administering LocalAI itself (install models, manage backends) by chatting.
What is MCP?
The Model Context Protocol is a standard for connecting AI models to external tools and data sources. It enables AI agents to:
Access real-time information from external APIs
Execute commands and interact with external systems
Use specialized tools for specific tasks
Maintain context across multiple tool interactions
Key Features
Real-time Tool Access: Connect to external MCP servers for live data
Multiple Server Support: Configure both remote HTTP and local stdio servers
Cached Connections: Efficient tool caching for better performance
Secure Authentication: Support for bearer token authentication
Multi-endpoint Support: Works with OpenAI Chat, Anthropic Messages, and Open Responses APIs
Selective Server Activation: Use metadata.mcp_servers to enable only specific servers per request
Server-side Tool Execution: Tools are executed on the server and results fed back to the model automatically
Agent Configuration: Customizable execution limits and retry behavior
MCP Prompts: Discover and expand reusable prompt templates from MCP servers
MCP Resources: Browse and inject resource content (files, data) from MCP servers into conversations
Configuration
MCP support is configured in your model’s YAML configuration file using the mcp section:
max_iterations: Maximum number of MCP tool execution loop iterations (default: 10). Each iteration allows the model to call tools and receive results before generating the next response.
Agent-scoped MCP servers
The mcp: block above attaches MCP servers to a model: every request that uses that model config can reach those tools. LocalAI’s agents can also attach MCP servers to a single agent, independent of the model it runs on. This is the mechanism the Agents feature advertises as “MCP Servers”.
Use model-scoped MCP (the mcp: block in a model YAML) when the tools belong to the model itself and every caller of that model should get them. Use agent-scoped MCP when only one agent should have a given tool, or when different agents sharing the same model need different tools.
Agent-scoped MCP servers are configured per agent, not in a model YAML:
In the web UI: open the Agents page, edit an agent, and fill in its MCP Servers (remote HTTP servers) and MCP STDIO Servers (local command servers) fields. The JSON shape is the same mcpServers map used above.
In an agent config (JSON): the agent stores remote servers under mcp_servers and local command servers under mcp_stdio_servers, so an exported/imported agent carries its MCP servers with it.
An agent-scoped MCP server that is unreachable is a common reason an imported agent’s tool “times out or is unavailable”; see the checklist in /getting-started/first-agent/.
Usage
Selecting MCP Servers via metadata
All API endpoints support MCP server selection through the standard metadata field. Pass a comma-separated list of server names in metadata.mcp_servers:
When present: Only the named MCP servers are activated for this request. Server names must match the keys in the model’s MCP config YAML (e.g., "weather-api", "search-engine").
When absent: Behavior depends on the endpoint:
OpenAI Chat Completions and Anthropic Messages: No MCP tools are injected (standard behavior).
Open Responses: If the model has MCP config and no user-provided tools, all MCP servers are auto-activated (backward compatible).
The mcp_servers metadata key is consumed by the MCP engine and stripped before reaching the backend. Clients that support the standard metadata field can use this without custom schema extensions.
API Endpoints
MCP tools work across all three API endpoints:
OpenAI Chat Completions (/v1/chat/completions)
curl http://localhost:8080/v1/chat/completions \
-H "Content-Type: application/json"\
-d '{
"model": "my-mcp-model",
"messages": [{"role": "user", "content": "What is the weather in New York?"}],
"metadata": {"mcp_servers": "weather-api"},
"stream": true
}'
Anthropic Messages (/v1/messages)
curl http://localhost:8080/v1/messages \
-H "Content-Type: application/json"\
-d '{
"model": "my-mcp-model",
"max_tokens": 1024,
"messages": [{"role": "user", "content": "What is the weather in New York?"}],
"metadata": {"mcp_servers": "weather-api"}
}'
Open Responses (/v1/responses)
curl http://localhost:8080/v1/responses \
-H "Content-Type: application/json"\
-d '{
"model": "my-mcp-model",
"input": "What is the weather in New York?",
"metadata": {"mcp_servers": "weather-api"}
}'
Server Listing Endpoint
You can list available MCP servers and their tools for a given model:
Resource contents are appended to the last user message as text blocks (following the same approach as llama.cpp’s WebUI).
Legacy Endpoint
The /mcp/v1/chat/completions endpoint is still supported for backward compatibility. It automatically enables all configured MCP servers (equivalent to not specifying mcp_servers).
curl http://localhost:8080/mcp/v1/chat/completions \
-H "Content-Type: application/json"\
-d '{
"model": "my-mcp-model",
"messages": [
{"role": "user", "content": "What is the current weather in New York?"}
]
}'
Example Response
{
"id": "chatcmpl-123",
"created": 1699123456,
"model": "my-mcp-model",
"choices": [
{
"text": "The current weather in New York is 72°F (22°C) with partly cloudy skies." }
],
"object": "text_completion"}
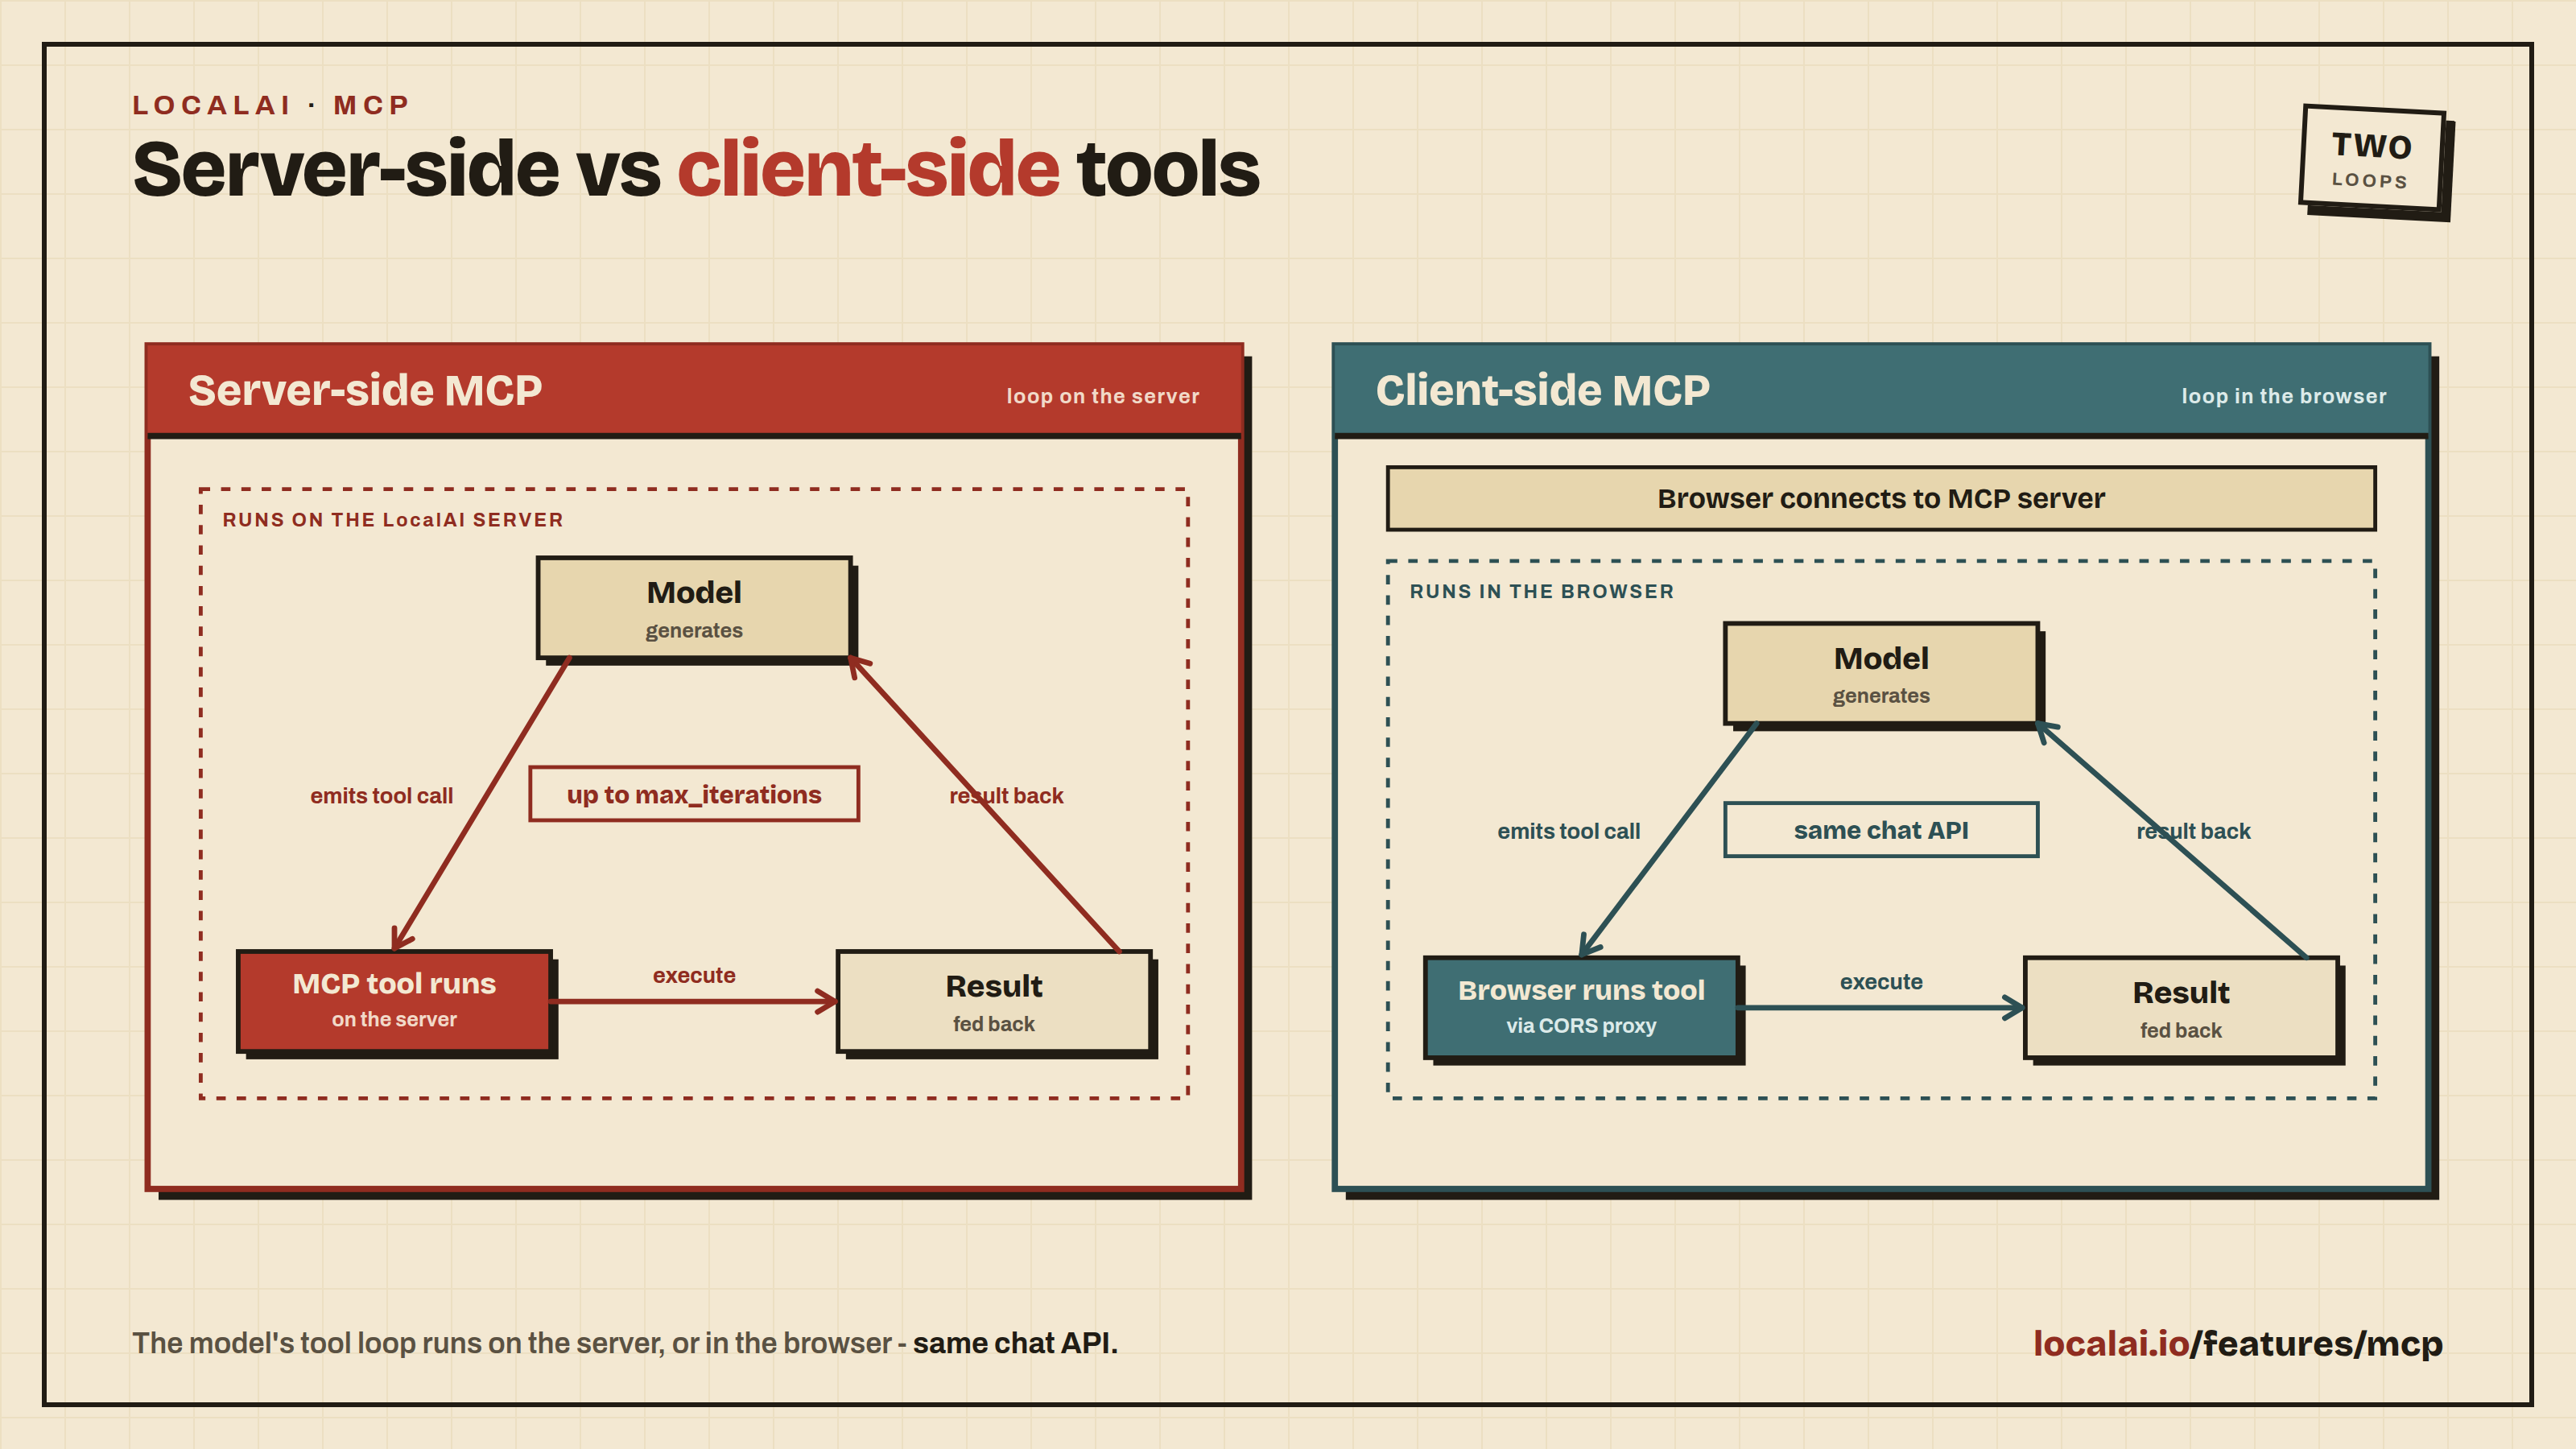
Tool Discovery: LocalAI connects to configured MCP servers and discovers available tools
Tool Injection: Discovered tools are injected into the model’s tool/function list alongside any user-provided tools
Inference Loop: The model generates a response. If it calls MCP tools, LocalAI executes them server-side, appends results to the conversation, and re-runs inference
Response Generation: When the model produces a final response (no more MCP tool calls), it is returned to the client
The execution loop is bounded by agent.max_iterations (default 10) to prevent infinite loops.
Session Lifecycle
MCP sessions are automatically managed by LocalAI:
Lazy initialization: Sessions are created the first time a model’s MCP tools are used
Cached per model: Sessions are reused across requests for the same model
Cleanup on model unload: When a model is unloaded (idle watchdog eviction, manual stop, or shutdown), all associated MCP sessions are closed and resources freed
Graceful shutdown: All MCP sessions are closed when LocalAI shuts down
This means you don’t need to manually manage MCP connections - they follow the model’s lifecycle automatically.
Supported MCP Servers
LocalAI is compatible with any MCP-compliant server.
Best Practices
Security
Use environment variables for sensitive tokens
Validate MCP server endpoints before deployment
Implement proper authentication for remote servers
Performance
Cache frequently used tools
Use appropriate timeout values for external APIs
Monitor resource usage for stdio servers
Error Handling
Implement fallback mechanisms for tool failures
Log tool execution for debugging
Handle network timeouts gracefully
With External Applications
Use MCP-enabled models in your applications:
import openai
client = openai.OpenAI(
base_url="http://localhost:8080/v1",
api_key="your-api-key")
response = client.chat.completions.create(
model="my-mcp-model",
messages=[
{"role": "user", "content": "Analyze the latest research papers on AI"}
],
extra_body={"metadata": {"mcp_servers": "search-engine"}}
)
MCP and adding packages
It might be handy to install packages before starting the container to setup the environment. This is an example on how you can do that with docker-compose (installing and configuring docker)
In addition to server-side MCP (where the backend connects to MCP servers), LocalAI supports client-side MCP where the browser connects directly to MCP servers. This is inspired by llama.cpp’s WebUI and works alongside server-side MCP.
How It Works
Add servers in the UI: Click the “Client MCP” button in the chat header and add MCP server URLs
Browser connects directly: The browser uses the MCP TypeScript SDK (StreamableHTTPClientTransport or SSEClientTransport) to connect to MCP servers
Tool discovery: Connected servers’ tools are sent as tools in the chat request body
Browser-side execution: When the LLM calls a client-side tool, the browser executes it against the MCP server and sends the result back in a follow-up request
Agentic loop: This continues (up to 10 turns) until the LLM produces a final response
CORS Proxy
Since browsers enforce CORS restrictions, LocalAI provides a built-in proxy at /api/cors-proxy. When “Use CORS proxy” is enabled (default), requests to external MCP servers are routed through:
The proxy forwards the request method, headers, and body to the target URL and streams the response back with appropriate CORS headers.
MCP Apps (Interactive Tool UIs)
LocalAI supports the MCP Apps extension, which allows MCP tools to declare interactive HTML UIs. When a tool has _meta.ui.resourceUri in its definition, calling that tool renders the app’s HTML inline in the chat as a sandboxed iframe.
How it works:
When the LLM calls a tool with _meta.ui.resourceUri, the browser fetches the HTML resource from the MCP server and renders it in an iframe
The iframe is sandboxed (allow-scripts allow-forms, no allow-same-origin) for security
The app can call server tools, send messages, and update context via the AppBridge protocol (JSON-RPC over postMessage)
Tools marked as app-only (_meta.ui.visibility: "app-only") are hidden from the LLM and only callable by the app iframe
On page reload, apps render statically until the MCP connection is re-established
Requirements:
Only works with client-side MCP connections (the browser must be connected to the MCP server)
The MCP server must implement the Apps extension (_meta.ui.resourceUri on tools, resource serving)
Coexistence with Server-Side MCP
Both modes work simultaneously in the same chat:
Server-side MCP tools are configured in model YAML files and executed by the backend. The backend handles these in its own agentic loop.
Client-side MCP tools are configured per-user in the browser and sent as tools in the request. When the LLM calls them, the browser executes them.
If both sides have a tool with the same name, the server-side tool takes priority.
Security Considerations
The CORS proxy can forward requests to any HTTP/HTTPS URL. It is only available when MCP is enabled (LOCALAI_DISABLE_MCP is not set).
Client-side MCP server configurations are stored in the browser’s localStorage and are not shared with the server.
Custom headers (e.g., API keys) for MCP servers are stored in localStorage. Use with caution on shared machines.
Disabling MCP Support
You can completely disable MCP functionality in LocalAI by setting the LOCALAI_DISABLE_MCP environment variable to true, 1, or yes:
export LOCALAI_DISABLE_MCP=true
When this environment variable is set, all MCP-related features will be disabled, including:
MCP server connections (both remote and stdio)
Agent tool execution
The /mcp/v1/chat/completions endpoint
This is useful when you want to:
Run LocalAI without MCP capabilities for security reasons
Reduce the attack surface by disabling unnecessary features
Troubleshoot MCP-related issues
Example
# Disable MCP completelyLOCALAI_DISABLE_MCP=true localai run
# Or in Dockerdocker run -e LOCALAI_DISABLE_MCP=true localai/localai:latest
When MCP is disabled, any model configuration with mcp sections will be ignored, and attempts to use the MCP endpoint will return an error indicating that MCP support is disabled.
LocalAI Assistant
Info
Looking for something else? LocalAI has three related agentic features that are easy to confuse:
LocalAI Assistant (this page): an admin chat modality for administering LocalAI itself (install models, manage backends) by chatting.
Agents (/features/agents/): autonomous agents you build that reason, use tools, and act on their own.
MCP (/features/mcp/): a way to give a model external tools through the Model Context Protocol.
LocalAI Assistant is an admin-only chat modality. When enabled on a chat session, the conversation is wired to an in-process MCP server that exposes LocalAI’s own admin/management surface as tools. You can install models, manage backends, edit model configs and check system status by chatting, with no REST calls or YAML edits.
The same MCP server is published as a Go package and can also be served over stdio to control a remote LocalAI instance from outside (e.g. from a desktop MCP host, Cursor, or mcphost).
Enabling the assistant in chat
Open the chat UI as an admin user and pick a chat-capable model in the model selector. The header shows a Manage toggle - flip it on, and a Manage mode badge appears next to the chat title. Starter chips (“What is installed?”, “Install a chat model”, “Show system status”, “Update a backend”) help you get going.
The home page also exposes a Manage by chat CTA that opens a fresh chat already in Manage mode.
Once on, try:
Install Qwen 3 chat
The assistant searches the gallery, lists candidates, asks you to pick, summarises the install, and waits for your confirmation before calling install_model. While the install runs, it polls progress and reports the outcome.
Disabling the feature
Either toggle it off in Settings → LocalAI Assistant (takes effect without restart), or hard-disable at startup:
LOCALAI_DISABLE_ASSISTANT=true local-ai run
When disabled, the chat handler refuses requests with metadata.localai_assistant=true and returns 503. The Manage toggle is hidden in the UI.
Security model
The chat toggle is hidden for non-admin users.
The chat handler re-checks admin role at request time even when auth is configured to skip the assistant feature gate (defense in depth).
The MCP server itself is in-process - there is no localhost loopback, no synthetic API key, and no extra TCP socket.
Mutating tools (install_model, delete_model, edit_model_config, upgrade_backend, …) are guarded by a system-prompt rule that requires the LLM to confirm the action with the user before calling them. There is no separate code-side preview/apply step.
Standalone stdio MCP server
You can run the same admin tool surface as a stdio MCP server pointed at any LocalAI HTTP API:
local-ai mcp-server --target http://remote.localai:8080 --api-key <admin-key>
# read-only mode - skips registration of every mutating toollocal-ai mcp-server --target http://remote.localai:8080 --read-only
Useful for hooking LocalAI admin into Claude Desktop, Cursor, or any MCP host. The tool catalog is identical to the in-process variant.
Mutating (require user confirmation per the assistant’s safety prompt): install_model, import_model_uri, delete_model, install_backend, upgrade_backend, edit_model_config, reload_models, toggle_model_state, toggle_model_pinned.
Adding new tools or skills
The MCP server lives at pkg/mcp/localaitools/. Tools are registered in tools_*.go; skill prompts (the markdown the LLM sees) are embedded from prompts/. To add a new admin tool, add a method to the LocalAIClient interface plus implementations in inproc/ and httpapi/, then register the tool and add or update a skill prompt. See .agents/localai-assistant-mcp.md for the full contributor checklist.
Audio to Text
Audio to text models are models that can generate text from an audio file.
The transcription endpoint allows to convert audio files to text. The endpoint supports multiple backends:
whisper.cpp: A C++ library for audio transcription (default)
moonshine: Ultra-fast transcription engine optimized for low-end devices
faster-whisper: Fast Whisper implementation with CTranslate2
parakeet-cpp: A C++/ggml port of NVIDIA NeMo Parakeet (FastConformer TDT/CTC/RNNT/hybrid). Runs quantized GGUFs on CPU or GPU, emits word-level timestamps, and supports cache-aware streaming (the realtime_eou model surfaces end-of-utterance events).
llama-cpp: Route transcription to any multimodal-audio GGUF model served by the llama-cpp backend (e.g. Qwen3-ASR, Voxtral, Qwen2-Audio). Under the hood the request is converted into a chat completion with the audio attached via the model’s audio encoder - the same path the upstream llama.cpp server uses. Set backend: llama-cpp in the model YAML and point mmproj at the matching audio encoder.
voxtral: Voxtral-family models served by a dedicated backend
The endpoint input supports all the audio formats supported by ffmpeg.
Looking for “who spoke when” instead of a flat transcript? See Speaker Diarization - /v1/audio/diarization returns time-stamped speaker segments and supports the rttm format used by pyannote.metrics.
Usage
Once LocalAI is started and whisper models are installed, you can use the /v1/audio/transcriptions API endpoint.
The transcriptions endpoint then can be tested like so:
## Get an example audio filewget --quiet --show-progress -O gb1.ogg https://upload.wikimedia.org/wikipedia/commons/1/1f/George_W_Bush_Columbia_FINAL.ogg
## Send the example audio file to the transcriptions endpointcurl http://localhost:8080/v1/audio/transcriptions -H "Content-Type: multipart/form-data" -F file="@$PWD/gb1.ogg" -F model="whisper-1"
Result:
{
"segments":[{"id":0,"start":0,"end":9640000000,"text":" My fellow Americans, this day has brought terrible news and great sadness to our country.","tokens":[50364,1222,7177,6280,11,341,786,575,3038,6237,2583,293,869,22462,281,527,1941,13,50846]},{"id":1,"start":9640000000,"end":15960000000,"text":" At 9 o'clock this morning, Mission Control and Houston lost contact with our Space Shuttle","tokens":[1711,1722,277,6,9023,341,2446,11,20170,12912,293,18717,2731,3385,365,527,8705,13870,10972,51162]},{"id":2,"start":15960000000,"end":16960000000,"text":" Columbia.","tokens":[17339,13,51212]},{"id":3,"start":16960000000,"end":24640000000,"text":" A short time later, debris was seen falling from the skies above Texas.","tokens":[316,2099,565,1780,11,21942,390,1612,7440,490,264,25861,3673,7885,13,51596]},{"id":4,"start":24640000000,"end":27200000000,"text":" The Columbia's lost.","tokens":[440,17339,311,2731,13,51724]},{"id":5,"start":27200000000,"end":29920000000,"text":" There are no survivors.","tokens":[821,366,572,18369,13,51860]},{"id":6,"start":29920000000,"end":32920000000,"text":" And board was a crew of seven.","tokens":[50364,400,3150,390,257,7260,295,3407,13,50514]},{"id":7,"start":32920000000,"end":39780000000,"text":" Colonel Rick Husband, Lieutenant Colonel Michael Anderson, Commander Laurel Clark, Captain","tokens":[28478,11224,21282,4235,11,28412,28478,5116,18768,11,20857,27270,75,18572,11,10873,50857]},{"id":8,"start":39780000000,"end":50020000000,"text":" David Brown, Commander William McCool, Dr. Cooltna Chavla, and Elon Ramon, a Colonel","tokens":[4389,8030,11,20857,6740,4050,34,1092,11,2491,13,8561,83,629,761,706,875,11,293,28498,9078,266,11,257,28478,51369]},{"id":9,"start":50020000000,"end":52800000000,"text":" in the Israeli Air Force.","tokens":[294,264,19974,5774,10580,13,51508]},{"id":10,"start":52800000000,"end":58480000000,"text":" These men and women assumed great risk in the service to all humanity.","tokens":[1981,1706,293,2266,15895,869,3148,294,264,2643,281,439,10243,13,51792]},{"id":11,"start":58480000000,"end":63120000000,"text":" And an age when Space Flight has come to seem almost routine.","tokens":[50364,400,364,3205,562,8705,28954,575,808,281,1643,1920,9927,13,50596]},{"id":12,"start":63120000000,"end":68800000000,"text":" It is easy to overlook the dangers of travel by rocket and the difficulties of navigating","tokens":[467,307,1858,281,37826,264,27701,295,3147,538,13012,293,264,14399,295,32054,50880]},{"id":13,"start":68800000000,"end":72640000000,"text":" the fierce outer atmosphere of the Earth.","tokens":[264,25341,10847,8018,295,264,4755,13,51072]},{"id":14,"start":72640000000,"end":78040000000,"text":" These astronauts knew the dangers and they faced them willingly.","tokens":[1981,28273,2586,264,27701,293,436,11446,552,44675,13,51342]},{"id":15,"start":78040000000,"end":83040000000,"text":" Knowing they had a high and noble purpose in life.","tokens":[25499,436,632,257,1090,293,20171,4334,294,993,13,51592]},{"id":16,"start":83040000000,"end":90800000000,"text":" Because of their courage and daring and idealism, we will miss them all the more.","tokens":[50364,1436,295,641,9892,293,43128,293,7157,1434,11,321,486,1713,552,439,264,544,13,50752]},{"id":17,"start":90800000000,"end":96560000000,"text":" All Americans today are thinking as well of the families of these men and women who have","tokens":[1057,6280,965,366,1953,382,731,295,264,4466,295,613,1706,293,2266,567,362,51040]},{"id":18,"start":96560000000,"end":100440000000,"text":" been given this sudden shock in grief.","tokens":[668,2212,341,3990,5588,294,18998,13,51234]},{"id":19,"start":100440000000,"end":102400000000,"text":" You're not alone.","tokens":[509,434,406,3312,13,51332]},{"id":20,"start":102400000000,"end":105440000000,"text":" Our entire nation agrees with you.","tokens":[2621,2302,4790,26383,365,291,13,51484]},{"id":21,"start":105440000000,"end":112360000000,"text":" And those you loved will always have the respect and gratitude of this country.","tokens":[400,729,291,4333,486,1009,362,264,3104,293,16935,295,341,1941,13,51830]},{"id":22,"start":112360000000,"end":116600000000,"text":" The cause in which they died will continue.","tokens":[50364,440,3082,294,597,436,4539,486,2354,13,50576]},{"id":23,"start":116600000000,"end":124240000000,"text":" Man kind is led into the darkness beyond our world by the inspiration of discovery and the","tokens":[2458,733,307,4684,666,264,11262,4399,527,1002,538,264,10249,295,12114,293,264,50958]},{"id":24,"start":124240000000,"end":127000000000,"text":" longing to understand.","tokens":[35050,281,1223,13,51096]},{"id":25,"start":127000000000,"end":131160000000,"text":" Our journey into space will go on.","tokens":[2621,4671,666,1901,486,352,322,13,51304]},{"id":26,"start":131160000000,"end":136480000000,"text":" In the skies today, we saw destruction and tragedy.","tokens":[682,264,25861,965,11,321,1866,13563,293,18563,13,51570]},{"id":27,"start":136480000000,"end":142080000000,"text":" As farther than we can see, there is comfort and hope.","tokens":[1018,20344,813,321,393,536,11,456,307,3400,293,1454,13,51850]},{"id":28,"start":142080000000,"end":149800000000,"text":" In the words of the prophet Isaiah, lift your eyes and look to the heavens who created","tokens":[50364,682,264,2283,295,264,18566,27263,11,5533,428,2575,293,574,281,264,26011,567,2942,50750]},{"id":29,"start":149800000000,"end":151640000000,"text":" all these.","tokens":[439,613,13,50842]},{"id":30,"start":151640000000,"end":159960000000,"text":" He who brings out the story hosts one by one and calls them each by name because of his great","tokens":[634,567,5607,484,264,1657,21573,472,538,472,293,5498,552,1184,538,1315,570,295,702,869,51258]},{"id":31,"start":159960000000,"end":163400000000,"text":" power and mighty strength.","tokens":[1347,293,21556,3800,13,51430]},{"id":32,"start":163400000000,"end":166400000000,"text":" Not one of them is missing.","tokens":[1726,472,295,552,307,5361,13,51580]},{"id":33,"start":166400000000,"end":173600000000,"text":" The same creator who names the stars also knows the names of the seven souls we mourn","tokens":[50364,440,912,14181,567,5288,264,6105,611,3255,264,5288,295,264,3407,16588,321,22235,77,50724]},{"id":34,"start":173600000000,"end":175600000000,"text":" today.","tokens":[965,13,50824]},{"id":35,"start":175600000000,"end":183160000000,"text":" The crew of the shuttle Columbia did not return safely to earth yet we can pray that all","tokens":[440,7260,295,264,26728,17339,630,406,2736,11750,281,4120,1939,321,393,3690,300,439,51202]},{"id":36,"start":183160000000,"end":185840000000,"text":" are safely home.","tokens":[366,11750,1280,13,51336]},{"id":37,"start":185840000000,"end":192600000000,"text":" May God bless the grieving families and may God continue to bless America.","tokens":[1891,1265,5227,264,48454,4466,293,815,1265,2354,281,5227,3374,13,51674]},{"id":38,"start":196400000000,"end":206400000000,"text":" [BLANK_AUDIO]","tokens":[50364,542,37592,62,29937,60,50864]}],
"text":"My fellow Americans, this day has brought terrible news and great sadness to our country. At 9 o'clock this morning, Mission Control and Houston lost contact with our Space Shuttle Columbia. A short time later, debris was seen falling from the skies above Texas. The Columbia's lost. There are no survivors. And board was a crew of seven. Colonel Rick Husband, Lieutenant Colonel Michael Anderson, Commander Laurel Clark, Captain David Brown, Commander William McCool, Dr. Cooltna Chavla, and Elon Ramon, a Colonel in the Israeli Air Force. These men and women assumed great risk in the service to all humanity. And an age when Space Flight has come to seem almost routine. It is easy to overlook the dangers of travel by rocket and the difficulties of navigating the fierce outer atmosphere of the Earth. These astronauts knew the dangers and they faced them willingly. Knowing they had a high and noble purpose in life. Because of their courage and daring and idealism, we will miss them all the more. All Americans today are thinking as well of the families of these men and women who have been given this sudden shock in grief. You're not alone. Our entire nation agrees with you. And those you loved will always have the respect and gratitude of this country. The cause in which they died will continue. Man kind is led into the darkness beyond our world by the inspiration of discovery and the longing to understand. Our journey into space will go on. In the skies today, we saw destruction and tragedy. As farther than we can see, there is comfort and hope. In the words of the prophet Isaiah, lift your eyes and look to the heavens who created all these. He who brings out the story hosts one by one and calls them each by name because of his great power and mighty strength. Not one of them is missing. The same creator who names the stars also knows the names of the seven souls we mourn today. The crew of the shuttle Columbia did not return safely to earth yet we can pray that all are safely home. May God bless the grieving families and may God continue to bless America. [BLANK_AUDIO]"}
You can also specify the response_format parameter to be one of lrc, srt, vtt, text, json or verbose_json (default):
## Send the example audio file to the transcriptions endpointcurl http://localhost:8080/v1/audio/transcriptions -H "Content-Type: multipart/form-data" -F file="@$PWD/gb1.ogg" -F model="whisper-1" -F response_format="srt"
Result (first few lines):
1
00:00:00,000 --> 00:00:09,640
My fellow Americans, this day has brought terrible news and great sadness to our country.

2
00:00:09,640 --> 00:00:15,960
At 9 o'clock this morning, Mission Control and Houston lost contact with our Space Shuttle

3
00:00:15,960 --> 00:00:16,960
Columbia.

4
00:00:16,960 --> 00:00:24,640
A short time later, debris was seen falling from the skies above Texas.

5
00:00:24,640 --> 00:00:27,200
The Columbia's lost.

6
00:00:27,200 --> 00:00:29,920
There are no survivors.
Supported request parameters
In addition to file and model, the endpoint accepts the following multipart form fields, matching the OpenAI audio transcription API:
Field
Description
language
ISO-639-1 language hint (e.g. en). Passed through to the backend.
prompt
Optional context hint to bias the decoder.
temperature
Sampling temperature (float). Honored by backends that support it.
timestamp_granularities[]
Multi-value form field: word and/or segment. Honored when the backend produces the requested granularity.
response_format
One of json (default for backwards-compat), verbose_json, text, srt, vtt, lrc.
stream
When true, the endpoint emits an SSE stream of transcript.text.delta events followed by a final transcript.text.done event.
The response body for verbose_json includes text, language, duration, and segments[] (with speaker populated when diarization is enabled).
Streaming transcriptions
Set -F stream=true to receive token-by-token SSE events as the backend produces them. The event shape matches the OpenAI streaming transcription format:
data: {"type":"transcript.text.delta","delta":"And so, my"}

data: {"type":"transcript.text.delta","delta":" fellow Americans..."}

data: {"type":"transcript.text.done","text":"And so, my fellow Americans..."}

data: [DONE]
Backends that do not natively stream tokens fall back to emitting one delta plus a done event with the full text - the SSE contract is identical either way.
Using the llama-cpp backend with an audio-capable model
Any GGUF model whose mmproj contains an audio encoder can be used for transcription via the llama-cpp backend. This reuses the model’s own audio front-end rather than shelling out to whisper.cpp, which is useful when you want a single backend serving both chat-with-audio and transcription.
parakeet.cpp is a C++/ggml port of NVIDIA NeMo Parakeet that matches the upstream PyTorch models on CPU. GGUF weights for every model and quant are published in a single repo, mudler/parakeet-cpp-gguf. F16 is the recommended default, and Q4_K stays near-lossless on the small models. The easiest path is to import directly (the GGUFs auto-detect to this backend):
For real-time use, load a cache-aware streaming model (e.g. realtime_eou_120m-v1-*.gguf) and pass -F stream=true. Deltas are emitted as the audio is decoded, with end-of-utterance events closing each segment.
Segment timestamps
Transcriptions are split into segments the same way NVIDIA NeMo does: a new segment starts after sentence-ending punctuation (., ?, !), and each segment carries start/end times. This is the default (NeMo’s punctuation-only segmentation) and needs no configuration. While streaming, each end-of-utterance closes a segment, now with timestamps.
You can additionally split on silence by setting segment_gap_threshold (NeMo’s segment_gap_threshold, in encoder frames; off by default). When set, a gap between two words wider than the threshold also starts a new segment. The value is in frames to match NeMo exactly; the backend converts it to seconds using the model’s frame stride (frame_sec, reported by the engine):
The backend can coalesce concurrent transcription requests into a single batched engine call, which improves throughput on GPU when many requests arrive at once. Batching is off by default (batch_max_size:1, one request at a time); raise it to opt in. Two options: knobs control it:
name: parakeet-110mbackend: parakeet-cppparameters:
model: tdt_ctc-110m-f16.ggufoptions:
- batch_max_size:8 # max requests coalesced into one batch (default 1 = off)- batch_max_wait_ms:15 # how long to wait to fill a batch, in ms (default 15)
By default each request runs on its own. Raise batch_max_size (for example 4 to 16) to enable batching; it pays off on GPU under concurrent load, where coalescing the per-step decode GEMMs across requests is a large throughput win. Leave it at 1 on CPU and for low-concurrency setups, where batching only adds latency. Batching only affects concurrent unary requests; streaming sessions always run on their own.
See also
Audio Transform - clean up the audio (echo cancellation, noise suppression, dereverberation) before passing it to a transcription model.
Administrators can manage reusable voice-cloning references from Operate → Voice Library in the LocalAI WebUI. The library replaces per-model filesystem and YAML setup for supported cloning backends:
Select Create voice and upload or record a clear reference clip.
Enter the exact words spoken in the clip. The transcript is sent to backends that require reference text.
Confirm that you have permission to clone the voice, then save the profile.
Open Text to Speech, choose a model marked Cloning ready, and select the saved voice.
The browser converts uploads and recordings to mono, 24 kHz, 16-bit PCM WAV so the same profile works across compatible backends. Clips must be between 1 and 120 seconds and no larger than 50 MiB; 6-30 seconds of clean, single-speaker audio is recommended. Profile audio is private biometric source material: LocalAI stores it below its configured data path, serves previews only to authenticated TTS users, and never returns its filesystem path.
Voice profile API
The WebUI uses the following endpoints. Creating and deleting profiles requires administrator access; listing profiles and playing previews requires access to the TTS feature.
Method
Endpoint
Purpose
GET
/api/voice-profiles
List saved profiles and their public metadata.
POST
/api/voice-profiles
Create a profile from multipart form data or JSON with base64 audio.
GET
/api/voice-profiles/{id}/audio
Stream the authenticated WAV preview, including range requests.
DELETE
/api/voice-profiles/{id}
Permanently delete a profile.
For example, an administrator can create a profile without the WebUI:
curl http://localhost:8080/api/voice-profiles \
-F 'name=Documentary narrator'\
-F 'language=en-US'\
-F 'transcript=The exact words spoken in this reference.'\
-F 'consent_confirmed=true'\
-F 'audio=@reference.wav;type=audio/wav'
The response includes an opaque voice reference such as localai://voice-profiles/550e8400-e29b-41d4-a716-446655440000. Pass that value as voice to either TTS-compatible endpoint:
curl http://localhost:8080/v1/audio/speech \
-H 'Content-Type: application/json'\
-d '{
"model": "qwen3-tts-base",
"input": "This sentence will use the saved voice.",
"voice": "localai://voice-profiles/550e8400-e29b-41d4-a716-446655440000"
}' --output speech.wav
LocalAI resolves the opaque reference only for models that advertise voice-cloning support. Existing named speakers, backend-specific voice IDs, and explicit model YAML voice configuration remain available for models and advanced workflows that do not use the library.
The Voice Library uses the same server-side capability resolver for installed models and gallery recommendations. Administrators can inspect the currently configured galleries without maintaining a separate backend list:
Each returned model includes a non-null voice_cloning contract. Variant checks are applied before the model is returned, so TTS-only CustomVoice, VoiceDesign, or preset-prompt variants are not offered as reference-audio models. When the WebUI detects that no compatible model is installed, it uses this response to offer direct installation.
Model configuration
Voice Library support is automatic for known backends and model variants. A custom model can override that detection with tts.voice_cloning:
name: private-qwen-basebackend: qwen3-tts-cppparameters:
model: private/qwen-talker-checkpoint.ggufknown_usecases:
- ttstts:
# Optional: omit this for automatic backend and variant detection.voice_cloning: true# Optional model-wide fallback when a request does not select a saved profile.audio_path: voices/default-reference.wavoptions:
- tokenizer:private/qwen-tokenizer.gguf
tts.voice_cloning has three states:
Value
Behavior
omitted
Detect support from the backend plus name, parameters.model, and compatibility options. This is recommended for gallery models.
true
Advertise Voice Library support for a custom-named variant of a backend that LocalAI already knows can clone voices. This cannot add cloning to an unsupported backend.
false
Hide the model from Voice Library compatibility results and reject localai://voice-profiles/... references for it. Backend-specific named voices and manual reference paths remain available.
The older options: ["voice_cloning:true"] and options: ["voice_cloning:false"] spellings remain accepted for compatibility. Prefer tts.voice_cloning; generic options may be forwarded to a backend, whereas the typed field is consumed only by LocalAI.
Reference selection follows this order:
A request voice, including a saved localai://voice-profiles/... URI.
The model’s tts.voice default.
The model’s tts.audio_path reference-audio fallback.
A backend-specific default voice or option.
When a saved profile is selected, LocalAI supplies both its private WAV and exact transcript for that request. It does not rewrite the model YAML or copy the recording into the model directory.
Reference-audio cloning models served by these dedicated backends.
qwen-tts, qwen3-tts-cpp, vllm-omni
Base or VoiceClone variants. CustomVoice and VoiceDesign variants are not raw reference-audio models.
vibevoice-cpp
1.5B reference-WAV variants. The realtime 0.5B preset-prompt model is excluded.
coqui
XTTS and YourTTS variants.
crispasr
F5-TTS variants. ASR, Piper, Orpheus, and other CrispASR model families are excluded.
This table describes the built-in resolver, not a frontend allowlist. Gallery entries and installed configs are evaluated by the server, and tts.voice_cloning can make a verified custom filename explicit.
Streaming TTS
LocalAI supports streaming TTS generation, allowing audio to be played as it’s generated. This is useful for real-time applications and reduces latency.
To enable streaming, add "stream": true to your request:
curl http://localhost:8080/tts -H "Content-Type: application/json" -d '{
  "input": "Hello world, this is a streaming test",
  "model": "voxcpm",
  "stream": true
}' | aplay
The audio will be streamed chunk-by-chunk as it’s generated, allowing playback to start before generation completes. This is particularly useful for long texts or when you want to minimize perceived latency.
You can also pipe the streamed audio directly to audio players like aplay (Linux) or save it to a file:
# Stream to aplay (Linux)curl http://localhost:8080/tts -H "Content-Type: application/json" -d '{
"input": "This is a longer text that will be streamed as it is generated",
"model": "voxcpm",
"stream": true
}' | aplay
# Stream to a filecurl http://localhost:8080/tts -H "Content-Type: application/json" -d '{
"input": "Streaming audio to file",
"model": "voxcpm",
"stream": true
}' > output.wav
Note: Streaming TTS is currently supported by the voxcpm backend. Other backends will fall back to non-streaming mode if streaming is not supported.
Backends
🐸 Coqui
Required: Don’t use LocalAI images ending with the -core tag,. Python dependencies are required in order to use this backend.
Coqui works without any configuration, to test it, you can run the following curl command:
    curl http://localhost:8080/tts -H "Content-Type: application/json" -d '{
        "backend": "coqui",
        "model": "tts_models/en/ljspeech/glow-tts",
        "input":"Hello, this is a test!"
        }'
You can use the env variable COQUI_LANGUAGE to set the language used by the coqui backend.
You can also use config files to configure tts models (see section below on how to use config files).
aplay is a Linux command. You can use other tools to play the audio file.
The model name is the filename with the extension.
The model name is case sensitive.
LocalAI must be compiled with the GO_TAGS=tts flag.
Transformers-musicgen
LocalAI also has experimental support for transformers-musicgen for the generation of short musical compositions. Currently, this is implemented via the same requests used for text to speech:
Future versions of LocalAI will expose additional control over audio generation beyond the text prompt.
ACE-Step
ACE-Step 1.5 is a music generation model that can create music from text descriptions, lyrics, or audio samples. It supports both simple text-to-music and advanced music generation with metadata like BPM, key scale, and time signature.
Setup
Install the ace-step-turbo model from the Model gallery or run local-ai models install ace-step-turbo.
Usage
ACE-Step supports two modes: Simple mode (text description + vocal language) and Advanced mode (caption, lyrics, BPM, key, and more).
Simple mode:
curl http://localhost:8080/v1/audio/speech -H "Content-Type: application/json" -d '{
  "model": "ace-step-turbo",
  "input": "A soft Bengali love song for a quiet evening",
  "vocal_language": "bn"
}' --output music.flac
Advanced mode (using the /v1/sound-generation endpoint):
curl http://localhost:8080/v1/sound-generation -H "Content-Type: application/json" -d '{
  "model": "ace-step-turbo",
  "caption": "A funky Japanese disco track",
  "lyrics": "[Verse 1]\n...",
  "bpm": 120,
  "keyscale": "Ab major",
  "language": "ja",
  "duration_seconds": 225
}' --output music.flac
Music and sound generation API (/v1/sound-generation)
The /v1/sound-generation endpoint is compatible with the ElevenLabs sound generation API and can produce music, sound effects, and other audio content. It responds with a binary audio file and the appropriate Content-Type header (for example audio/wav, audio/mpeg, audio/flac, or audio/ogg). The request body is JSON and supports two usage modes.
Simple mode:
Parameter
Type
Required
Description
model_id
string
Yes
Model identifier (for example ace-step-turbo)
text
string
Yes
Audio description or prompt
instrumental
bool
No
Generate instrumental audio (no vocals)
vocal_language
string
No
Language code for vocals (for example bn, ja)
Advanced mode:
Parameter
Type
Required
Description
model_id
string
Yes
Model identifier (for example ace-step-turbo)
text
string
Yes
Text prompt or description
duration_seconds
float
No
Target duration in seconds
prompt_influence
float
No
Temperature / prompt influence parameter
do_sample
bool
No
Enable sampling
think
bool
No
Enable extended thinking for generation
caption
string
No
Caption describing the audio
lyrics
string
No
Lyrics for the generated audio
bpm
int
No
Beats per minute
keyscale
string
No
Musical key/scale (for example Ab major)
language
string
No
Language code
vocal_language
string
No
Vocal language (fallback if language is empty)
timesignature
string
No
Time signature (for example 4)
instrumental
bool
No
Generate instrumental audio (no vocals)
Error responses: 400 for a missing or invalid model or request parameters, and 500 for a backend error during sound generation.
Configuration
You can configure ACE-Step models with various options:
The Python vibevoice realtime 0.5B model uses .pt voice preset files. You can configure a model with a specific preset:
name: vibevoicebackend: vibevoiceparameters:
model: microsoft/VibeVoice-Realtime-0.5Btts:
voice: "Frank"# or use audio_path to specify a .pt file path# Available English voices: Carter, Davis, Emma, Frank, Grace, Mike
Note
The realtime 0.5B preset model is not advertised to the Voice Library because it does not accept a raw reference WAV per request. For Voice Library profiles, use a vibevoice-cpp 1.5B reference-WAV model; LocalAI detects the 1.5B variant automatically, or a custom name can set tts.voice_cloning: true.
OmniVoice (omnivoice-cpp backend) is a native C++ / GGML text-to-speech engine. It supports voice cloning (from reference audio plus its transcript), voice design (steering the voice with attribute keywords such as gender, age, pitch, style, volume, and emotion), and streaming synthesis. Output is 24kHz mono audio and it covers 646 languages.
Setup
Install the omnivoice-cpp model in the Model gallery or run local-ai models install omnivoice-cpp. A higher-quality BF16 variant is available as omnivoice-cpp-hq (the default omnivoice-cpp ships Q8_0 GGUFs).
Usage
Use the speech endpoint by specifying the omnivoice-cpp backend:
curl http://localhost:8080/v1/audio/speech -H "Content-Type: application/json" -d '{
     "model": "omnivoice-cpp",
     "input": "Hello world, this is a test."
   }' | aplay
Voice cloning
Pass a reference audio file via the voice parameter and its transcript via the ref_text generation parameter:
curl http://localhost:8080/v1/audio/speech -H "Content-Type: application/json" -d '{
     "model": "omnivoice-cpp",
     "input": "Hello world, this is a test.",
     "voice": "path/to/reference_audio.wav",
     "params": { "ref_text": "This is the transcript of the reference audio." }
   }' | aplay
You can also pin a default cloned voice in the model config so callers do not have to pass it on every request. Both tts.voice and tts.audio_path are honored as the reference audio (a per-request voice overrides them); paths are resolved relative to the model directory:
Steer the synthesized voice with attribute keywords (gender, age, pitch, style, volume, emotion) by passing an instructions string per request:
curl http://localhost:8080/v1/audio/speech -H "Content-Type: application/json" -d '{
     "model": "omnivoice-cpp",
     "input": "Hello world, this is a test.",
     "instructions": "female young high soft emotion:happy"
   }' | aplay
Configuration
The backend loads the base GGUF from parameters.model and its tokenizer from the tokenizer: option. A few optional generation knobs are available as options:
A per-request seed can also be supplied through the params map alongside ref_text.
Pocket TTS
Pocket TTS is a lightweight text-to-speech model designed to run efficiently on CPUs. It supports voice cloning through HuggingFace voice URLs or local audio files.
Setup
Install the pocket-tts model in the Model gallery or run local-ai models install pocket-tts.
Usage
Use the tts endpoint by specifying the pocket-tts backend:
curl http://localhost:8080/tts -H "Content-Type: application/json" -d '{
     "model": "pocket-tts",
     "input":"Hello world, this is a test."
   }' | aplay
Voice cloning
Pocket TTS supports voice cloning through built-in voice names, HuggingFace URLs, or local audio files. You can configure a model with a specific voice:
name: pocket-ttsbackend: pocket-ttstts:
voice: "azelma"# Built-in voice name# Or use HuggingFace URL: "hf://kyutai/tts-voices/alba-mackenna/casual.wav"# Or use local file path: "path/to/voice.wav"# Available built-in voices: alba, marius, javert, jean, fantine, cosette, eponine, azelma
To make a reference recording the model-wide fallback, use tts.audio_path. The gallery model is detected automatically; tts.voice_cloning is only needed when you want an explicit declaration:
You can also pre-load a default voice for faster first generation:
name: pocket-ttsbackend: pocket-ttsoptions:
- "default_voice:azelma"# Pre-load this voice when model loads
Then you can use the model:
curl http://localhost:8080/tts -H "Content-Type: application/json" -d '{
     "model": "pocket-tts",
     "input":"Hello world, this is a test."
   }' | aplay
Qwen3-TTS
Qwen3-TTS is a high-quality text-to-speech model that supports three modes: custom voice (predefined speakers), voice design (natural language instructions), and voice cloning (from reference audio).
Setup
Install the qwen-tts model in the Model gallery or run local-ai models install qwen-tts.
C++ / GGML gallery variants
For a native backend, install one of the Base variants qwen3-tts-cpp, qwen3-tts-cpp-0.6b-base-q4, qwen3-tts-cpp-1.7b-base, or qwen3-tts-cpp-1.7b-base-q4. These variants accept saved Voice Library profiles and are advertised automatically. Gallery entries containing customvoice or voicedesign provide their respective Qwen modes but are intentionally excluded from raw reference-audio cloning.
A private Qwen C++ Base conversion with an opaque filename can declare the capability explicitly. The tokenizer GGUF can sit beside the talker GGUF for automatic discovery:
Supported languages: en (English), zh (Chinese), ru (Russian), ja (Japanese), ko (Korean), de (German), fr (French), es (Spanish), it (Italian), pt (Portuguese).
The value is matched case-insensitively and accepts a few forms for convenience:
the two-letter code (fr, FR)
a locale/region form, whose region is ignored (fr-FR, pt_BR, zh-Hans → fr/pt/zh)
the English full name (french, Portuguese)
If the field is omitted or the value isn’t one of the supported languages, the backend defaults to English.
Custom Voice Mode
Qwen3-TTS supports predefined speakers. You can specify a speaker using the voice parameter:
curl http://localhost:8080/tts -H "Content-Type: application/json" -d '{
     "model": "qwen-tts-design",
     "input":"Hello world, this is a test."
   }' | aplay
Per-request instructions
Instead of (or in addition to) the static YAML instruct option, you can pass an
instructions string per request. It maps to the OpenAI
instructions field
and takes precedence over the YAML option when set, falling back to it when empty. This lets
a single model config serve a different emotion (CustomVoice) or a different designed voice
(VoiceDesign) on every request - useful for roleplay/narration clients that need many voices:
curl http://localhost:8080/v1/audio/speech -H "Content-Type: application/json" -d '{
     "model": "qwen-tts-design",
     "input": "Hello world, this is a test.",
     "instructions": "A calm, low-pitched elderly storyteller with a warm tone."
   }' | aplay
Backends that do not support style/voice instructions simply ignore the field.
You can also pass backend-specific generation parameters per request via the LocalAI
params extension (a string-to-string map; values are coerced to the backend’s expected
types). For example, with the Chatterbox backend:
curl http://localhost:8080/v1/audio/speech -H "Content-Type: application/json" -d '{
     "model": "chatterbox",
     "input": "Hello world, this is a test.",
     "params": { "exaggeration": "0.7", "cfg_weight": "0.3", "temperature": "0.8" }
   }' | aplay
Voice Clone Mode
Voice Clone allows you to clone a voice from reference audio. Configure the model with an AudioPath and optional ref_text:
name: qwen-tts-clonebackend: qwen-ttsparameters:
model: Qwen/Qwen3-TTS-12Hz-1.7B-Basetts:
voice_cloning: true# optional for this Base model; useful when a private checkpoint has an opaque nameaudio_path: "path/to/reference_audio.wav"# Reference audio fileoptions:
- "ref_text:This is the transcript of the reference audio." - "x_vector_only_mode:false"# Set to true to use only speaker embedding (ref_text not required)
You can also use URLs or base64 strings for the reference audio. The backend automatically detects the mode based on available parameters (AudioPath → VoiceClone, instruct option → VoiceDesign, voice parameter → CustomVoice).
Then use the model:
curl http://localhost:8080/tts -H "Content-Type: application/json" -d '{
     "model": "qwen-tts-clone",
     "input":"Hello world, this is a test."
   }' | aplay
Multi-Voice Clone Mode
Qwen3-TTS also supports loading multiple voices for voice cloning, allowing you to select different voices at request time. Configure multiple voices using the voices option:
The voices option accepts a JSON array where each voice entry must have:
name: The voice identifier (used in API requests)
audio: Path to the reference audio file (relative to model directory or absolute)
ref_text: Path to the reference text file for the audio it is paired with
Then use the model with voice selection:
curl http://localhost:8080/tts -H "Content-Type: application/json" -d '{
"model": "qwen-tts-multi-voice",
"input":"Hello world, this is Jane speaking.",
"voice": "jane"
}' | aplay
# Switch to a different voicecurl http://localhost:8080/tts -H "Content-Type: application/json" -d '{
"model": "qwen-tts-multi-voice",
"input":"Hello world, this is John speaking.",
"voice": "john"
}' | aplay
Voice Selection Priority:
voice parameter in the API request (highest priority)
voice option in the model configuration
Error if voice is not found among configured voices
Error Handling:
If you request a voice that doesn’t exist in the voices list, the API will return an error with a list of available voices:
{"error": "Voice 'unknown' not found. Available voices: jane, john"}
Backward Compatibility:
The multi-voice mode is backward compatible with existing single-voice configurations. Models using audio_path in the tts section will continue to work as before.
You can also use a config-file to specify TTS models and their parameters.
In the following example, a custom config loads xtts_v2 with a default cloning reference and language.
For XTTS/YourTTS, tts.audio_path is the default cloning reference and a saved Voice Library profile overrides it per request. Other Coqui model families are not advertised as Voice Library-compatible unless they match the supported variant rules or are explicitly verified with tts.voice_cloning: true.
With this config, you can now use the following curl command to generate a text-to-speech audio file:
curl -L http://localhost:8080/tts \
-H "Content-Type: application/json"\
-d '{
"model": "xtts_v2",
"input": "Bonjour, je suis Ana Florence. Comment puis-je vous aider?"
}' | aplay
Response format
To provide some compatibility with OpenAI API regarding response_format, ffmpeg must be installed (or a docker image including ffmpeg used) to leverage converting the generated wav file before the api provide its response.
Warning regarding a change in behaviour. Before this addition, the parameter was ignored and a wav file was always returned, with potential codec errors later in the integration (like trying to decode a mp3 file from a wav, which is the default format used by OpenAI)
Supported format thanks to ffmpeg are wav, mp3, aac, flac, opus, defaulting to wav if an unknown or no format is provided.
If a response_format is added in the query (other than wav) and ffmpeg is not available, the call will fail.
Sound Classification
Sound-event classification (audio tagging) answers the question “what am I hearing?” - given an audio clip, it returns a list of scored AudioSet labels (e.g. Baby cry, infant cry, Glass breaking, Dog bark, Alarm).
LocalAI exposes this through the /v1/audio/classification endpoint, modelled after /v1/audio/transcriptions. The reference backend is ced.cpp (CED, a 527-class AudioSet tagger), a small ViT over a log-mel spectrogram ported to ggml with full PyTorch parity. Apache-2.0 weights are redistributable as GGUF.
Because classification is exposed as a regular OpenAI-style endpoint, any HTTP client works - there is no Python dependency on the consumer side.
Endpoint
POST /v1/audio/classification
Content-Type: multipart/form-data
Field
Type
Description
file
file (required)
audio file in any format ffmpeg accepts
model
string (required)
name of the sound-classification-capable model (e.g. ced-base-f16)
top_k
int
number of top tags to return (0 = backend default)
Speaker diarization answers the question “who spoke when?” - given an audio clip with multiple speakers, it returns time-stamped segments labelled with a stable speaker ID (SPEAKER_00, SPEAKER_01, …).
LocalAI exposes this through the /v1/audio/diarization endpoint, modelled after /v1/audio/transcriptions. Two backends are supported today:
sherpa-onnx - pyannote-3.0 segmentation + a speaker-embedding extractor (3D-Speaker, NeMo, WeSpeaker) + fast clustering. Pure diarization - no transcription cost. Recommended when you only need speaker turns.
vibevoice.cpp - produces speaker-labelled segments as a by-product of its long-form ASR pass, so you can optionally get a transcript per segment for free.
Because diarization is exposed as a regular OpenAI-compatible endpoint, any HTTP client works. There is no Python dependency on pyannote or NeMo on the consumer side.
Endpoint
POST /v1/audio/diarization
Content-Type: multipart/form-data
Field
Type
Description
file
file (required)
audio file in any format ffmpeg accepts
model
string (required)
name of the diarization-capable model
num_speakers
int
exact speaker count when known (>0 forces; 0 = auto)
min_speakers
int
hint when auto-detecting
max_speakers
int
hint when auto-detecting
clustering_threshold
float
cosine distance threshold used when num_speakers is unknown
min_duration_on
float
discard segments shorter than this many seconds
min_duration_off
float
merge gaps shorter than this many seconds
language
string
only meaningful for backends that bundle ASR (e.g. vibevoice)
include_text
bool
when the backend can emit per-segment transcript for free, populate it
response_format
string
json (default), verbose_json, or rttm
Response - json (default)
Compact payload, no transcription, no per-speaker summary:
speaker is the normalized, zero-padded label clients should display. label preserves the raw backend-emitted ID for clients that maintain their own speaker dictionary.
Response - verbose_json
Adds per-speaker totals and (when the backend supports it and include_text=true) the per-segment transcript:
Returned as Content-Type: text/plain; charset=utf-8.
Quick start
First install a diarization-capable model from the gallery. The example below uses vibevoice-cpp-asr, which serves the vibevoice.cpp backend and returns speaker-labelled segments (and, optionally, a transcript):
The sections below show how to configure the two supported backends by hand when you want full control over the segmentation and embedding models.
Backend setup - sherpa-onnx (pure diarization)
Sherpa-onnx needs two ONNX models: pyannote segmentation and a speaker-embedding extractor. Place them under your LocalAI models directory and reference them from the YAML:
Speaker identity across files: speaker IDs (SPEAKER_00, SPEAKER_01, …) are local to each request. To track the same person across multiple recordings, combine /v1/audio/diarization with /v1/voice/embed (speaker embedding) and maintain your own embedding store.
Hints vs. forces: num_speakers overrides clustering when set; min_speakers / max_speakers are advisory and only honored by backends that expose a range hint. vibevoice.cpp ignores them - its model picks the count itself.
Sample rate: input is automatically converted to 16 kHz mono via ffmpeg before the backend sees it; sherpa-onnx pyannote-3.0 requires 16 kHz.
See also
Sound Classification - tag non-speech sound events (alarms, glass breaking, baby cry) in a clip.
Audio Transform
The audio-transform endpoints take audio in and emit audio out, optionally
conditioned on a second reference audio signal. The category is generic by
design - concrete operations include joint acoustic echo cancellation +
noise suppression + dereverberation (LocalVQE), voice conversion (reference
= target speaker), pitch shifting, audio super-resolution, and so on.
The first shipping backend is LocalVQE,
a 1.3 M-parameter GGML-based model that performs joint AEC + noise suppression
dereverberation on 16 kHz mono speech, ~9.6× realtime on a desktop CPU. It
is a derivative of the Microsoft DeepVQE paper.
The mental model
Every audio-transform request carries:
audio - the primary input file (required).
reference - an auxiliary signal whose meaning is backend-specific (optional).
For echo cancellation: the loopback / far-end signal played through the speakers.
For voice conversion: the target speaker’s reference clip.
For pitch / style transfer: a tonal or style reference.
When omitted, the backend treats it as silence and degrades gracefully (LocalVQE,
for example, does denoise + dereverb only when ref is empty).
params - a generic key=value map forwarded to the backend.
When reference is omitted, LocalVQE zero-fills the reference channel and
the operation reduces to noise suppression + dereverberation.
Streaming endpoint
GET /audio/transformations/stream - bidirectional WebSocket. The first
client message is a JSON envelope; subsequent client messages are binary
PCM frames; server emits binary PCM frames at the same cadence.
sample_format is S16_LE (16-bit signed little-endian) or F32_LE (32-bit
float little-endian, [-1, 1]). frame_samples defaults to the backend’s
preferred hop length (256 = 16 ms for LocalVQE).
Client → server (binary frames, subsequent): interleaved stereo PCM,
channel 0 = audio (mic), channel 1 = reference. Frame size:
frame_samples × 2 channels × sample_size. For S16_LE at 256 samples that
is 1024 bytes per frame; for F32_LE it is 2048 bytes. If the reference is
silent (no auxiliary signal), send zeros on channel 1.
Server → client (binary frames): mono PCM in the same format,
frame_samples × sample_size bytes (512 bytes for S16_LE, 1024 for F32_LE).
Mid-stream control (text frame): another session.update resets the
streaming state when its reset field is true; a session.close text frame
ends the session cleanly.
Latency
LocalVQE has 16 ms algorithmic latency (one hop). At runtime the per-frame CPU
cost depends on the model: ~1.6 ms for the compact 1.3 M models (v1.1/v1.2,
~9.7× realtime) and ~3.3 ms for the wider v1.3 4.8 M model (~4.7× realtime) on
a 4-thread modern desktop, leaving the rest of the budget for network and
downstream playback.
Backend-specific tuning (LocalVQE)
params[<key>]
Type
Default
Effect
noise_gate
bool
false
Enable post-OLA RMS-based residual-echo gate
noise_gate_threshold_dbfs
float
-45.0
Gate threshold in dBFS; frames below are zeroed
The gate is most useful in far-end-only / silent-near-end stretches where the
model’s residual would otherwise sound like buffering or amplified noise floor.
A reasonable starting point is -50 dBFS.
Configuring a model
LocalVQE ships several weight releases in the gallery: localvqe-v1.3-4.8m
(current default - best quality), localvqe-v1.2-1.3m and localvqe-v1.1-1.3m
(compact, ~¼ the per-hop cost - good for low-core or power-constrained hosts).
All share the same backend and request API; only the model filename differs.
name: localvqebackend: localvqeparameters:
model: localvqe-v1.3-4.8M-f32.gguf# Backend-specific defaults can be set in Options[]; per-request# params[*] form fields override.## `backend` and `device` route through the upstream localvqe options# builder so you can force a non-default GGML backend (e.g. `Vulkan`) or# pin to a specific GPU index. Leave both unset to keep the CPU default.options:
- noise_gate=true- noise_gate_threshold_dbfs=-50# - backend=Vulkan# - device=0
Voice Activity Detection (VAD) identifies segments of speech in audio data. LocalAI provides a /v1/vad endpoint powered by the Silero VAD backend.
API
Method:POST
Endpoints:/v1/vad, /vad
Request
The request body is JSON with the following fields:
Parameter
Type
Required
Description
model
string
Yes
Model name (e.g. silero-vad)
audio
float32[]
Yes
Array of audio samples (16kHz PCM float)
Response
Returns a JSON object with detected speech segments:
Field
Type
Description
segments
array
List of detected speech segments
segments[].start
float
Start time in seconds
segments[].end
float
End time in seconds
Usage
Example request
The /v1/vad endpoint expects the audio field to be an array of raw
16kHz mono PCM samples as float32 values, so the request body is usually
built from a real audio file rather than typed by hand.
First convert any audio file to 16kHz mono with ffmpeg:
Create a YAML configuration file for the VAD model:
name: silero-vadbackend: silero-vad
Detection Parameters
The Silero VAD backend uses the following internal defaults:
Sample rate: 16kHz
Threshold: 0.5
Min silence duration: 100ms
Speech pad duration: 30ms
Error Responses
Status Code
Description
400
Missing or invalid model or audio field
500
Backend error during VAD processing
Voice Recognition
LocalAI supports voice (speaker) recognition: speaker verification
(1:1), speaker identification (1:N) against a built-in vector store,
speaker embedding, and demographic analysis (age / gender / emotion
from voice).
The audio analog to Face Recognition,
served over the same /v1/voice/* HTTP API by two backends:
voice-detect (recommended, default). A standalone C++/ggml
engine (voice-detect.cpp):
no Python, no onnxruntime, no torch runtime. Each gallery entry is a
single self-describing GGUF. This is the recommended option for new
deployments.
speaker-recognition (Python). The original SpeechBrain / ONNX
backend. Still supported; see the Python backend
below.
Both backends expose the identical wire format, so the API examples on
this page work with either - only the gallery entry name (the model
field) changes.
voice-detect (ggml) backend
The voice-detect backend reads the embedding (or analysis)
architecture (voicedetect.arch) directly from the GGUF metadata, so
installing a gallery entry is all that is needed to select an engine. It
drives the VoiceEmbed / VoiceVerify / VoiceAnalyze gRPC rpcs behind the
/v1/voice/{embed,verify,analyze,register,identify,forget} endpoints.
Gallery entries
Gallery entry
Model
Embedding dim
License
voice-detect-ecapa-tdnn
SpeechBrain ECAPA-TDNN (VoxCeleb)
192
Apache 2.0 - commercial-safe
voice-detect-wespeaker-resnet34
WeSpeaker ResNet34 (VoxCeleb)
256
CC-BY-4.0
voice-detect-eres2net
3D-Speaker ERes2Net (VoxCeleb)
192
Apache 2.0 - commercial-safe
voice-detect-campplus
3D-Speaker CAM++ (VoxCeleb)
192
Apache 2.0 - commercial-safe
voice-detect-emotion-wav2vec2
audEERING wav2vec2 (age / gender / emotion)
analyze head
CC-BY-NC-SA-4.0 - non-commercial
The four speaker-recognition entries drive verify / embed / identify.
voice-detect-emotion-wav2vec2 is the analysis head behind
/v1/voice/analyze (continuous age estimate plus gender and emotion
class scores) and is non-commercial / research use only.
Quickstart
Install the default entry (recommended for copy-paste):
local-ai models install voice-detect-ecapa-tdnn
Verify that two audio clips were spoken by the same person:
The 1:N register / identify / forget workflow and the rest of the API
are identical to the API reference below - just pass a
voice-detect-* model name. The default verify threshold is ~0.25 for
the ECAPA-TDNN / ERes2Net / CAM++ recognizers and ~0.30 for WeSpeaker
ResNet34.
speaker-recognition (Python) backend
The speaker-recognition backend follows the same two-engine pattern
under one image.
Engines
Gallery entry
Model
Size
License
speechbrain-ecapa-tdnn
ECAPA-TDNN on VoxCeleb (SpeechBrain)
~17 MB
Apache 2.0 - commercial-safe
wespeaker-resnet34
WeSpeaker ResNet34 ONNX
~26 MB
Apache 2.0 - commercial-safe
Both entries are commercial-safe Apache-2.0. SpeechBrain is the
default - it’s a lightweight pure-PyTorch checkpoint that auto-
downloads on first use. The wespeaker-resnet34 entry wires the
direct-ONNX path for CPU-only deployments that don’t want the torch
runtime.
Quickstart
Install the default backend and model:
local-ai models install speechbrain-ecapa-tdnn
Verify that two audio clips were spoken by the same person:
curl -sX POST http://localhost:8080/v1/voice/forget \
-d '{"id": "b2f..."}'# → 204 No Content
Warning
Storage caveat. The default vector store is in-memory. All
registered speakers are lost when LocalAI restarts. Persistent storage
(pgvector) is a tracked future enhancement shared with face
recognition - the voice-recognition HTTP API is designed to swap the
backing store without changing the wire format.
API reference
POST /v1/voice/verify (1:1)
field
type
description
model
string
gallery entry name (e.g. speechbrain-ecapa-tdnn)
audio1, audio2
string
URL, base64, or data-URI of an audio file
threshold
float, optional
cosine-distance cutoff; default 0.25 for ECAPA-TDNN
anti_spoofing
bool, optional
reserved - unused in the current release
Returns verified, distance, threshold, confidence, model,
and processing_time_ms.
POST /v1/voice/analyze
Returns demographic attributes (age, gender, emotion) inferred from
speech:
field
type
description
model
string
gallery entry
audio
string
URL / base64 / data-URI
actions
string[]
subset of ["age","gender","emotion"]; empty = all supported
Emotion is inferred from the SUPERB emotion-recognition checkpoint
(superb/wav2vec2-base-superb-er, Apache 2.0) - 4-way categorical
neutral / happy / angry / sad. The model auto-downloads on the first
analyze call.
Age and gender are opt-in: no standard-transformers checkpoint
with a clean classifier head is shipped as the default. The
high-accuracy Audeering age/gender model uses a custom multi-task
head that AutoModelForAudioClassification doesn’t load safely
(the age weights are silently dropped and the classifier is
re-initialised with random values). To enable age/gender, set
age_gender_model:<repo> in the model YAML’s options: pointing at
a checkpoint with a vanilla Wav2Vec2ForSequenceClassification
head. Override the emotion default similarly via emotion_model:.
Set either to an empty string to disable that head.
If a head fails to load (offline, disk full, transformers
missing), the engine degrades gracefully: it still returns the
attributes it could compute. When nothing can be computed the backend
returns 501 Unimplemented.
Analyze is supported by both speechbrain-ecapa-tdnn and
wespeaker-resnet34 - the speaker recognizer and the analysis head
are independent.
POST /v1/voice/register (1:N enrollment)
field
type
description
model
string
voice recognition model
audio
string
speaker audio to enroll
name
string
human-readable label
labels
map[string]string, optional
arbitrary metadata
store
string, optional
vector store model; defaults to local-store
Returns {id, name, registered_at}. The id is an opaque UUID used
by /v1/voice/identify and /v1/voice/forget.
POST /v1/voice/identify (1:N recognition)
field
type
description
model
string
voice recognition model
audio
string
probe audio
top_k
int, optional
max matches to return; default 5
threshold
float, optional
cosine-distance cutoff; default 0.25
store
string, optional
vector store model
Returns a list of matches sorted by ascending distance, each with
id, name, labels, distance, confidence, and match
(distance ≤ threshold).
POST /v1/voice/forget
field
type
description
id
string
ID returned by /v1/voice/register
Returns 204 No Content on success, 404 Not Found if the ID is
unknown.
POST /v1/voice/embed
Returns the L2-normalized speaker embedding vector.
field
type
description
model
string
voice model
audio
string
URL / base64 / data-URI
Returns {embedding: float[], dim: int, model: string}. Dimension
depends on the recognizer: 192 for ECAPA-TDNN, 256 for WeSpeaker
ResNet34.
Note: the OpenAI-compatible /v1/embeddings endpoint is
intentionally text-only - it does nothing useful with audio input.
Use /v1/voice/embed for audio.
Audio input
Audio is materialised by the HTTP layer to a temporary WAV file
before the gRPC call. All audio fields accept:
The backend itself always receives a filesystem path - the same
convention the Whisper / Voxtral transcription backends use.
Threshold reference
Recognizer
Cosine-distance threshold
ECAPA-TDNN (SpeechBrain, VoxCeleb)
~0.25
WeSpeaker ResNet34
~0.30
3D-Speaker ERes2Net
~0.28
Pass threshold explicitly when switching recognizers - the per-model
default only applies when omitted.
Related features
Face Recognition - the image analog;
the two share a registry design.
Audio to Text - transcription (Whisper,
Voxtral, faster-whisper). Runs in addition to, not instead of,
voice recognition.
Stores - the generic vector store powering
both the face and voice 1:N recognition pipelines.
Embeddings - text-only OpenAI-compatible
embedding endpoint; for audio embeddings use /v1/voice/embed.
Realtime API
LocalAI supports the OpenAI Realtime API which enables low-latency, multi-modal conversations (voice and text) over WebSocket.
To use the Realtime API, you need to configure a pipeline model that defines the components for Voice Activity Detection (VAD), Transcription (STT), Language Model (LLM), and Text-to-Speech (TTS).
Configuration
Create a model configuration file (e.g., gpt-realtime.yaml) in your models directory. For a complete reference of configuration options, see Model Configuration.
This configuration links the following components:
vad: The Voice Activity Detection model (e.g., silero-vad-ggml) to detect when the user is speaking.
transcription: The Speech-to-Text model (e.g., whisper-large-turbo) to transcribe user audio.
llm: The Large Language Model (e.g., qwen3-4b) to generate responses.
tts: The Text-to-Speech model (e.g., tts-1) to synthesize the audio response.
Make sure all referenced models (silero-vad-ggml, whisper-large-turbo, qwen3-4b, tts-1) are also installed or defined in your LocalAI instance.
Streaming the pipeline
By default each stage runs to completion before the next begins: the whole utterance is transcribed, the full LLM reply is generated, then it is synthesized. Each stage can instead be streamed incrementally, which lowers the time-to-first-audio of a turn:
name: gpt-realtimepipeline:
vad: silero-vad-ggmltranscription: whisper-large-turbollm: qwen3-4btts: tts-1streaming:
llm: true# stream LLM tokens as transcript deltastts: true# emit audio deltas per synthesized chunktranscription: true# stream transcript text deltas of the user's speechclause_chunking: true# synthesize each clause as soon as it completes
streaming.tts: emit a response.output_audio.delta per audio chunk the TTS backend produces (requires a backend that supports streaming synthesis), instead of one delta for the whole utterance. Falls back to a single unary delta otherwise.
streaming.transcription: stream conversation.item.input_audio_transcription.delta events as the transcript is produced (requires a transcription backend that supports streaming).
streaming.llm: stream the LLM reply token-by-token as response.output_audio_transcript.delta events. The full reply is buffered and synthesized once it is complete - streamed as audio chunks when streaming.tts is enabled (and the TTS backend supports it), otherwise as a single unary delta. Reasoning/thinking is always stripped from the spoken transcript. Tool calls are supported while streaming when the LLM uses its tokenizer template (use_tokenizer_template: true): the backend’s autoparser then delivers content and tool calls separately, so the spoken transcript never leaks tool-call tokens. Grammar-based function calling keeps the buffered path.
streaming.clause_chunking: instead of buffering the whole reply before TTS, split it into speakable clauses and synthesize each as soon as it completes, lowering the time-to-first-audio. The splitter is script-aware: it uses Unicode sentence segmentation (so it handles CJK 。!? with no whitespace), CJK clause punctuation (,、;:), and Thai/Lao spaces - it does not rely on whitespace sentence boundaries, so it works for languages such as Chinese, Japanese and Thai where the old per-sentence approach degraded to whole-message buffering. Requires streaming.llm; scripts that genuinely need a dictionary (e.g. Khmer, Burmese) simply stay buffered until a space or end-of-message. Off by default.
All streaming flags are off by default, so existing pipelines are unaffected.
Model warm-up (cold start)
Without warm-up the pipeline’s models are loaded into memory only on first use within a session: the VAD on the first audio chunk, transcription at the first end-of-speech, the LLM on the first reply, and TTS on the first spoken output. On a cold session this staggers a load delay across those first few interactions - and a model that fails to load (missing weights, wrong backend, out of memory) only fails part-way through the first turn.
To avoid that, LocalAI warms the pipeline by default: it loads the VAD, transcription, LLM and TTS backends into memory before the session is announced, and the session start blocks until they are all ready. The loads run concurrently, so the wait is the slowest single model, not the sum. This means:
The first turn pays no cold-start cost - every backend is already resident.
Model-load errors surface at session start. If any stage fails to load, the session is not started and the client receives a model_load_error instead of session.created, so a broken pipeline fails fast and visibly rather than mid-call.
Set disable_warmup: true to restore the lazy “load on first use” behavior - session start no longer waits on loading and load errors surface on the first turn instead. Useful if you want idle sessions to avoid holding model memory they may never use:
name: gpt-realtimepipeline:
vad: silero-vad-ggmltranscription: whisper-large-turbollm: qwen3-4btts: tts-1disable_warmup: true# lazily load each model on first use instead of at session start
Pre-loading a pipeline on demand
Warm-up only fires when a realtime session opens. To load a pipeline into memory ahead of time - e.g. to warm it right after boot, or when running with disable_warmup: true - POST the model name to the admin-only /backend/load endpoint. For a pipeline model it loads every configured sub-model (VAD, transcription, LLM, TTS, sound_detection, voice_recognition) concurrently:
The endpoint is not realtime-specific - it pre-loads any model. See Backend Monitor for the full request/response reference (it is the inverse of /backend/shutdown).
Turn detection
Turn detection decides when the user has finished speaking and the pipeline should respond. Two modes are supported, matching the OpenAI session schema:
server_vad (default): silence-based. The VAD model watches the audio and the turn commits after silence_duration_ms (default 500 ms) of silence. Simple and model-agnostic, but a fixed silence window must trade interrupting mid-sentence pauses against sluggish responses.
semantic_vad: model-driven. The transcription model itself signals end-of-utterance and the silence window becomes dynamic: short right after the model emits its end-of-utterance token, much longer when it does not - so pausing to think no longer gets cut off, while finished sentences get a fast response.
semantic_vad requires a transcription model that emits an end-of-utterance token over a cache-aware streaming decode - currently parakeet-cpp-realtime_eou_120m-v1 (the model is trained to distinguish “paused, expecting a reply” from “paused mid-thought”). The realtime pipeline feeds it the microphone audio live while the user speaks. With any other transcription backend the session degrades gracefully to silence-only detection using the eagerness timeout below (a warning is logged once). The model also emits a distinct end-of-backchannel token (<EOB>) for short acknowledgments like “uh-huh”: those are transcribed but never treated as the user yielding the turn.
Sessions can opt in via session.update (turn_detection: {"type": "semantic_vad", "eagerness": "medium"}), or the pipeline can set a server-side default so clients need no changes:
name: gpt-realtimepipeline:
vad: silero-vad-ggmltranscription: parakeet-cpp-realtime_eou_120m-v1llm: qwen3-4btts: tts-1turn_detection:
type: semantic_vad # default for sessions on this model (server_vad if unset)eagerness: medium # low | medium | high | auto (auto == medium)retranscribe: false# see below
A client session.update still overrides type and eagerness per session.
Eagerness sets the fallback silence window used when no end-of-utterance token was seen (the model missed it, or the user genuinely trails off): low waits 8 s, medium/auto 4 s, high 2 s - the same max-timeout semantics OpenAI documents. After the token is seen, the turn commits on the next VAD tick (~300 ms).
Live captions: while the user speaks, semantic_vad streams conversation.item.input_audio_transcription.delta events under the item id the commit will later reuse, so clients can render the words as they are recognized. The completed event at commit carries the authoritative transcript and replaces the partial text (with retranscribe: true it may differ from the captions); a turn discarded before commit emits conversation.item.input_audio_transcription.failed so clients can retract its captions.
retranscribe (server-side only, semantic_vad only) cross-checks the streaming decode against a batch decode at commit time:
false (default): the transcript accumulated from the live stream is used as-is - the model runs once per utterance and the LLM starts immediately at commit.
true: the committed audio is re-transcribed offline. If the batch decode also ends with the end-of-utterance token the turn proceeds (using the batch transcript); if it does not, the commit is cancelled and the session keeps listening - treating the streaming token as a false positive. Both transcripts are compared and logged, which makes this mode a useful diagnostic for how well the streaming and batch decodes align, at the cost of one extra decode per turn.
Disabling thinking
For reasoning models, you can force the pipeline LLM’s thinking off without editing the LLM model config:
pipeline:
llm: qwen3-4bdisable_thinking: true# maps to enable_thinking=false for the realtime LLM
This is applied only to the realtime session’s copy of the LLM config, so it does not affect other users of the same model. Leave it unset to use the LLM model config’s own reasoning settings.
Conversation compaction (long sessions on CPU)
By default a realtime session feeds only the last max_history_items turns to the LLM; older turns are dropped and forgotten. On CPU, long calls also grow expensive as the prompt fills with verbatim history. Enable compaction to instead fold older turns into a rolling summary, so long calls stay cheap without losing earlier context.
Compaction works with two numbers:
max_history_items is the live window - the recent turns kept verbatim in the prompt.
compaction.trigger_items is the high-water mark - let the buffer grow to here, then summarize the overflow (everything above max_history_items) into a rolling memory and evict it. It must be greater than max_history_items; if it is not, it is clamped up.
The gap between the two controls how often summarization runs: a summary call fires roughly every (trigger_items - max_history_items) turns (here, about every 6 turns).
pipeline:
max_history_items: 6# live window - recent turns kept verbatimcompaction:
enabled: truetrigger_items: 12# summarize overflow back down to max_history_itemssummary_model: ""# optional: a small model for the summary (CPU); default = pipeline LLMmax_summary_tokens: 512
Tip
On CPU, set summary_model to a small, fast model so compaction never competes with the conversation LLM for compute. Left empty, the pipeline’s own LLM produces the summary.
Clients can also manage history directly via the now-supported conversation.item.delete, conversation.item.truncate, and input_audio_buffer.clear realtime events.
Transports
The Realtime API supports two transports: WebSocket and WebRTC.
Audio is sent and received as raw PCM in the WebSocket messages, following the OpenAI Realtime API protocol.
WebRTC
The WebRTC transport enables browser-based voice conversations with lower latency. Connect by POSTing an SDP offer to the REST endpoint:
POST http://localhost:8080/v1/realtime?model=gpt-realtime
Content-Type: application/sdp

<SDP offer body>
The response contains the SDP answer to complete the WebRTC handshake.
Opus backend requirement
WebRTC uses the Opus audio codec for encoding and decoding audio on RTP tracks. The opus backend must be installed for WebRTC to work. Install it from the Backends page in the web UI, or from the backend gallery with the API:
The opus backend is loaded automatically when a WebRTC session starts. It does not require any model configuration file - just the backend binary.
WebRTC behind Docker host networking or NAT
By default pion gathers a host ICE candidate for every local interface. Under
Docker host networking that includes bridge addresses (docker0/veth,
172.x) that a remote browser cannot route to: the call typically connects on a
good candidate and then drops a few seconds later when ICE consent checks fail on
the unreachable ones. Two settings let you advertise only the reachable address:
# Advertise these IPs as the host ICE candidates (e.g. the host's LAN IP)LOCALAI_WEBRTC_NAT_1TO1_IPS=192.168.1.10
# ...or restrict ICE gathering to specific interfacesLOCALAI_WEBRTC_ICE_INTERFACES=eth0
Tip
For a browser on another LAN machine talking to LocalAI in a host-networked
container, set LOCALAI_WEBRTC_NAT_1TO1_IPS to the host’s LAN IP. This is the
most reliable fix for WebRTC connections that establish and then drop.
Protocol
The API follows the OpenAI Realtime API protocol for handling sessions, audio buffers, and conversation items.
Response modalities (text-only sessions)
By default a realtime session responds with audio plus a transcript. To make the model respond with text only, set the output modalities on either the session or an individual response:
output_modalities is the GA field name. For compatibility, LocalAI also accepts the legacy Realtime beta field name modalities as an alias (a lot of community sample code still sends modalities: ["text"]):
The GA output_modalities wins when both are present. A response-level value overrides the session-level one, and when neither is set the session falls back to ["audio"].
Gating a realtime pipeline with voice recognition
A pipeline realtime model can require speaker verification before it responds. Add a voice_recognition block under pipeline. When present, each committed utterance is verified against authorized speakers; unauthorized utterances are dropped before the LLM runs (no LLM call, no tool execution, no TTS). The session stays open.
The same block also drives two optional, independent behaviors: an authorization gate (enforce) and speaker surfacing/personalization (identity). Set enforce: false to keep recognizing the speaker without ever rejecting a turn.
name: my-realtimepipeline:
vad: silero-vadtranscription: whisperllm: qwentts: kokorovoice_recognition:
model: speaker-recognition # the speaker-recognition backend modelmode: identify # "identify" (registry) or "verify" (references)threshold: 0.25# cosine distance; <= passesenforce: true# authorization gate (default true)when: every # "every" (default) or "first"on_reject: drop_event # "drop_event" (default) or "drop_silent"anti_spoofing: false# optional liveness check (verify mode)# identify mode: authorized registry identities (multiple persons)allow:
names: ["alice", "bob"] # match registered speaker nameslabels: ["family"] # OR any identity carrying this label# empty allow = any registered speaker within threshold passes# verify mode: reference speakers (multiple persons)references:
- name: aliceaudio: /models/voices/alice.wav - name: bobaudio: /models/voices/bob.wav
Identifying speakers without gating
To recognize who is speaking and surface it to the client and the LLM without ever rejecting a turn, set enforce: false and add an identity block. The identity block works with or without the gate; when it is set, the speaker is resolved on every turn even if when: first.
name: my-realtimepipeline:
vad: silero-vadtranscription: whisperllm: qwentts: kokorovoice_recognition:
model: speaker-recognitionmode: identifythreshold: 0.25# Authorization gate. Defaults to enforcing (rejects unauthorized speakers).# Set enforce:false to identify the speaker WITHOUT rejecting anyone.enforce: falsewhen: every# Surface the recognized speaker to the client and the LLM. Works with or# without enforce; when set, identity is resolved on every turn even if# when:first.identity:
announce: true# emit the conversation.item.speaker eventannounce_unknown: false# also emit it when there is no confident matchpersonalize: true# tell the LLM who is speakinginject_name: true# set the per-message OpenAI name fieldinject_system_note: true# append a "current speaker" line to the system messagenote_unknown: false# append a "speaker is unknown" note when unidentified
Field
Meaning
model
Speaker-recognition backend model name.
mode
identify matches against speakers registered via /v1/voice/register; verify matches against the references audios.
threshold
Maximum cosine distance that still counts as a match (default ~0.25).
enforce
Authorization gate. true (or omitted) rejects unauthorized speakers (the gating behavior above). false resolves and surfaces the speaker without ever dropping a turn.
when
every verifies each utterance; first verifies once then trusts the session. When an identity block is set, the speaker is still resolved on every turn even with first.
on_reject
drop_event drops and emits a speaker_not_authorized error event; drop_silent drops quietly.
anti_spoofing
Verify mode only: runs the backend liveness check (slower).
allow.names / allow.labels
identify mode: which registry identities are authorized. Empty = any registered speaker.
references
verify mode: authorized reference speakers; the utterance passes if it matches any.
identity.announce
Emit the conversation.item.speaker event to the client (see below).
identity.announce_unknown
Also emit that event when there is no confident match. By default the event is emitted only on a match.
identity.personalize
Inform the LLM who is speaking.
identity.inject_name
Set the per-message OpenAI name field on each user turn.
identity.inject_system_note
Append a The current speaker is <Name>. line to the system message.
identity.note_unknown
When unidentified, append The current speaker is unknown. (lets the model ask who it is talking to).
identify mode requires the voice registry (speakers registered through /v1/voice/register). verify mode needs no registry: reference audios are embedded once at model load.
The conversation.item.speaker event
When identity.announce is enabled, the server emits a conversation.item.speaker event after the user conversation item, naming the recognized speaker:
confidence is a 0-100 score, distance is the cosine distance, and matched is true when a confident match was found. labels carries any labels attached to the registered speaker (identify mode); it is omitted when the speaker has none. The name and id fields are omitted when empty. By default the event is emitted only on a match; set identity.announce_unknown: true to also emit it (with matched: false) when no speaker is identified.
This event is a LocalAI extension to the OpenAI Realtime API and is server-emitted only. Standard OpenAI Realtime clients ignore event types they do not recognize, so enabling it is non-breaking.
Examples
Realtime voice assistant demo (Go): a minimal Go client for the Realtime (WebSocket) API with a full talk-back voice loop and an example tool call. Ships a docker compose setup that brings up a realtime-capable LocalAI for you.
Realtime voice assistant example (Python): thin-client architecture (Silero VAD on the client, heavy lifting on LocalAI), suited to running the client on a Raspberry Pi.
GPT Vision
LocalAI supports understanding images by using LLaVA, and implements the GPT Vision API from OpenAI.
First install a vision-capable model from the gallery (the examples below use moondream2-20250414, a small vision model):
local-ai run moondream2-20250414
To let LocalAI understand and reply with what sees in the image, use the /v1/chat/completions endpoint, for example with curl:
curl http://localhost:8080/v1/chat/completions -H "Content-Type: application/json" -d '{
     "model": "moondream2-20250414",
     "messages": [{"role": "user", "content": [{"type":"text", "text": "What is in the image?"}, {"type": "image_url", "image_url": {"url": "https://upload.wikimedia.org/wikipedia/commons/thumb/d/dd/Gfp-wisconsin-madison-the-nature-boardwalk.jpg/2560px-Gfp-wisconsin-madison-the-nature-boardwalk.jpg" }}], "temperature": 0.9}]}'
Grammars and function tools can be used as well in conjunction with vision APIs:
 curl http://localhost:8080/v1/chat/completions -H "Content-Type: application/json" -d '{
     "model": "moondream2-20250414", "grammar": "root ::= (\"yes\" | \"no\")",
     "messages": [{"role": "user", "content": [{"type":"text", "text": "Is there some grass in the image?"}, {"type": "image_url", "image_url": {"url": "https://upload.wikimedia.org/wikipedia/commons/thumb/d/dd/Gfp-wisconsin-madison-the-nature-boardwalk.jpg/2560px-Gfp-wisconsin-madison-the-nature-boardwalk.jpg" }}], "temperature": 0.9}]}'
Setup
Install a vision-capable model from the gallery, either from the Models page in the web UI or from the CLI:
local-ai run moondream2-20250414
Other vision models are available in the gallery (for example smolvlm-instruct and smolvlm2-2.2b-instruct). Browse them on the Models page or see the /models/.
Object Detection
LocalAI supports object detection and image segmentation through various backends. This feature allows you to identify and locate objects within images with high accuracy and real-time performance. Available backends include RF-DETR (Python) and rf-detr.cpp (native C++/ggml) for object detection and segmentation, and sam3.cpp for image segmentation (SAM 3/2/EdgeTAM).
For detecting faces specifically, see the dedicated
Face Recognition feature - its
/v1/detection support is tuned for face bounding boxes and ships
with commercially-safe model options.
Overview
Object detection in LocalAI is implemented through dedicated backends that can identify and locate objects within images. Each backend provides different capabilities and model architectures.
Key Features:
Real-time object detection
High accuracy detection with bounding boxes
Image segmentation with binary masks (SAM backends)
Text-prompted, point-prompted, and box-prompted segmentation
Support for multiple hardware accelerators (CPU, NVIDIA GPU, Intel GPU, AMD GPU)
Structured detection results with confidence scores
Easy integration through the /v1/detection endpoint
Usage
Detection Endpoint
LocalAI provides a dedicated /v1/detection endpoint for object detection tasks. This endpoint is specifically designed for object detection and returns structured detection results with bounding boxes and confidence scores.
API Reference
To perform object detection, send a POST request to the /v1/detection endpoint:
The RF-DETR backend is implemented as a Python-based gRPC service that integrates seamlessly with LocalAI. It provides object detection capabilities using the RF-DETR model architecture and supports multiple hardware configurations:
CPU: Optimized for CPU inference
NVIDIA GPU: CUDA acceleration for NVIDIA GPUs
Intel GPU: Intel oneAPI optimization
AMD GPU: ROCm acceleration for AMD GPUs
NVIDIA Jetson: Optimized for ARM64 NVIDIA Jetson devices
Setup
Using the Model Gallery (Recommended)
The easiest way to get started is using the model gallery. The rfdetr-base model is available in the official LocalAI gallery:
# Install and run the rfdetr-base modellocal-ai run rfdetr-base
You can also install it through the web interface by navigating to the Models section and searching for “rfdetr-base”.
Manual Configuration
Create a model configuration file in your models directory:
Currently, the following model is available in the Model Gallery:
rfdetr-base: Base model with balanced performance and accuracy
You can browse and install this model through the LocalAI web interface or using the command line.
RF-DETR Native Backend (rfdetr-cpp)
The rfdetr-cpp backend is a native C++/ggml implementation of RF-DETR
inference based on rf-detr.cpp. It
runs as a Go gRPC service that dlopens a per-CPU-variant shared library, so
there is no Python runtime on the inference path - startup is fast and the
binary is self-contained.
Compared to the Python rfdetr backend, the native backend:
Has no Python or PyTorch dependency at inference time
Supports both detection and segmentation variants of RF-DETR
Returns segmentation masks as PNG bytes in Detection.mask
Setup
Install the backend
local-ai backends install rfdetr-cpp
Using the Model Gallery (Recommended)
The gallery ships ready-to-run entries for every published variant:
# Detection variantslocal-ai run rfdetr-cpp-nano
local-ai run rfdetr-cpp-small
local-ai run rfdetr-cpp-base
local-ai run rfdetr-cpp-medium
local-ai run rfdetr-cpp-large
# Segmentation variants (return per-instance PNG masks)local-ai run rfdetr-cpp-seg-nano
local-ai run rfdetr-cpp-seg-small
local-ai run rfdetr-cpp-seg-medium
local-ai run rfdetr-cpp-seg-large
local-ai run rfdetr-cpp-seg-xlarge
local-ai run rfdetr-cpp-seg-2xlarge
Pre-quantized GGUFs are published under
mudler/rfdetr-cpp-*
on Hugging Face. Each repo carries the F32/F16/Q8_0/Q4_K quants - F16 is
the recommended default (matches F32 accuracy, ~1.86x smaller).
Segmentation Output
When running a segmentation model (any rfdetr-cpp-seg-* variant), each
Detection in the response carries a mask field with a base64-encoded
PNG of the per-instance binary mask. The mask is sized to the original
image resolution and aligns with the corresponding bounding box.
SAM3 Backend (sam3-cpp)
The sam3-cpp backend provides image segmentation using sam3.cpp, a portable C++ implementation of Meta’s Segment Anything Model. It supports multiple model architectures:
SAM 3: Full model with text encoder for text-prompted detection and segmentation
SAM 2 / SAM 2.1: Hiera backbone models in multiple sizes
SAM 3 Visual-Only: Point/box segmentation without text encoder
EdgeTAM: Ultra-efficient mobile variant (~15MB quantized)
Setup
Manual Configuration
Create a model configuration file in your models directory:
Verify model compatibility with your backend version
Low Detection Accuracy
Ensure good image quality and lighting
Check if objects are clearly visible
Consider using a larger model for better accuracy
Slow Performance
Enable GPU acceleration if available
Use a smaller model for faster inference
Optimize image resolution
Debug Mode
Enable debug logging for troubleshooting:
local-ai run --debug rfdetr-base
Object Detection Category
LocalAI includes a dedicated object-detection category for models and backends that specialize in identifying and locating objects within images. This category currently includes:
rfdetr-cpp: Native C++/ggml RF-DETR for detection + segmentation
sam3-cpp: SAM 3/2/EdgeTAM image segmentation
Additional object detection models and backends will be added to this category in the future. You can filter models by the object-detection tag in the model gallery to find all available object detection models.
LocalAI supports face recognition: face verification (1:1), face
identification (1:N) against a built-in vector store, face embedding,
face detection, demographic analysis (age / gender), and antispoofing /
liveness detection.
The same /v1/face/* HTTP API is served by two backends:
face-detect (recommended, default). A standalone C++/ggml
engine (face-detect.cpp):
no Python, no onnxruntime, no torch runtime. Each gallery entry is a
single self-describing GGUF. This is the recommended option for new
deployments.
insightface (Python). The original ONNX Runtime backend. Still
supported; see the Python backend below.
Both backends expose the identical wire format, so the API examples in
this page work with either - only the gallery entry name (the model
field) changes.
face-detect (ggml) backend
The face-detect backend reads the detector and recognizer architecture
(facedetect.arch) directly from the GGUF metadata, so installing a
gallery entry is all that is needed to select an engine. It drives the
Embeddings / Detect / FaceVerify / FaceAnalyze gRPC rpcs behind the
/v1/face/{embed,verify,analyze,detect,register,identify,forget}
endpoints.
Licensing - read this first
Gallery entry
Detector + recognizer
Embedding dim
License
face-detect-buffalo-l
SCRFD-10GF + ArcFace R50 + GenderAge
512
Non-commercial research only (upstream insightface weights)
face-detect-buffalo-m
SCRFD-2.5GF + ArcFace R50 + GenderAge
512
Non-commercial research only
face-detect-buffalo-s
SCRFD-500MF + MBF + GenderAge
512
Non-commercial research only
face-detect-yunet-sface
YuNet + SFace (OpenCV Zoo)
128
Apache 2.0 - commercial-safe
The insightface buffalo packs (buffalo_l / buffalo_m / buffalo_s) are
released by the upstream maintainers for non-commercial research use
only. Pick the face-detect-yunet-sface entry for production /
commercial deployments.
Quickstart
Install the commercial-safe entry (recommended for copy-paste):
The 1:N register / identify / forget workflow and the rest of the API
are identical to the API reference below - just pass a
face-detect-* model name. The per-engine verify thresholds are ~0.35
for the buffalo ArcFace/MBF recognizers and ~0.363 for SFace.
insightface (Python) backend
The insightface backend ships two interchangeable engines under
one image, each paired with a distinct gallery entry so users can pick
by license and accuracy needs.
Licensing - read this first
Gallery entry
Detector + recognizer
Size
License
insightface-buffalo-l
SCRFD-10GF + ArcFace R50 + GenderAge
~326 MB
Non-commercial research only (upstream insightface weights)
insightface-buffalo-s
SCRFD-500MF + MBF + GenderAge
~159 MB
Non-commercial research only
insightface-opencv
YuNet + SFace
~40 MB
Apache 2.0 - commercial-safe
The insightface Python library itself is MIT, but the pretrained model
packs (buffalo_l, buffalo_s, antelopev2) are released by the upstream
maintainers for non-commercial research use only. Pick the
insightface-opencv entry for production / commercial deployments.
Quickstart
Pull the commercial-safe backend (recommended for copy-paste):
curl -sX POST http://localhost:8080/v1/face/forget \
-d '{"id": "8b7..."}'# → 204 No Content
Warning
Storage caveat. The default vector store is in-memory. All
registered faces are lost when LocalAI restarts. Persistent storage
(pgvector) is a tracked future enhancement - the face-recognition HTTP
API is designed to swap the backing store without changing the wire
format.
API reference
POST /v1/face/verify (1:1)
field
type
description
model
string
gallery entry name (e.g. insightface-buffalo-l)
img1, img2
string
URL, base64, or data-URI
threshold
float, optional
cosine-distance cutoff; default depends on engine
anti_spoofing
bool, optional
also run MiniFASNet liveness on each image - see Antispoofing
Returns verified, distance, threshold, confidence, model,
img1_area, img2_area, and processing_time_ms. When
anti_spoofing is set, the response also carries per-image liveness
fields: img1_is_real, img1_antispoof_score, img2_is_real,
img2_antispoof_score. A failed liveness check on either image forces
verified=false regardless of similarity.
POST /v1/face/analyze
Returns demographic attributes for every detected face:
field
type
description
model
string
gallery entry
img
string
URL / base64 / data-URI
actions
string[]
subset of ["age","gender","emotion","race"]; empty = all supported
Only insightface-buffalo-l / insightface-buffalo-s populate age and
gender (genderage head). insightface-opencv returns face regions with
empty attributes - SFace has no demographic classifier. Emotion and
race are always empty in the current release.
POST /v1/face/register (1:N enrollment)
field
type
description
model
string
face recognition model
img
string
face to enroll
name
string
human-readable label
labels
map[string]string, optional
arbitrary metadata
store
string, optional
vector store model; defaults to local-store
Returns {id, name, registered_at}. The id is an opaque UUID used by
/v1/face/identify and /v1/face/forget.
POST /v1/face/identify (1:N recognition)
field
type
description
model
string
face recognition model
img
string
probe image
top_k
int, optional
max matches to return; default 5
threshold
float, optional
cosine-distance cutoff; default 0.35 (ArcFace)
store
string, optional
vector store model; defaults to local-store
Returns a list of matches sorted by ascending distance, each with id,
name, labels, distance, confidence, and match
(distance ≤ threshold).
POST /v1/face/forget
field
type
description
id
string
ID returned by /v1/face/register
Returns 204 No Content on success, 404 Not Found if the ID is
unknown.
POST /v1/face/embed
Returns the L2-normalized face embedding vector for the detected face.
field
type
description
model
string
face model
img
string
URL / base64 / data-URI
Returns {embedding: float[], dim: int, model: string}. Dimension is
512 for the insightface ArcFace/MBF recognizers and 128 for OpenCV’s
SFace.
Note: the OpenAI-compatible /v1/embeddings endpoint is
intentionally text-only by contract (input is a string or list of
strings of TEXT to embed) - passing an image data-URI there does
nothing useful. Use /v1/face/embed for image inputs.
Reused endpoint
POST /v1/detection - returns face bounding boxes with
class_name: "face"; works for both engines.
Antispoofing (liveness detection)
All gallery entries ship the Silent-Face-Anti-Spoofing
MiniFASNetV2 + MiniFASNetV1SE ensemble (Apache 2.0, ~4 MB total, CPU-only)
alongside the face recognition weights. Set anti_spoofing: true on
/v1/face/verify or /v1/face/analyze to run liveness on each detected
face. The two models look at different crop scales and their softmax
outputs are averaged before argmax - the upstream-recommended setup.
If either image fails liveness (is_real=false), verified is forced
to false - similarity alone is not enough.
/v1/face/analyze reports per-face is_real and antispoof_score
when the flag is set.
Fail-loud semantics. If anti_spoofing: true is sent against a
model installed without the MiniFASNet files (e.g. a custom entry that
only listed the face recognition weights), the request returns a gRPC
FAILED_PRECONDITION error - the endpoint will never silently return
is_real=false. Re-install the gallery entry or point the backend at a
model that bundles the MiniFASNet ONNX files.
Info
The MiniFASNet score is best at catching printed photos and screen
replays. Deepfake videos and high-quality prosthetics are out of
scope - liveness here is a low-cost first line of defence, not a
guarantee. For higher assurance, combine with challenge-response (e.g.
ask the user to turn their head).
Choosing an engine
Need
Entry
Commercial product
insightface-opencv
Highest accuracy (research / demos)
insightface-buffalo-l
Edge / low-memory / research
insightface-buffalo-s
The recommended default threshold for /v1/face/verify and
/v1/face/identify depends on the recognizer:
Recognizer
Cosine-distance threshold
ArcFace R50 (buffalo_l)
~0.35
MBF (buffalo_s)
~0.40
SFace (opencv)
~0.50
Pass threshold explicitly when switching engines - the per-engine
default only fires when the field is omitted.
Related features
Object Detection - generic bounding-box
detection; /v1/detection works with the insightface backend too.
Embeddings - raw vector extraction; face
embeddings live in the same endpoint under the hood.
Stores - the generic vector store powering the
1:N recognition pipeline.
Note: To set a negative prompt, you can split the prompt with |, for instance: a cute baby sea otter|malformed.
curl http://localhost:8080/v1/images/generations -H "Content-Type: application/json" -d '{
"prompt": "floating hair, portrait, ((loli)), ((one girl)), cute face, hidden hands, asymmetrical bangs, beautiful detailed eyes, eye shadow, hair ornament, ribbons, bowties, buttons, pleated skirt, (((masterpiece))), ((best quality)), colorful|((part of the head)), ((((mutated hands and fingers)))), deformed, blurry, bad anatomy, disfigured, poorly drawn face, mutation, mutated, extra limb, ugly, poorly drawn hands, missing limb, blurry, floating limbs, disconnected limbs, malformed hands, blur, out of focus, long neck, long body, Octane renderer, lowres, bad anatomy, bad hands, text",
"size": "256x256"
}'
Backends
stablediffusion-ggml
This backend is based on stable-diffusion.cpp. Every model supported by that backend is supported indeed with LocalAI.
Setup
There are already several models in the gallery that are available to install and get up and running with this backend, you can for example run flux by searching it in the Model gallery (flux.1-dev-ggml) or start LocalAI with run:
local-ai run flux.1-dev-ggml
To use a custom model, you can follow these steps:
Create a model file stablediffusion.yaml in the models folder:
Download the required assets to the models repository
Start LocalAI
Memory and device placement options
When a model does not fit entirely in VRAM, the following options: control where weights and computation are placed. They map directly to the upstream stable-diffusion.cpp options.
Option
Example
Description
backend
backend:clip=cpu,vae=cuda0,diffusion=vulkan0
Runtime (compute) backend assignment per component. Use cpu to place a component’s compute on the CPU. Component keys include te (text encoder / CLIP), vae, diffusion, controlnet.
params_backend
params_backend:diffusion=disk,clip=cpu
Where parameters (weights) are stored. Supports cpu, disk (mmap weights from disk to save RAM/VRAM), or per-component specs.
max_vram
max_vram:8 or max_vram:-1
VRAM budget (in GiB) for graph-cut segmented parameter offload. 0 disables it, -1 auto-selects (free VRAM minus ~1 GiB). Also accepts per-backend budgets.
stream_layers
stream_layers:true
Enable residency + prefetch streaming on top of max_vram (no effect unless max_vram is set).
rpc_servers
rpc_servers:localhost:50052,192.168.1.3:50052
Comma-separated list of host:port RPC servers to offload compute to.
pulid_weights_path
pulid_weights_path:pulid.safetensors
Path to PuLID-Flux weights for identity injection.
The following convenience booleans are still accepted and are translated into the backend / params_backend specs above:
Option
Equivalent spec
offload_params_to_cpu:true
params_backend += *=cpu
keep_clip_on_cpu:true
backend += te=cpu
keep_vae_on_cpu:true
backend += vae=cpu
keep_control_net_on_cpu:true
backend += controlnet=cpu
For example, to mmap the diffusion weights from disk while keeping the text encoder on the CPU:
vae_decode_only is still accepted for backwards compatibility but is now a no-op: upstream removed the flag and the model decides automatically.
Distributed inference (RPC workers)
The stablediffusion-ggml backend can offload computation to remote ggml RPC workers, sharding a model that does not fit on a single machine. It reuses the same backend-agnostic rpc-server workers as the llama.cpp backend, so one worker pool can serve both.
Manual: point the model at running workers with the rpc_servers option:
Automatic (peer-to-peer): when LocalAI runs in p2p worker mode, discovered workers are published in the LLAMACPP_GRPC_SERVERS environment variable. The image-generation backend reads that variable automatically (when rpc_servers is not set), so the same local-ai worker p2p-llama-cpp-rpc workers used for text generation also accelerate image generation - no per-model configuration needed.
By default the RPC devices join the pool and participate in placement; combine with the backend / params_backend options above to pin specific components to them (e.g. backend:diffusion=rpc0).
Diffusers
Diffusers is the go-to library for state-of-the-art pretrained diffusion models for generating images, audio, and even 3D structures of molecules. LocalAI has a diffusers backend which allows image generation using the diffusers library.
This is an extra backend - in the container is already available and there is nothing to do for the setup. Do not use core images (ending with -core). If you are building manually, see the build instructions.
Model setup
The models will be downloaded the first time you use the backend from huggingface automatically.
Create a model configuration file in the models directory, for instance to use Linaqruf/animagine-xl with CPU:
The following parameters are available in the configuration file:
Parameter
Description
Default
f16
Force the usage of float16 instead of float32
false
step
Number of steps to run the model for
30
cuda
Enable CUDA acceleration
false
enable_parameters
Parameters to enable for the model
negative_prompt,num_inference_steps,clip_skip
scheduler_type
Scheduler type
k_dpp_sde
cfg_scale
Configuration scale
8
clip_skip
Clip skip
None
pipeline_type
Pipeline type
AutoPipelineForText2Image
lora_adapters
A list of lora adapters (file names relative to model directory) to apply
None
lora_scales
A list of lora scales (floats) to apply
None
There are available several types of schedulers:
Scheduler
Description
ddim
DDIM
pndm
PNDM
heun
Heun
unipc
UniPC
euler
Euler
euler_a
Euler a
lms
LMS
k_lms
LMS Karras
dpm_2
DPM2
k_dpm_2
DPM2 Karras
dpm_2_a
DPM2 a
k_dpm_2_a
DPM2 a Karras
dpmpp_2m
DPM++ 2M
k_dpmpp_2m
DPM++ 2M Karras
dpmpp_sde
DPM++ SDE
k_dpmpp_sde
DPM++ SDE Karras
dpmpp_2m_sde
DPM++ 2M SDE
k_dpmpp_2m_sde
DPM++ 2M SDE Karras
Pipelines types available:
Pipeline type
Description
StableDiffusionPipeline
Stable diffusion pipeline
StableDiffusionImg2ImgPipeline
Stable diffusion image to image pipeline
StableDiffusionDepth2ImgPipeline
Stable diffusion depth to image pipeline
DiffusionPipeline
Diffusion pipeline
StableDiffusionXLPipeline
Stable diffusion XL pipeline
StableVideoDiffusionPipeline
Stable video diffusion pipeline
AutoPipelineForText2Image
Automatic detection pipeline for text to image
VideoDiffusionPipeline
Video diffusion pipeline
StableDiffusion3Pipeline
Stable diffusion 3 pipeline
FluxPipeline
Flux pipeline
FluxTransformer2DModel
Flux transformer 2D model
SanaPipeline
Sana pipeline
Advanced: Additional parameters
Additional arbitrary parameters can be specified in the option field in key/value separated by ::
name: animagine-xloptions:
- "cfg_scale:6"
Note: There is no complete parameter list. Any parameter can be passed arbitrarily and is passed to the model directly as argument to the pipeline. Different pipelines/implementations support different parameters.
The example above, will result in the following python code when generating images:
pipe(
prompt="A cute baby sea otter", # Options passed via API size="256x256", # Options passed via API cfg_scale=6# Additional parameter passed via configuration file)
Usage
Text to Image
Use the image generation endpoint with the model name from the configuration file:
LocalAI can generate videos from text prompts and optional image or audio conditioning via the /video endpoint. Supported backends include diffusers, stablediffusion, vllm-omni, and the dedicated longcat-video backend.
API
Method:POST
Endpoint:/video
Request
The request body is JSON with the following fields:
Parameter
Type
Required
Default
Description
model
string
Yes
Model name to use
prompt
string
Yes
Text description of the video to generate
negative_prompt
string
No
What to exclude from the generated video
start_image
string
No
Starting image as base64 string or URL
end_image
string
No
Ending image for guided generation
audio
string
No
Audio conditioning as base64, a data URI, or URL
width
int
No
512
Video width in pixels
height
int
No
512
Video height in pixels
num_frames
int
No
Number of frames
fps
int
No
Frames per second
seconds
string
No
Duration in seconds
size
string
No
Size specification (alternative to width/height)
input_reference
string
No
Input reference for the generation
seed
int
No
Random seed for reproducibility
cfg_scale
float
No
Classifier-free guidance scale
step
int
No
Number of inference steps
response_format
string
No
url
url to return a file URL, b64_json for base64 output
params
object
No
Backend-specific string parameters
Response
Returns an OpenAI-compatible JSON response:
Field
Type
Description
created
int
Unix timestamp of generation
id
string
Unique identifier (UUID)
data
array
Array of generated video items
data[].url
string
URL path to video file (if response_format is url)
data[].b64_json
string
Base64-encoded video (if response_format is b64_json)
Usage
First install a video-generation model from the gallery (the examples below use longcat-video):
local-ai run longcat-video
Generate a video from a text prompt
curl http://localhost:8080/video \
-H "Content-Type: application/json"\
-d '{
"model": "longcat-video",
"prompt": "A cat playing in a garden on a sunny day",
"width": 512,
"height": 512,
"num_frames": 16,
"fps": 8
}'
curl http://localhost:8080/video \
-H "Content-Type: application/json"\
-d '{
"model": "longcat-video",
"prompt": "Ocean waves on a beach",
"response_format": "b64_json"
}'
LongCat-Video and Avatar 1.5
LocalAI’s longcat-video backend serves Meituan’s official LongCat video-generation models through the /video API and the Studio Video page.
Gallery model
Upstream checkpoint
Inputs
Output
longcat-video
meituan-longcat/LongCat-Video
text, optional start image
video
longcat-video-avatar-1.5
meituan-longcat/LongCat-Video-Avatar-1.5
text, audio, optional portrait
video with the source audio
The base checkpoint supports text-to-video and image-to-video. Avatar 1.5 adds audio-driven character animation, optional portrait conditioning, and continuation segments for longer speech.
Warning
LongCat is a large, CUDA-only model family. LocalAI publishes this backend for Linux with NVIDIA CUDA 12 or CUDA 13 on x86_64 and CUDA 13 on ARM64. CPU, ROCm, and macOS images are not available. Avatar 1.5 also loads components from the base checkpoint, so reserve substantial disk and GPU or unified memory.
Install from the Model Gallery
Install one or both recipes from Models in the web UI, or use the CLI:
You can also import either official Hugging Face URL. The importer recognizes the two repositories and writes a longcat-video model config with the appropriate use case and input/output modalities.
The required OCI backend is installed automatically when LocalAI first loads the model. The hardware detector selects the CUDA 12, CUDA 13, or CUDA 13 ARM64 variant.
DGX Spark and NVIDIA ARM64
Use a LocalAI CUDA 13 ARM64 image as described in GPU acceleration. The backend defaults to PyTorch SDPA, avoiding the FlashAttention dependency that is commonly unavailable on Blackwell ARM64 systems.
For unified-memory systems, start with BF16 (use_int8:false, the default). INT8 lowers steady-state DiT memory but can have a higher load-time peak because the full model is materialized before the quantized weights are applied.
Generate in Studio
Open Studio, then choose Video.
Select longcat-video or longcat-video-avatar-1.5.
Enter a prompt and choose 832x480 or 1280x720.
Expand Reference media to upload a start image. For Avatar 1.5, upload or record the speech under Avatar audio.
Select Generate.
The base model can run without a reference image for text-to-video. Avatar 1.5 requires audio; the portrait is optional.
LongCat API examples
Text-to-video
curl http://localhost:8080/video \
-H "Content-Type: application/json"\
-d '{
"model": "longcat-video",
"prompt": "A cinematic tracking shot through a misty redwood forest",
"width": 832,
"height": 480,
"num_frames": 93,
"fps": 15
}'
Image-to-video
start_image accepts raw base64, a browser-style data URI, or a public HTTP(S) URL:
curl http://localhost:8080/video \
-H "Content-Type: application/json"\
-d "{
\"model\": \"longcat-video\",
\"prompt\": \"The subject turns toward the camera as leaves move in the breeze\",
\"start_image\": \"$(base64 --wrap=0 portrait.png)\",
\"params\": {
\"resolution\": \"480p\"
}
}"
Avatar from speech and a portrait
audio accepts raw base64, a data URI, or a public HTTP(S) URL. Each staged image or audio input is limited to 128 MiB.
Avatar output is generated at 25 FPS and is muxed with the submitted audio. When neither num_frames nor params.num_segments is provided, LocalAI derives the continuation count from the audio duration, up to the model’s max_segments setting.
LongCat model configuration
The gallery and importer make each model self-describing. A manual Avatar 1.5 config looks like this:
The explicit modality declarations are used by GET /v1/models/capabilities and attachment-aware clients. They avoid inferring model behavior from backend or checkpoint names.
Load options
Model load options use key:value entries in options:
Option
Default
Description
attention_backend
sdpa
sdpa, auto, flash2, flash3, or xformers; packaged images guarantee sdpa
use_distill
Avatar: true; base: false
Use the checkpoint’s accelerated distillation path
use_int8
false
Use Avatar 1.5’s INT8 DiT; unsupported by the base model
base_model
meituan-longcat/LongCat-Video
Base tokenizer, text encoder, and VAE used by Avatar 1.5
max_segments
8
Maximum continuation segments accepted for one request
resolution
480p
Default image-conditioned resolution: 480p or 720p
The initial backend supports one GPU per process. Tensor or context parallel sizes above one are rejected.
Per-request parameters
The /video request’s params object accepts string values:
Parameter
Description
num_segments
Explicit number of Avatar continuation segments
audio_guidance_scale
Audio classifier-free guidance when distillation is disabled
offload_kv_cache
Offload continuation KV cache (true or false)
ref_img_index
Reference-frame index used during continuation
mask_frame_range
Number of frames blended around continuation boundaries
resolution
Per-request image-conditioned resolution (480p or 720p)
With distillation enabled, Avatar uses eight inference steps and fixed text/audio guidance of 1.0. Disable use_distill in the model config before tuning step, cfg_scale, or audio_guidance_scale.
LongCat troubleshooting
HTTP 400, audio is required: Avatar 1.5 was selected without audio.
HTTP 400, request needs too many segments: trim the audio or raise max_segments in the model options.
HTTP 412: the installed LocalAI runtime cannot select a compatible NVIDIA backend image.
Out of memory while loading: use BF16 on unified-memory hardware, close other GPU workloads, or reduce model concurrency. INT8 is not guaranteed to reduce peak load memory.
Slow first request: the backend and checkpoints are downloaded and loaded on demand; subsequent requests reuse the loaded pipeline.
Error Responses
Status Code
Description
400
Missing or invalid model or request parameters
412
The selected backend cannot run on the available hardware
500
Backend error during video generation
Embeddings
LocalAI supports generating embeddings for text or list of tokens.
For face embeddings specifically, see the
Face Recognition feature - it produces
512-d L2-normalized vectors tuned for face similarity.
The embedding endpoint is compatible with llama.cpp models, bert.cpp models and sentence-transformers models available in huggingface.
Using Gallery Models
LocalAI provides a model gallery with pre-configured embedding models. To use a gallery model:
Ensure the model is available in the gallery (check Model Gallery)
Use the model name directly in your API calls
Example gallery models:
qwen3-embedding-4b - Qwen3 Embedding 4B model
qwen3-embedding-8b - Qwen3 Embedding 8B model
qwen3-embedding-0.6b - Qwen3 Embedding 0.6B model
Example: Using Qwen3-Embedding-4B from Gallery
curl http://localhost:8080/embeddings -X POST -H "Content-Type: application/json" -d '{
"input": "My text to embed",
"model": "qwen3-embedding-4b",
"dimensions": 2560
}'
Manual Setup
Create a YAML config file in the models directory. Specify the backend and the model file.
name: text-embedding-ada-002# The model name used in the APIparameters:
model: <model_file>backend: "<backend>"embeddings: true
Huggingface embeddings
To use sentence-transformers and models in huggingface you can use the sentencetransformers embedding backend.
The sentencetransformers backend is an optional backend of LocalAI and uses Python. If you are running LocalAI from the containers you are good to go and should be already configured for use.
For local execution, you also have to specify the extra backend in the EXTERNAL_GRPC_BACKENDS environment variable.
The sentencetransformers backend does support only embeddings of text, and not of tokens. If you need to embed tokens you can use the bert backend or llama.cpp.
No models are required to be downloaded before using the sentencetransformers backend. The models will be downloaded automatically the first time the API is used.
Llama.cpp embeddings
Embeddings with llama.cpp are supported with the llama-cpp backend, it needs to be enabled with embeddings set to true.
Returned embedding dimensions don’t match expected dimensions
Solution:
Use the dimensions parameter in your API request to specify the output dimension
Qwen3-Embedding models support dimensions from 32 to 2560 (4B) or 4096 (8B)
curl http://localhost:8080/embeddings -X POST -H "Content-Type: application/json" -d '{
"input": "My text",
"model": "qwen3-embedding-4b",
"dimensions": 1024
}'
Issue: Model not found
Symptoms:
API returns 404 or “model not found” error
Solution:
Ensure the model is properly configured in the models directory
Check that the model name in your API request matches the name field in the configuration
For gallery models, ensure the gallery is properly loaded
Qwen3 Embedding Models Specifics
The Qwen3 Embedding series models have these characteristics:
Model
Parameters
Max Context
Max Dimensions
Supported Languages
qwen3-embedding-0.6b
0.6B
32k
1024
100+
qwen3-embedding-4b
4B
32k
2560
100+
qwen3-embedding-8b
8B
32k
4096
100+
All models support:
User-defined output dimensions (32 to max dimensions)
Multilingual text embedding (100+ languages)
Instruction-tuned embedding with custom instructions
Reranker
A reranking model, often referred to as a cross-encoder, is a core component in the two-stage retrieval systems used in information retrieval and natural language processing tasks.
Given a query and a set of documents, it will output similarity scores.
We can use then the score to reorder the documents by relevance in our RAG system to increase its overall accuracy and filter out non-relevant results.
LocalAI supports reranker models, and you can use them by using the rerankers backend, which uses rerankers.
Usage
You can test rerankers by using container images with python (this does NOT work with core images) and a model config file like this, or by installing cross-encoder from the gallery in the UI:
curl http://localhost:8080/v1/rerank \
-H "Content-Type: application/json"\
-d '{
"model": "jina-reranker-v1-base-en",
"query": "Organic skincare products for sensitive skin",
"documents": [
"Eco-friendly kitchenware for modern homes",
"Biodegradable cleaning supplies for eco-conscious consumers",
"Organic cotton baby clothes for sensitive skin",
"Natural organic skincare range for sensitive skin",
"Tech gadgets for smart homes: 2024 edition",
"Sustainable gardening tools and compost solutions",
"Sensitive skin-friendly facial cleansers and toners",
"Organic food wraps and storage solutions",
"All-natural pet food for dogs with allergies",
"Yoga mats made from recycled materials"
],
"top_n": 3
}'
Stores
Stores are an experimental feature to help with querying data using similarity search. It is
a low level API that consists of only get, set, delete and find.
Tip
Face recognition uses this store. The 1:N face identification flow
(/v1/face/register, /v1/face/identify, /v1/face/forget) is built
on top of the generic store - see
Face Recognition for the face-oriented
API.
For example if you have an embedding of some text and want to find text with similar embeddings.
You can create embeddings for chunks of all your text then compare them against the embedding of the text you
are searching on.
An embedding here meaning a vector of numbers that represent some information about the text. The
embeddings are created from an A.I. model such as BERT or a more traditional method such as word
frequency.
Previously you would have to integrate with an external vector database or library directly.
With the stores feature you can now do it through the LocalAI API.
Note however that doing a similarity search on embeddings is just one way to do retrieval. A higher level
API can take this into account, so this may not be the best place to start.
API overview
There is an internal gRPC API and an external facing HTTP JSON API. We’ll just discuss the external HTTP API,
however the HTTP API mirrors the gRPC API. Consult pkg/store/client for internal usage.
Everything is in columnar format meaning that instead of getting an array of objects with a key and a value each.
You instead get two separate arrays of keys and values.
Keys are arrays of floating point numbers with a maximum width of 32bits. Values are strings (in gRPC they are bytes).
The key vectors must all be the same length and it’s best for search performance if they are normalized. When
addings keys it will be detected if they are not normalized and what length they are.
All endpoints accept a store field which specifies which store to operate on. Presently they are created
on the fly and there is only one store backend so no configuration is required.
topk limits the number of results returned. The result value is the same as get,
except that it also includes an array of similarities. Where 1.0 is the maximum similarity.
They are returned in the order of most similar to least.
P2P / Federated Inference
Tip
Looking for production-grade horizontal scaling with PostgreSQL and NATS? See Distributed Mode.
Choosing a distributed mode
LocalAI can spread inference across multiple machines in three ways. Pick the one that matches your setup:
Mode
Best for
Guide
P2P / Federated inference
Ad-hoc clusters, community sharing, quick experimentation. Nodes discover each other via a shared libp2p token, with no central server.
This page
Distributed Mode (PostgreSQL + NATS)
Production deployments, Kubernetes, and managed infrastructure. Stateless frontends behind a load balancer, workers self-register, and state lives in PostgreSQL.
For the low-level protocol and endpoints used by P2P workers, see the P2P API reference.
This functionality enables LocalAI to distribute inference requests across multiple worker nodes, improving efficiency and performance. Nodes are automatically discovered and connect via p2p by using a shared token which makes sure the communication is secure and private between the nodes of the network.
LocalAI supports two modes of distributed inferencing via p2p:
Federated Mode: Requests are shared between the cluster and routed to a single worker node in the network based on the load balancer’s decision.
Worker Mode (aka “model sharding” or “splitting weights”): Requests are processed by all the workers which contributes to the final inference result (by sharing the model weights).
A list of global instances shared by the community is available at explorer.localai.io.
Usage
Starting LocalAI with --p2p generates a shared token for connecting multiple instances: and that’s all you need to create AI clusters, eliminating the need for intricate network setups.
Simply navigate to the “Swarm” section in the WebUI and follow the on-screen instructions.
For fully shared instances, initiate LocalAI with –p2p –federated and adhere to the Swarm section’s guidance. This feature, while still experimental, offers a tech preview quality experience.
Federated mode
Federated mode allows to launch multiple LocalAI instances and connect them together in a federated network. This mode is useful when you want to distribute the load of the inference across multiple nodes, but you want to have a single point of entry for the API. In the Swarm section of the WebUI, you can see the instructions to connect multiple instances together.
To start a LocalAI server in federated mode, run:
local-ai run --p2p --federated
This will generate a token that you can use to connect other LocalAI instances to the network or others can use to join the network. If you already have a token, you can specify it using the TOKEN environment variable.
To start a load balanced server that routes the requests to the network, run with the TOKEN:
local-ai federated
To see all the available options, run local-ai federated --help.
The instructions are displayed in the “Swarm” section of the WebUI, guiding you through the process of connecting multiple instances.
Workers mode
Note
This feature is available exclusively with llama-cpp compatible models.
(Note: You can also supply the token via command-line arguments)
The server logs should indicate that new workers are being discovered.
Start inference as usual on the server initiated in step 1.
Environment Variables
There are options that can be tweaked or parameters that can be set using environment variables
Environment Variable
Description
LOCALAI_P2P
Set to “true” to enable p2p
LOCALAI_FEDERATED
Set to “true” to enable federated mode
FEDERATED_SERVER
Set to “true” to enable federated server
LOCALAI_P2P_DISABLE_DHT
Set to “true” to disable DHT and enable p2p layer to be local only (mDNS)
LOCALAI_P2P_ENABLE_LIMITS
Set to “true” to enable connection limits and resources management (useful when running with poor connectivity or want to limit resources consumption)
LOCALAI_P2P_LISTEN_MADDRS
Set to comma separated list of multiaddresses to override default libp2p 0.0.0.0 multiaddresses
LOCALAI_P2P_DHT_ANNOUNCE_MADDRS
Set to comma separated list of multiaddresses to override announcing of listen multiaddresses (useful when external address:port is remapped)
LOCALAI_P2P_BOOTSTRAP_PEERS_MADDRS
Set to comma separated list of multiaddresses to specify custom DHT bootstrap nodes
LOCALAI_P2P_TOKEN
Set the token for the p2p network
LOCALAI_P2P_LOGLEVEL
Set the loglevel for the LocalAI p2p stack (default: info)
LOCALAI_P2P_LIB_LOGLEVEL
Set the loglevel for the underlying libp2p stack (default: fatal)
Architecture
LocalAI uses https://github.com/libp2p/go-libp2p under the hood, the same project powering IPFS. Differently from other frameworks, LocalAI uses peer2peer without a single master server, but rather it uses sub/gossip and ledger functionalities to achieve consensus across different peers.
EdgeVPN is used as a library to establish the network and expose the ledger functionality under a shared token to ease out automatic discovery and have separated, private peer2peer networks.
The weights are split proportional to the memory when running into worker mode, when in federation mode each request is split to every node which have to load the model fully.
Debugging
To debug, it’s often useful to run in debug mode, for instance:
Distributed mode enables horizontal scaling of LocalAI across multiple machines using PostgreSQL for state and node registry, and NATS for real-time coordination. Unlike the P2P/federation approach, distributed mode is designed for production deployments and Kubernetes environments where you need centralized management, health monitoring, and deterministic routing.
Note
Distributed mode requires authentication enabled with a PostgreSQL database - SQLite is not supported. This is because the node registry, job store, and other distributed state are stored in PostgreSQL tables.
Architecture Overview
Frontends are stateless LocalAI instances that receive API requests and route them to worker nodes via the SmartRouter. All frontends share state through PostgreSQL and coordinate via NATS.
Workers are generic processes that self-register with a frontend. They don’t have a fixed backend type - the SmartRouter dynamically installs the required backend via NATS backend.install events when a model request arrives.
Scheduling Algorithm
The SmartRouter uses idle-first scheduling with preemptive eviction:
If the model is already loaded on a node → use it (per-model gRPC address)
Drop any node without room to store the model on its models filesystem (see Disk headroom)
If no node has the model → prefer nodes with enough free VRAM
Fall back to idle nodes (zero models), then least-loaded nodes
If no node has capacity → evict the least-recently-used model with zero in-flight requests to free a node
If all models are busy → wait (with timeout) for a model to become idle, then evict
Send backend.install NATS event with backend name + model ID → worker starts a new gRPC process on a dynamic port
SmartRouter calls gRPC LoadModel on the model-specific port, records in DB
Each model gets its own gRPC backend process, so a single worker can serve multiple models simultaneously (e.g., a chat model and an embedding model).
Prerequisites
PostgreSQL (with pgvector extension recommended for RAG) - used for node registry, job store, auth, and shared state
NATS server - used for real-time backend lifecycle events and file staging
All services must be on the same network (or reachable via configured URLs)
Quick Start with Docker Compose
The easiest way to try distributed mode locally is with the provided Docker Compose file:
docker compose -f docker-compose.distributed.yaml up
This starts PostgreSQL, NATS, a LocalAI frontend, and one worker node. When you send an inference request, the SmartRouter automatically installs the needed backend on the worker and loads the model. See the file for details on adding GPU support, shared volumes, and additional workers.
Tip
Use docker-compose.distributed.yaml for quick local testing. For production, deploy PostgreSQL and NATS as managed services and run frontends/workers on separate hosts.
Frontend Configuration
The frontend is a standard LocalAI instance with distributed mode enabled. These flags are added to the local-ai run command:
Flag
Env Var
Default
Description
--distributed
LOCALAI_DISTRIBUTED
false
Enable distributed mode
--instance-id
LOCALAI_INSTANCE_ID
auto UUID
Unique instance ID for this frontend
--nats-url
LOCALAI_NATS_URL
(required)
NATS server URL (e.g., nats://localhost:4222)
--registration-token
LOCALAI_REGISTRATION_TOKEN
(empty)
Token that workers must provide to register
--registration-require-auth
LOCALAI_REGISTRATION_REQUIRE_AUTH
false
Fail startup when distributed mode is enabled but the registration token is empty (node endpoints and worker file-transfer would otherwise be unauthenticated)
--distributed-require-auth
LOCALAI_DISTRIBUTED_REQUIRE_AUTH
false
Umbrella switch. Implies both --nats-require-auth and --registration-require-auth - one knob to lock down the NATS bus and the registration/file-transfer layer. Set this in production instead of the two granular flags.
--auto-approve-nodes
LOCALAI_AUTO_APPROVE_NODES
false
Auto-approve new worker nodes (skip admin approval)
--distributed-shared-models
LOCALAI_DISTRIBUTED_SHARED_MODELS
false
Assert that every node mounts the same models directory at the same path (a shared volume). When true, the router skips file staging entirely and workers load models directly from the shared path instead of re-downloading them. See Shared models directory.
--distributed-disk-headroom-check
LOCALAI_DISTRIBUTED_DISK_HEADROOM_CHECK
true
Reject worker nodes that lack free space to store the model, at scheduling time rather than partway through staging. When false, node selection ignores free disk; the check still runs and warns when it would have rejected every node. Also toggleable at runtime via the distributed_disk_headroom_check setting. See Disk headroom.
--auth
LOCALAI_AUTH
false
Must be true for distributed mode
--auth-database-url
LOCALAI_AUTH_DATABASE_URL
(required)
PostgreSQL connection URL
--backend-install-timeout
LOCALAI_NATS_BACKEND_INSTALL_TIMEOUT
15m
How long the frontend waits for a worker to acknowledge a backend install before considering the request stalled. Raise it when workers pull large backend images over slow links. If a worker takes longer than this, the operation shows as “still installing in background” in the admin UI and clears once the worker finishes.
--backend-upgrade-timeout
LOCALAI_NATS_BACKEND_UPGRADE_TIMEOUT
15m
Same as the install timeout, applied to backend upgrades (force-reinstall).
--model-load-timeout
LOCALAI_NATS_MODEL_LOAD_TIMEOUT
(derived from checkpoint size)
Pins the deadline for the LoadModel gRPC call the frontend issues to a worker. Leave it unset: by default the deadline is derived from the checkpoint’s on-disk size (see below), which is what the worker actually spends its load time reading. Set it only to pin a specific budget — the value is then used verbatim, including when it is shorter than the derived one, so an operator who wants fast failure gets it.
--expose-node-header
LOCALAI_EXPOSE_NODE_HEADER
false
When enabled, inference responses carry an X-LocalAI-Node header with the ID of the worker node that served the request. Coverage spans the OpenAI-compatible endpoints (chat completions, completions, embeddings, audio transcriptions, audio speech / TTS, image generations, image inpainting), the Jina rerank endpoint (/v1/rerank), the VAD endpoints (/v1/vad, /vad), and the Anthropic Messages (/v1/messages) and Ollama (/api/chat, /api/generate, /api/embed) shims. Useful for debugging, observability and load-balancer attribution. Off by default: the node ID reveals internal cluster topology and should not be exposed on a public endpoint. Best-effort: under heavy concurrency for the same model across multiple replicas, the header may reflect a recent routing decision rather than this exact request’s. Acceptable for observability and debugging.
The model load deadline scales with the checkpoint
The LoadModel deadline starts after the backend is installed and the model files are staged, so it covers only the worker backend’s own checkpoint read and pipeline init. That work is proportional to the bytes on disk, which makes any fixed deadline a model-size cliff rather than a timeout: a 70 GB video checkpoint on a Jetson Thor worker failed reproducibly against the old fixed 5m default (rpc error: code = DeadlineExceeded after 953.5s of wall clock, roughly 11m of which was backend install and staging), and simply raising the constant would only move the cliff to the next larger model while making a genuinely wedged small model hang for the whole inflated duration.
So the deadline is derived per model:
budget = 5m + 20s per GiB of checkpoint, capped at 6h
Checkpoint
Derived budget
2 GB
5m40s
70 GB
28m20s
600 GB
3h25m
The per-GiB rate is deliberately pessimistic — it corresponds to reading weights at about 54 MB/s, below what any supported storage sustains — because the two errors are not symmetric: a budget that is too long costs only failure latency on a load that was going to fail anyway, while a budget that is too short causes a guaranteed false failure on a load that was perfectly healthy.
The size is measured from the model files on the frontend’s disk, over the same set of paths that get staged to the worker. If those files are not present locally — a backend handed a bare HuggingFace repo id fetches its own weights on the worker — there is nothing to measure and the budget stays at the plain 5m default. Pin LOCALAI_NATS_MODEL_LOAD_TIMEOUT for those models if their load is slow.
When the budget is exceeded, the error names the budget, the checkpoint size it was derived from, and the knob that overrides it, instead of surfacing a bare context deadline exceeded.
The cold-load lock ceiling
The router also bounds how long a single cold load may hold the per-model advisory lock, so a worker that dies mid-install cannot pin every other replica’s request for that model. That bound is derived, not configured, and it is based on progress rather than on wall-clock time.
The load starts with a base budget of max(backend-install-timeout + model-load-timeout + 5m, 25m) — with the defaults, 15m + 5m + 5m = 25m. That budget covers the steps that report no progress: node selection, backend install, and the remote LoadModel call. Raising either timeout widens it in step, so a longer load deadline is never clipped.
That base is the hold’s starting budget, not its maximum. Because the derived load budget above can exceed it — a 70 GB checkpoint’s 28m20s against a 25m base — the hold is widened again as the router enters the load phase, by the derived budget plus the same 5m of slack. Without that step the ceiling would cancel a load that was still comfortably inside its own deadline.
While model files are staging, however, the deadline extends every time staging does real work, and expires only once staging has been silent for a 5-minute stall window. Real work means uploaded bytes, and also the resumable-upload verify phase: when a shard is already present on the worker from an earlier attempt, the frontend HEADs it and hashes the local copy to confirm it matches, then skips the transfer. That phase uploads nothing at all — on a 70 GB model resuming with 56 GB already staged it ran for six-plus consecutive minutes at ~45s per shard — so hashing counts as progress too. Otherwise a resumed transfer would be mistaken for a wedged one. Staging time is a function of checkpoint size and available bandwidth, not a constant: a 70 GB model at 26 MB/s needs about 45 minutes, and a 600 GB checkpoint needs hours. A fixed ceiling would therefore be a model-size cliff — every increase just moves the cliff to the next larger model. Extending on progress means a large model transfers for as long as it legitimately needs, while a worker that dies mid-transfer still releases the lock within the stall window.
An absolute cap of 24h ends the hold even if progress keeps arriving, so a degenerate peer trickling a few bytes at a time cannot pin the lock forever. No configuration is needed for either value; both are sized well above any legitimate transfer.
NATS JWT authentication (recommended for production)
By default, NATS connections are anonymous: any client that can reach port 4222 may publish control-plane subjects such as nodes.<id>.backend.install. Enable JWT auth to scope workers to their own node subjects and give the frontend a dedicated service credential.
Flag
Env Var
Description
--nats-account-seed
LOCALAI_NATS_ACCOUNT_SEED
Account signing seed (SU...). The frontend mints a per-node user JWT at registration (nats_jwt in the register response).
--nats-service-jwt
LOCALAI_NATS_SERVICE_JWT
User JWT for the frontend (and optional fallback for agent workers) to publish install/upgrade and related subjects.
--nats-service-seed
LOCALAI_NATS_SERVICE_SEED
User signing seed (SU...) paired with the service JWT.
--nats-worker-jwt-ttl
LOCALAI_NATS_WORKER_JWT_TTL
Lifetime of minted worker JWTs (default 24h).
--nats-require-auth
LOCALAI_NATS_REQUIRE_AUTH
Fail startup if JWT credentials are missing when distributed mode is enabled.
NATS TLS / mTLS (optional)
Use tls:// in --nats-url / LOCALAI_NATS_URL for encrypted transport. When the server uses a private CA or requires client certificates, set:
Flag
Env Var
Description
--nats-tls-ca
LOCALAI_NATS_TLS_CA
PEM file to verify the NATS server (private CA)
--nats-tls-cert
LOCALAI_NATS_TLS_CERT
Client certificate for NATS mTLS
--nats-tls-key
LOCALAI_NATS_TLS_KEY
Client private key (required with --nats-tls-cert)
The same env vars apply to backend workers and local-ai agent-worker. If the server cert is already trusted by the OS, tls:// alone is enough.
Worker register response (when minting is enabled and the node is approved):
Workers connect with that JWT and seed automatically (shown once; store securely). Override with LOCALAI_NATS_JWT / LOCALAI_NATS_USER_SEED if needed. Set LOCALAI_NATS_REQUIRE_AUTH=true on workers when the bus requires credentials.
When LOCALAI_NATS_REQUIRE_AUTH=true and no static credentials are provided, a worker that registers while still pending admin approval keeps re-registering (with backoff) until an admin approves it and the frontend mints its JWT - it does not start unauthenticated. This retry is bounded: if the node is never approved (or no credentials are minted) after a large number of attempts, the worker exits non-zero so the failure is visible (a crash-looping or failed worker) rather than hanging silently. Minted worker JWTs are also refreshed automatically before they expire (the worker re-registers at ~75% of the JWT lifetime), so long-running workers survive past LOCALAI_NATS_WORKER_JWT_TTL; the NATS connection picks up the new JWT on its next reconnect. If refresh fails persistently, the worker exits (to restart and re-acquire) rather than drifting toward an expired, unrenewable JWT. Statically configured (LOCALAI_NATS_JWT) and service (LOCALAI_NATS_SERVICE_JWT) credentials are used as-is and not refreshed.
Generate operator/account material with scripts/nats-auth-setup.sh (requires nsc). Configure the NATS server with account resolver JWTs before enabling LOCALAI_NATS_REQUIRE_AUTH.
Note
LOCALAI_AUTH (HTTP users/sessions) and NATS JWTs are separate: end-user API keys do not connect to NATS. HTTP registration still uses LOCALAI_REGISTRATION_TOKEN.
Optional: S3 Object Storage
For multi-host deployments where workers don’t share a filesystem, S3-compatible storage enables distributed file transfer (model files, configs):
Flag
Env Var
Default
Description
--storage-url
LOCALAI_STORAGE_URL
(empty)
S3 endpoint URL (e.g., http://minio:9000)
--storage-bucket
LOCALAI_STORAGE_BUCKET
localai
S3 bucket name
--storage-region
LOCALAI_STORAGE_REGION
us-east-1
S3 region
--storage-access-key
LOCALAI_STORAGE_ACCESS_KEY
(empty)
S3 access key
--storage-secret-key
LOCALAI_STORAGE_SECRET_KEY
(empty)
S3 secret key
When S3 is not configured, model files are transferred directly from the frontend to workers via HTTP - no shared filesystem needed. Each worker runs a small HTTP file transfer server alongside the gRPC backend process. This is the default and works out of the box.
For high-throughput or very large model files, S3 can be more efficient since it avoids streaming through the frontend.
Shared models directory
If every node (frontend and workers) mounts the same models directory at the same path - for example a shared volume or network filesystem, as shown in the “Shared Volume Mode” section of docker-compose.distributed.yaml - the model files are already present on each worker at their canonical path. In that case staging is wasted work: it copies files that already exist into a per-model subdirectory the worker then loads from, which shows up as a re-download of a model you already have.
Set LOCALAI_DISTRIBUTED_SHARED_MODELS=true (or --distributed-shared-models) on the frontend to skip staging entirely. The router then leaves the model’s absolute paths untouched and the worker loads them directly from the shared volume.
This flag is a contract you assert: all nodes must mount identical paths. Leave it off (the default) when workers have independent models directories - the frontend stages files to them over HTTP (or S3) as described above.
Model artifact staging
For managed Hugging Face artifacts, the controller resolves the repository and
downloads every selected file. Workers receive the committed snapshot through
the existing directory stager. They never receive HF_TOKEN and do not contact
Hugging Face for managed artifacts.
With LOCALAI_DISTRIBUTED_SHARED_MODELS enabled, workers use the shared
absolute snapshot path and skip transfer. Otherwise, the controller stages the
complete snapshot tree to each worker before loading the backend.
Warning
Every controller and worker must have enough disk space for its own snapshot
copy unless shared-models mode is enabled. Account for temporary partial files
during installation as well as the committed snapshot.
Warning
The worker HTTP file transfer server is authenticated by LOCALAI_REGISTRATION_TOKEN. If the token is empty, the server fails open - anyone who can reach the port gets read/write access to the worker’s models/staging/data directories (a remote model-poisoning / exfiltration vector). The worker logs a loud warning at startup in this case. Always set LOCALAI_REGISTRATION_TOKEN in distributed mode, and set LOCALAI_DISTRIBUTED_REQUIRE_AUTH=true (frontend and workers) to make a missing token or missing NATS credentials a hard startup error rather than a silent fail-open. Firewall the file-transfer port (gRPC base − 1) so only the frontend can reach it.
Watching Backend Installs
While a worker downloads a backend, the admin Operations Bar at the top
of the UI shows real-time progress: current file, downloaded/total bytes,
and percentage. This works the same as single-node mode.
When an install targets more than one worker, an N nodes chevron
appears on the operation row. Click it to expand a per-node breakdown,
with one row per worker showing:
A status pill: Queued (gray), Downloading (blue), Worker busy
(yellow), Done (green), or Failed (red).
The file currently being downloaded with current/total bytes and percentage.
A thin per-node progress bar.
Any error returned by the worker.
The yellow Worker busy pill means the worker took longer than
--backend-install-timeout to acknowledge but is most likely still
working in the background. The admin UI clears it as soon as the worker
finishes; no action is required from the operator.
If a worker is running an older LocalAI release that does not report
progress, its row in the breakdown will still show terminal status
(queued / done / failed / worker busy) but no per-file progress.
Worker Configuration
Workers are started with the worker subcommand. Each worker is generic - it doesn’t need a backend type at startup:
Highest port the worker may assign to a backend gRPC process. Each backend gets its own port, allocated upward from the base port, so the width of [base port, this] caps how many backends this worker can run at once (see Backend gRPC port range)
--advertise-addr
LOCALAI_ADVERTISE_ADDR
(auto)
Address the frontend uses to reach this node (see below)
--http-addr
LOCALAI_HTTP_ADDR
gRPC port - 1
HTTP file transfer server bind address
--advertise-http-addr
LOCALAI_ADVERTISE_HTTP_ADDR
(auto)
HTTP address the frontend uses for file transfer
--register-to
LOCALAI_REGISTER_TO
(required)
Frontend URL for self-registration
--node-name
LOCALAI_NODE_NAME
hostname
Human-readable node name
--registration-token
LOCALAI_REGISTRATION_TOKEN
(empty)
Token to authenticate with the frontend
--registration-require-auth
LOCALAI_REGISTRATION_REQUIRE_AUTH
false
Refuse to start the HTTP file-transfer server when no registration token is set (it would otherwise fail open)
--distributed-require-auth
LOCALAI_DISTRIBUTED_REQUIRE_AUTH
false
Umbrella switch implying both --registration-require-auth and --nats-require-auth
--heartbeat-interval
LOCALAI_HEARTBEAT_INTERVAL
10s
Interval between heartbeat pings
--nats-url
LOCALAI_NATS_URL
(required)
NATS URL for backend installation and file staging
--nats-jwt
LOCALAI_NATS_JWT
(empty)
Optional override for the nats_jwt returned at registration
--nats-user-seed
LOCALAI_NATS_USER_SEED
(empty)
Optional override for nats_user_seed from registration
--nats-require-auth
LOCALAI_NATS_REQUIRE_AUTH
false
Require NATS JWT+seed (from registration or env)
--nats-tls-ca
LOCALAI_NATS_TLS_CA
(empty)
PEM file for NATS server CA
--nats-tls-cert
LOCALAI_NATS_TLS_CERT
(empty)
Client certificate for NATS mTLS
--nats-tls-key
LOCALAI_NATS_TLS_KEY
(empty)
Client private key for NATS mTLS
--backends-path
LOCALAI_BACKENDS_PATH
./backends
Path to backend binaries
--models-path
LOCALAI_MODELS_PATH
./models
Path to model files
--vram-budget
LOCALAI_VRAM_BUDGET
(empty)
Cap the VRAM this node advertises for model placement, as a percentage (e.g. 80%) or an absolute amount (e.g. 12GB). Empty uses all detected VRAM. See Per-node VRAM budget.
Tip
Advertise address: The --addr flag is the local bind address for gRPC. The --advertise-addr is the address the frontend stores and uses to reach the worker via gRPC. If not set, the worker auto-derives it by replacing 0.0.0.0 with the OS hostname (which in Docker is the container ID, resolvable via Docker DNS). Set --advertise-addr explicitly when the auto-detected hostname is not routable from the frontend (e.g., in Kubernetes, use the pod’s service DNS name).
HTTP file transfer: Each worker also runs a small HTTP server for file transfer (model files, configs). By default it listens on the gRPC base port - 1 (e.g., if gRPC base is 50051, HTTP is on 50050). gRPC ports grow upward from the base port as additional models are loaded. Set --advertise-http-addr if the auto-detected address is not routable from the frontend.
Worker Health Probes
The worker’s HTTP server (base port - 1, default 50050) exposes two unauthenticated probes:
Endpoint
Meaning
/healthz
Liveness. 200 whenever the process is up and serving. Deliberately independent of readiness, so a brief NATS outage does not trigger a restart storm across every worker.
/readyz
Readiness. 200 only when the worker is registered and its NATS connection is live; 503 otherwise.
/readyz reports something the frontend cannot see on its own. The node registry’s status and last_heartbeat are driven by an HTTP heartbeat to the frontend, which is a different network path from NATS — a worker can keep heartbeating while its NATS link is dead, and so appear healthy in the registry while being unable to receive any work. The local probe closes that gap.
The container image’s HEALTHCHECK detects worker mode and probes this endpoint automatically; no HEALTHCHECK_ENDPOINT override is needed. Set HEALTHCHECK_ENDPOINT only to pin an explicit URL.
Worker Address Configuration
The simplest way to configure a worker’s network address is with a single variable:
Variable
Description
LOCALAI_ADDR
Reachable address of this worker (host:port). The port is used as the base for gRPC backend processes, and port-1 for the HTTP file transfer server.
For advanced networking scenarios (NAT, load balancers, separate gRPC/HTTP ports), the following override variables are available:
Variable
Description
Default
LOCALAI_SERVE_ADDR
gRPC base port bind address
0.0.0.0:50051
LOCALAI_GRPC_MAX_PORT
Highest port assignable to a backend gRPC process
65535
LOCALAI_HTTP_ADDR
HTTP file transfer bind address
0.0.0.0:{gRPC port - 1}
LOCALAI_ADVERTISE_ADDR
Public gRPC address (if different from LOCALAI_ADDR)
Derived from LOCALAI_ADDR
LOCALAI_ADVERTISE_HTTP_ADDR
Public HTTP address (if different from gRPC host)
Derived from advertise host + HTTP port
Backend gRPC port range
Every backend process a worker starts listens on its own gRPC port, allocated
upward from the worker’s base port (LOCALAI_SERVE_ADDR, default 50051).
LOCALAI_GRPC_MAX_PORT sets the top of that range. The width of
[base port, LOCALAI_GRPC_MAX_PORT] is therefore a hard cap on how many
backend processes one worker can run concurrently.
Set it when the worker shares a host with other services and you need to keep
the rest of the ephemeral range clear, or when you want a worker’s backend
count bounded explicitly rather than by whatever the host happens to allow:
# Confine this worker's backends to 50051-50150 (100 concurrent backends).LOCALAI_SERVE_ADDR=0.0.0.0:50051
LOCALAI_GRPC_MAX_PORT=50150
Leave it unset (the default) and the worker may use anything up to 65535.
Budget headroom above your real concurrency. When a backend stops, its port is
held briefly before it can be reused, so a worker with heavy start/stop churn
has more ports tied up than it has running backends at any instant. If the
range does fill, backend starts fail with:
no free gRPC port in range: 50051-50150 is fully consumed by 100 running
backend(s) and 12 port(s) still in quarantine; raise LOCALAI_GRPC_MAX_PORT to
widen the range
Raise LOCALAI_GRPC_MAX_PORT (or reduce how many models you schedule onto that
worker). A value above 65535 is clamped, and a value below the base port is
ignored in favour of the full range, so a typo degrades the setting rather than
wedging every backend start on the node.
NVIDIA GPU support
When running workers in a container, two runtime settings affect how VRAM
usage is reported back to the frontend:
NVIDIA_DRIVER_CAPABILITIES must include utility. Without it, the
NVML library (and therefore nvidia-smi) is not available inside the
container. CUDA compute still works, but the worker cannot query free VRAM
and the Nodes page will show the node as fully used. Set
NVIDIA_DRIVER_CAPABILITIES=compute,utility (or, with the NVIDIA CDI
runtime, list capabilities: [gpu, utility] on the device reservation).
Run the container with init: true (or docker run --init). The
worker process becomes PID 1 in the container and cannot reap zombies on
its own. Without an init, nvidia-smi calls can fail intermittently with
waitid: no child processes, which briefly clears free-VRAM metrics.
Unified memory devices (Jetson, DGX Spark / GB10, Thor): these SoCs
share one physical RAM between CPU and GPU. LocalAI detects them via
/sys/devices/soc0/family and /sys/devices/soc0/soc_id (no nvidia-smi
required) and reports system-RAM figures as VRAM. Free VRAM therefore tracks
MemAvailable in /proc/meminfo.
Node Labels
Workers can declare labels at startup for scheduling constraints:
Workers start as generic processes with no backend installed. When the SmartRouter needs to load a model on a worker, it sends a NATS backend.install event with the backend name and model ID. The worker:
Installs the backend from the gallery (if not already installed)
Starts a new gRPC backend process on a dynamic port (each model gets its own process)
Replies with the allocated gRPC address
The SmartRouter calls LoadModel via direct gRPC to that address
Workers can run multiple models concurrently - each model gets its own gRPC process on a separate port. For example, an embedding model on port 50051 and a chat model on port 50052 can run simultaneously on the same worker.
When the SmartRouter needs to free capacity, it can unload models with zero in-flight requests without affecting other models on the same worker.
Node Management API
The API is split into two prefixes with distinct auth:
/api/node/ - Node self-service
Used by workers themselves (registration, heartbeat, etc.). Authenticated via the registration token, exempt from global auth.
Method
Path
Description
POST
/api/node/register
Register a new worker
POST
/api/node/:id/heartbeat
Update heartbeat timestamp
POST
/api/node/:id/drain
Mark self as draining
GET
/api/node/:id/models
Query own loaded models
DELETE
/api/node/:id
Deregister self
/api/nodes/ - Admin management
Used by the WebUI and admin API consumers. Requires admin authentication.
Method
Path
Description
GET
/api/nodes
List all registered workers
GET
/api/nodes/:id
Get a single worker by ID
GET
/api/nodes/:id/models
List models loaded on a worker
DELETE
/api/nodes/:id
Admin-delete a worker
POST
/api/nodes/:id/drain
Admin-drain a worker
POST
/api/nodes/:id/approve
Approve a pending worker node
POST
/api/nodes/:id/backends/install
Install a backend on a worker
POST
/api/nodes/:id/backends/upgrade
Upgrade (force-reinstall) a backend on a worker
POST
/api/nodes/:id/backends/delete
Delete a backend from a worker
POST
/api/nodes/:id/models/unload
Unload a model from a worker
POST
/api/nodes/:id/models/delete
Delete model files from a worker
PUT
/api/nodes/:id/vram-budget
Set a VRAM budget for a worker ({"value":"80%"})
DELETE
/api/nodes/:id/vram-budget
Clear a worker’s VRAM budget (revert to all detected VRAM)
The Nodes page in the React WebUI provides a visual overview of all registered workers, their statuses, and loaded models. The page opens with a one-line cluster pulse summarising node health and an attention callout that surfaces nodes needing action (for example pending approvals). Below that, a roster of node panels lists each worker with its inline model chips (no expand click needed), filtered by an All / Backend / Agent segmented control. Selecting a panel opens a dedicated node detail page at /app/nodes/:id with per-node metrics, models, and backend actions. Model scheduling lives on its own Scheduling page (separate nav item), not as a tab on the Nodes page.
Per-node VRAM budget
Each worker advertises its detected VRAM, and the SmartRouter uses that number when picking a node with enough free memory. You can cap the VRAM a node offers for placement so it never gets scheduled beyond a chosen limit, leaving headroom for other workloads on that machine.
There are two ways to set the cap:
At the worker: start it with --vram-budget / LOCALAI_VRAM_BUDGET (see Worker Configuration).
From the frontend, live: set it per node in the node capacity editor on the node detail page, or via the admin API:
# Cap node placement at 80% of its detected VRAMcurl -X PUT http://frontend:8080/api/nodes/<node-id>/vram-budget \
-H "Authorization: Bearer <admin-token>"\
-H "Content-Type: application/json"\
-d '{"value":"80%"}'# Or an absolute amountcurl -X PUT http://frontend:8080/api/nodes/<node-id>/vram-budget \
-H "Authorization: Bearer <admin-token>"\
-d '{"value":"12GB"}'# Clear the budget (revert to all detected VRAM)curl -X DELETE http://frontend:8080/api/nodes/<node-id>/vram-budget \
-H "Authorization: Bearer <admin-token>"
The value accepts the same formats as the standalone budget: a percentage (80%) or an absolute amount (12GB, 12GiB, 12000MB, or raw bytes). It is a hard ceiling: the node’s advertised VRAM becomes min(detected, budget), so a budget can only lower the number, never raise it above the hardware. An admin-set node budget is sticky across worker restarts: it is stored in the node registry and reapplied when the worker re-registers, so it wins over whatever the worker reports on reconnect. For the underlying semantics and the standalone equivalent, see VRAM Budget.
Disk headroom
Model weights are staged onto the worker’s disk before the backend loads them, so a node needs free space as well as free VRAM. Each worker reports the capacity of the filesystem backing its models directory (--models-path), not the root filesystem, on registration and on every heartbeat. Those figures appear as total_disk and available_disk in the nodes API and as Models disk free on the node detail page.
Before placing a model, the SmartRouter removes any node whose models filesystem cannot hold it. The requirement is derived from the model’s actual on-disk size plus a small margin (5%, at least 1 GiB), rather than a fixed percentage of the node’s disk — a fixed threshold would take a small-but-usable node out of rotation for models it could comfortably store. When the model’s size cannot be determined locally (a bare HuggingFace repo id that the worker fetches itself), the node only has to clear a 2 GiB floor.
If no node has enough space, the request fails immediately with a capacity error naming the requirement and each node’s free space, for example:
scheduling longcat-video-avatar-1.5: no node has enough free disk for the model:
need 73.5 GB free on the models filesystem, but nvidia-thor has 0 B free of 937.0 GB
This is deliberately a scheduling-time verdict. Without it, a worker with a full disk still reported status: healthy, accepted the staging request, transferred tens of gigabytes and only then failed with no space left on device — minutes after a decision that could never have succeeded.
Workers that predate this feature (or whose disk reading fails) report total_disk as 0. Such nodes are treated as unknown, not full, and stay in rotation, so a rolling upgrade never empties the candidate pool. A full disk is distinguishable because it reports a non-zero total_disk with available_disk at 0.
Low disk does not mark a node unhealthy. Disk is compared per model rather than against a global threshold, so a node that is too small for one model remains a valid target for smaller ones. The check is also skipped entirely in shared-models mode, where nothing is staged to the worker at all.
Turning the check off
The check is on by default. To disable it, start the frontend with --distributed-disk-headroom-check=false / LOCALAI_DISTRIBUTED_DISK_HEADROOM_CHECK=false, or toggle Settings → Distributed → Disk headroom check in the WebUI (distributed_disk_headroom_check via POST /api/settings). The runtime setting takes effect on the next placement, with no restart; the env/CLI flag only sets the value LocalAI boots with, and both write the same underlying value, so the last change wins.
Disabling means warn, do not block. Node selection goes back to ignoring free disk (the pre-check behaviour), but the check still runs, and when it would have rejected every node it logs a warning naming the shortfall:
WARN No node has room to store this model, but the disk-headroom check is DISABLED;
scheduling anyway — staging will most likely fail with ENOSPC
model=longcat-video-avatar-1.5 knob=distributed-disk-headroom-check
The alternative — skipping the check outright — was rejected because it reproduces the condition that made the original bug expensive: the cluster was doing something that could not work and said nothing about it. The escape hatch exists for setups where the size estimate is wrong (deduplicating or compressing filesystems, a backend that fetches its own weights rather than using the staged copy), and in exactly those cases the operator needs to see what LocalAI thought was wrong. Disabling is logged once at startup as well.
The LocalAI Assistant can also set a node budget conversationally through the set_node_vram_budget MCP tool.
Node Approval
By default, new worker nodes start in pending status and must be approved by an admin before they can receive traffic. This prevents unknown machines from joining the cluster.
To approve a pending node via the API:
curl -X POST http://frontend:8080/api/nodes/<node-id>/approve \
-H "Authorization: Bearer <admin-token>"
The Nodes page in the WebUI also shows pending nodes with an Approve button.
To skip manual approval and let nodes join immediately, set --auto-approve-nodes (or LOCALAI_AUTO_APPROVE_NODES=true) on the frontend. This is convenient for development and trusted environments.
Node Statuses
Status
Meaning
pending
Node registered but waiting for admin approval (when --auto-approve-nodes is false)
healthy
Node is active and responding to heartbeats
unhealthy
Node has missed heartbeats beyond the threshold (detected by the HealthMonitor)
offline
Node is temporarily offline (graceful shutdown or stale heartbeat). The node row is preserved so re-registration restores the previous approval status without requiring re-approval
draining
Node is shutting down gracefully - no new requests are routed to it, existing in-flight requests are allowed to complete
Agent Workers
Agent workers are dedicated processes for executing agent chats and MCP CI jobs. Unlike backend workers (which run gRPC model inference), agent workers use cogito to orchestrate multi-step conversations with tool calls.
MCP servers configured in model configs work in distributed mode. The frontend routes MCP operations through NATS to agent workers:
MCP discovery (GET /v1/mcp/servers/:model): routed to agent workers which create sessions and return server info
MCP tool execution (during /v1/chat/completions): tool calls are routed to agent workers via NATS request-reply
MCP CI jobs: executed entirely on agent workers with access to docker for stdio-based MCP servers
vLLM Multi-Node (Data-Parallel)
A single vLLM model can span multiple GPU nodes via data parallelism: the head node serves the OpenAI API and runs the local DP ranks, follower nodes run vanilla vllm serve --headless and speak ZMQ directly to the head. LocalAI’s role is starting the follower processes and surfacing them in the admin UI; the cross-rank tensor traffic is vLLM’s own.
This mode is operator-launched - the head config and each follower’s invocation must agree on the topology (data_parallel_size, data_parallel_size_local, data_parallel_address, data_parallel_rpc_port). The SmartRouter does not place follower ranks automatically.
Head node configuration
The head runs the existing single-node vLLM gRPC backend. Set engine_args to publish the DP topology vLLM expects:
backend: vllmparameters:
model: moonshotai/Kimi-K2.6-Instructengine_args:
data_parallel_size: 4# total ranks across all nodesdata_parallel_size_local: 2# ranks on the head nodedata_parallel_address: 10.0.0.1# head's reachable IPdata_parallel_rpc_port: 32100# any free port; followers connect hereenable_expert_parallel: true# for MoE models
The head will start its 2 local ranks, listen on 10.0.0.1:32100, and wait for the remaining 2 ranks to handshake.
Follower nodes
Each follower runs local-ai p2p-worker vllm with matching topology, an explicit start rank, and the head’s address:
--register-to is optional but recommended - it makes the follower visible in the admin UI as an agent-type node tagged with node.role=vllm-follower. Without it the worker just runs vLLM and exits silently when vLLM does. The role label discourages SmartRouter from placing other models on the follower; pair it with model selectors like {"!node.role":"vllm-follower"} if you also run regular LocalAI models on the same fleet.
Worked example: 2-node Kimi-K2.6 deployment
Two A100 nodes (10.0.0.1, 10.0.0.2), 8 GPUs total, data_parallel_size=8 with 4 ranks per node:
# /models/kimi.yaml on the head (10.0.0.1)name: kimi-k2-6backend: vllmparameters:
model: moonshotai/Kimi-K2.6-Instructengine_args:
data_parallel_size: 8data_parallel_size_local: 4data_parallel_address: 10.0.0.1data_parallel_rpc_port: 32100enable_expert_parallel: trueall2all_backend: deepep_high_throughput
A curl http://10.0.0.1:8080/v1/chat/completions ... against the head will then dispatch across all 8 ranks.
Intel Arc / XPU notes
vLLM XPU supports DP (vllm/platforms/xpu.py:198 handles world_size_across_dp > 1; ranks bind to xpu:{local_rank} in xpu_worker.py:62, with xccl as the collective backend). Each rank still needs a distinct discrete GPU - the iGPU on a hybrid host is not a viable second device.
Older XE-HPG GPUs (e.g. Arc A770) need to bypass the cutlass attention path:
engine_args:
attention_backend: TRITON_ATTN
docker-compose.vllm-multinode.intel.yaml at the repo root is the Intel equivalent of docker-compose.vllm-multinode.yaml - uses /dev/dri passthrough, ZE_AFFINITY_MASK to pin each rank to one device, and latest-gpu-intel images. Run via ./tests/e2e/vllm-multinode/smoke.sh --intel.
Caveats
Tensor parallel within a node only. vLLM v1 does not support TP across nodes; combine tensor_parallel_size (within a node, via engine_args) with data_parallel_size (across nodes).
Followers don’t host LocalAI gRPC. The follower process is vanilla vLLM, so /api/backend-logs/<modelId> does not stream follower output. Use journalctl / kubectl logs / compose logs for the follower’s stderr.
Network reachability. The head’s data_parallel_rpc_port plus a range of ZMQ ports (typically data_parallel_rpc_port..+N) must be reachable from every follower. Open them in your firewall / security group.
Topology must match exactly. A mismatch in --data-parallel-size between head and any follower will hang the handshake. Check the head’s vLLM logs for waiting for N DP ranks if startup stalls.
ds4 Layer-Split Distributed Inference
The ds4 backend (DeepSeek V4 Flash) supports layer-parallel distributed inference: a single model that is too large for one machine is split by transformer layer across several machines. Each machine must have the GGUF present locally, but loads only its own slice of the layers. This lets you run a model whose weights exceed any single host’s memory.
This is not routed through the SmartRouter: it is a model-internal split, configured manually (Phase 1). It is unrelated to the NATS/PostgreSQL distributed mode described above.
Topology
ds4 uses a coordinator/worker split:
The coordinator owns tokenization, sampling, the prompt, and a low layer range (e.g. 0:19). It is LocalAI’s ds4 backend and listens on a host/port. Workers dial into it.
One or more workers own higher layer ranges (e.g. 20:output). Each worker loads only its slice and dials the coordinator to register the range it can serve. The last worker normally owns the output head.
Activations flow through the connected slices and back to the coordinator. The route is “ready” only once the coordinator plus all connected workers cover every layer.
This dial direction is the inverse of the llama.cpp RPC model, where the main server dials out to a list of rpc-server workers. With ds4 the workers dial in to the coordinator.
Coordinator setup
The coordinator is a normal LocalAI ds4 model whose YAML carries distributed options::
Enables distributed coordinator mode. Without ds4_role, the backend behaves as a normal single-node ds4 model.
ds4_layers:0:19
The coordinator’s own layer slice (inclusive).
ds4_listen:0.0.0.0:1234
Address that workers dial into.
ds4_route_timeout:60
Optional. Seconds the coordinator waits for the worker route to form before returning an error on a request. Defaults to 60.
Warning
Worker↔coordinator traffic is plaintext and unauthenticated: there is no TLS or auth on this channel. Bind ds4_listen to an address on a trusted/private network only; using 0.0.0.0 exposes the coordinator on every interface. Run the layer split exclusively over a network you control.
Once the model is loaded, the coordinator serves requests exactly like a single-node ds4 model: generation goes through the ordinary inference path and is transparently routed across the layer slices.
Worker setup
On each worker machine (with the GGUF present locally), start a worker pointed at the coordinator:
local-ai worker ds4-distributed resolves the ds4 backend and execs the packaged ds4-worker binary, passing everything after -- straight through.
Layer-range semantics
Ranges are inclusive: 0:19 is layers 0 through 19.
N:output means layer N through the final layer plus the output head. The last worker normally owns the output head.
The coordinator and all connected workers together must cover every layer. Until they do, the coordinator returns a gRPC UNAVAILABLE error on inference requests (so a worker that starts slightly after the coordinator is tolerated: once it connects and the route is complete, requests succeed). The wait is tunable via ds4_route_timeout.
Note
ds4 layer-split inference is manual setup in this release (Phase 1): you place the coordinator config and launch each worker yourself, and the layer ranges must be partitioned by hand so they cover the whole model. P2P auto-discovery of the coordinator is planned for a later phase.
Scaling
Adding worker capacity: Start additional worker instances pointing to the same frontend. They self-register automatically:
Multiple frontend replicas: Run multiple LocalAI frontends behind a load balancer. Since all state is in PostgreSQL and coordination is via NATS, frontends are fully stateless and interchangeable.
Model Scheduling
Model scheduling controls where models are placed and how many replicas are maintained. In the React WebUI it has its own Scheduling page (a top-level nav item, separate from the Nodes page). It combines two optional features:
Node Selectors
Pin models to nodes with specific labels. Only nodes matching all selector labels are eligible:
# Only schedule on NVIDIA nodes in the us-east zonecurl -X POST http://frontend:8080/api/nodes/scheduling \
-H "Content-Type: application/json"\
-d '{"model_name": "llama3", "node_selector": {"gpu.vendor": "nvidia", "zone": "us-east"}}'
Without a node selector, models can schedule on any healthy node (default behavior).
Replica Auto-Scaling
Control the number of model replicas across the cluster:
Field
Description
min_replicas
Minimum replicas to maintain (0 = no minimum, single replica default)
max_replicas
Maximum replicas allowed (0 = unlimited)
Auto-scaling is only active when min_replicas > 0 or max_replicas > 0.
# Scale llama3 between 2 and 4 replicas on NVIDIA nodescurl -X POST http://frontend:8080/api/nodes/scheduling \
-H "Content-Type: application/json"\
-d '{
"model_name": "llama3",
"node_selector": {"gpu.vendor": "nvidia"},
"min_replicas": 2,
"max_replicas": 4
}'
The Replica Reconciler runs as a background process on the frontend:
Scale up: Adds replicas when all existing replicas are busy (have in-flight requests)
Scale down: Removes idle replicas after 5 minutes of inactivity
Maintain minimum: Ensures min_replicas are always loaded (recovers from node failures)
Eviction protection: Models with auto-scaling enabled are never evicted below min_replicas
Restart-safe: Per-model load metadata (backend type + ModelOptions) is persisted in the model_load_infos PostgreSQL table on the first successful dispatch, so a frontend restart or rolling upgrade does not require a fresh inference request to repopulate state before the reconciler can scale up replacement replicas.
All fields are optional and composable:
Node selector only: pin model to matching nodes, single replica
In distributed mode you can declare per-model scheduling at startup, instead of
using the WebUI/API. Config is authoritative: it is re-applied on every boot
and overwrites the listed models (models not listed are left untouched).
Variable
Description
LOCALAI_MODEL_SCHEDULING
Inline JSON list of scheduling entries
LOCALAI_MODEL_SCHEDULING_CONFIG
Path to a YAML file with the same list
Entry fields: model_name (required), node_selector (a label map; omit it to
match every node), and then one of two replica modes (they are mutually
exclusive):
replicas: all - static spread: place exactly one replica on every
matching node, proactively, regardless of load, and keep it in sync as nodes
join and leave. Use this for “run model X everywhere (with this label)”.
min_replicas / max_replicas - elastic auto-scaling: keep at least
min_replicas running, and burst up tomax_replicas only when all
replicas are busy, scaling back down to the minimum when idle. max_replicas: 0
means no upper bound (grow to cluster capacity). To enable this mode you
must set min_replicas >= 1 or max_replicas >= 1 - an entry with only
max_replicas: 0 (and no replicas: all) does nothing.
Net effect at a glance:
Config
Behavior
replicas: all
One replica per matching node, placed immediately, tracks join/leave
min_replicas: 1, max_replicas: 0
Always >=1, bursts to cluster capacity under load, back to 1 when idle
min_replicas: 2, max_replicas: 4
Always >=2, bursts to at most 4 under load
node_selector constrains which nodes a model may use; with no selector the
model may use all healthy nodes. So “spread model X across all nodes” is just
replicas: all with no node_selector. replicas: all targets one replica per
matching node; with the default per-node cap of one replica per model this lands
exactly one on each node (see the note below about LOCALAI_MAX_REPLICAS_PER_MODEL).
YAML example (scheduling.yaml):
# One replica on every GPU-labelled node (static spread, tracks join/leave):- model_name: gpt-ossnode_selector:
tier: gpureplicas: all# One replica on EVERY node in the cluster (no selector = all nodes):- model_name: embeddingsreplicas: all# Elastic on CPU nodes: always >=1, burst to capacity under load, 0 = no cap:- model_name: whispernode_selector:
tier: cpumin_replicas: 1max_replicas: 0
LOCALAI_DISTRIBUTED=true \
LOCALAI_MODEL_SCHEDULING_CONFIG=/etc/localai/scheduling.yaml \
local-ai run
Because the config is authoritative, each listed model’s entire scheduling
row is replaced on every boot, including the optional prefix-cache routing
overrides (route_policy, balance_abs_threshold, balance_rel_threshold,
min_prefix_match). For a model you manage via this config, set those fields
here too if you need non-default values; values set only through the API are
reset on the next restart. Models not listed in the config are never touched.
replicas: all places one replica per matching node by relying on the default
per-node cap of one replica per model. If you raise LOCALAI_MAX_REPLICAS_PER_MODEL
on a worker above 1, the target count can be met by stacking replicas on fewer
nodes rather than spreading one to each.
Label Management API
Method
Path
Description
GET
/api/nodes/:id/labels
Get labels for a node
PUT
/api/nodes/:id/labels
Replace all labels (JSON object)
PATCH
/api/nodes/:id/labels
Merge labels (add/update)
DELETE
/api/nodes/:id/labels/:key
Remove a single label
Scheduling API
Method
Path
Description
GET
/api/nodes/scheduling
List all scheduling configs
GET
/api/nodes/scheduling/:model
Get config for a model
POST
/api/nodes/scheduling
Create/update config
DELETE
/api/nodes/scheduling/:model
Remove config
Comparison with P2P
P2P / Federation
Distributed Mode
Discovery
Automatic via libp2p token
Self-registration to frontend URL
State storage
In-memory / ledger
PostgreSQL
Coordination
Gossip protocol
NATS messaging
Node management
Automatic
REST API + WebUI
Health monitoring
Peer heartbeats
Centralized HealthMonitor
Backend management
Manual per node
Dynamic via NATS backend.install
Best for
Ad-hoc clusters, community sharing
Production, Kubernetes, managed infrastructure
Setup complexity
Minimal (share a token)
Requires PostgreSQL + NATS
Troubleshooting
Worker not registering:
Verify the frontend URL is reachable from the worker (curl http://frontend:8080/api/node/register)
Check that --registration-token matches on both frontend and worker
Ensure auth is enabled on the frontend (LOCALAI_AUTH=true)
NATS connection errors:
Confirm NATS is running and reachable (nats-server --signal ldm or check port 4222)
Check that --nats-url uses the correct hostname/IP from the worker’s network perspective
PostgreSQL connection errors:
Verify the connection URL format: postgresql://user:password@host:5432/dbname?sslmode=disable
Ensure the database exists and the user has CREATE TABLE permissions (for auto-migration)
Check that pgvector extension is installed if using RAG features
Node shows as unhealthy or offline:
The HealthMonitor marks nodes offline when heartbeats are missed. Check network connectivity between worker and frontend.
Verify --heartbeat-interval is not set too high
Offline nodes automatically restore to healthy when they re-register (no re-approval needed)
Backend not installing:
Check the worker logs for backend.install events
Port conflicts on workers:
Each model gets its own gRPC process on an incrementing port (50051, 50052, …)
The HTTP file transfer server runs on the base port - 1 (default: 50050)
Ensure the port range is not blocked by firewalls or used by other services
Verify the backend gallery configuration is correct
The worker needs network access to download backends from the gallery
Roadmap: Routing and Caching Enhancements
The scheduling algorithm above is load-based (least in-flight, then least-recently-used). Work is underway to make routing prefix-cache-aware: bias each request toward the replica that already holds the relevant KV/prefix cache (multi-turn conversations and shared system prompts), so backends reuse cache instead of recomputing it. The first step is a router-side radix tree of prompt-prefix hashes mapped to nodes, with longest-prefix match, a load guard that preserves round-robin behavior under imbalance, and NATS sync across frontends. It is purely a routing-layer hint (no backend changes) and never routes worse than today’s round-robin.
Further enhancements, surfaced from a survey of SGLang, vLLM production-stack, Ray Serve, llm-d, AIBrix, and NVIDIA Dynamo, are tracked under the routing roadmap epic (#10063):
Reported/precise KV-event mode (#10064): subscribe to actual backend KV-cache events for exact residency instead of inferring it from routing history.
Load-shaping (#10067): anti-herding (softmax/temperature) and dispatch-time freshness.
Prefill/decode disaggregation routing (#10068): route prefill and decode to separate pools with KV transfer.
Per-user fairness (VTC) (#10069): balance per-user token usage against pod load.
Minor tuning + MCP parity (#10070): per-model TTL override, probabilistic LRU updates, and MCP scheduling-config tool parity.
(experimental) MLX Distributed Inference
MLX distributed inference allows you to split large language models across multiple Apple Silicon Macs (or other devices) for joint inference. Unlike federation (which distributes whole requests), MLX distributed splits a single model’s layers across machines so they all participate in every forward pass.
How It Works
MLX distributed uses pipeline parallelism via the Ring backend: each node holds a slice of the model’s layers. During inference, activations flow from rank 0 through each subsequent rank in a pipeline. The last rank gathers the final output.
For high-bandwidth setups (e.g., Thunderbolt-connected Macs), JACCL (tensor parallelism via RDMA) is also supported, where each rank holds all layers but with sharded weights.
Prerequisites
Two or more machines with MLX installed (Apple Silicon recommended)
Network connectivity between all nodes (TCP for Ring, RDMA/Thunderbolt for JACCL)
Same model accessible on all nodes (e.g., from Hugging Face cache)
Quick Start with P2P
The simplest way to use MLX distributed is with LocalAI’s P2P auto-discovery.
1. Start LocalAI with P2P
docker run -ti --net host \
--name local-ai \
localai/localai:latest-metal-darwin-arm64 run --p2p
This generates a network token. Copy it for the next step.
The mlx-distributed backend is started automatically by LocalAI like any other backend. You configure distributed inference through the model YAML file using the options field:
The hostfile is a JSON array where entry i is the "ip:port" that rank i listens on for ring communication. All ranks must use the same hostfile so they know how to reach each other.
Example: Two Macs - Mac A (192.168.1.10) and Mac B (192.168.1.11):
["192.168.1.10:5555", "192.168.1.11:5555"]
Entry 0 (192.168.1.10:5555) - the address rank 0 (Mac A) listens on for ring communication
Entry 1 (192.168.1.11:5555) - the address rank 1 (Mac B) listens on for ring communication
Port 5555 is arbitrary - use any available port, but it must be open in your firewall.
JACCL requires a coordinator - a TCP service that helps all ranks establish RDMA connections. Rank 0 (the LocalAI machine) is always the coordinator. Workers are told the coordinator address via their --coordinator CLI flag (see Starting Workers below).
Without hostfile (single-node)
If no hostfile option is set and no MLX_DISTRIBUTED_HOSTFILE environment variable exists, the backend runs as a regular single-node MLX backend. This is useful for testing or when you don’t need distributed inference.
Available Options
Option
Description
hostfile
Path to the hostfile JSON. Ring: array of "ip:port". JACCL: device matrix.
distributed_backend
ring (default) or jaccl
trust_remote_code
Allow trust_remote_code for the tokenizer
max_tokens
Override default max generation tokens
temperature / temp
Sampling temperature
top_p
Top-p sampling
These can also be set via environment variables (MLX_DISTRIBUTED_HOSTFILE, MLX_DISTRIBUTED_BACKEND) which are used as fallbacks when the model options don’t specify them.
Starting Workers
LocalAI starts the rank 0 process (gRPC server) automatically when the model is loaded. But you still need to start worker processes (ranks 1, 2, …) on the other machines. These workers participate in every forward pass but don’t serve any API - they wait for commands from rank 0.
Ring Workers
On each worker machine, start a worker with the same hostfile:
The --rank must match the worker’s position in the hostfile. For example, if hosts.json is ["192.168.1.10:5555", "192.168.1.11:5555", "192.168.1.12:5555"], then:
Rank 0: started automatically by LocalAI on 192.168.1.10
The --coordinator address is the IP of the machine running LocalAI (rank 0) with any available port. Rank 0 binds the coordinator service there; workers connect to it to establish RDMA connections.
Worker Startup Order
Start workers before loading the model in LocalAI. When LocalAI sends the LoadModel request, rank 0 initializes mx.distributed which tries to connect to all ranks listed in the hostfile. If workers aren’t running yet, it will time out.
Advanced: Manual Rank 0
For advanced use cases, you can also run rank 0 manually as an external gRPC backend instead of letting LocalAI start it automatically:
# On Mac A: start rank 0 manuallylocal-ai worker mlx-distributed --hostfile hosts.json --rank 0 --addr 192.168.1.10:50051
# On Mac B: start rank 1local-ai worker mlx-distributed --hostfile hosts.json --rank 1# On any machine: start LocalAI pointing at rank 0local-ai run --external-grpc-backends "mlx-distributed:192.168.1.10:50051"
Then use a model config with backend: mlx-distributed (no need for hostfile in options since rank 0 already has it from CLI args).
CLI Reference
worker mlx-distributed
Starts a worker or manual rank 0 process.
Flag
Env
Default
Description
--hostfile
MLX_DISTRIBUTED_HOSTFILE
(required)
Path to hostfile JSON. Ring: array of "ip:port" where entry i is rank i’s listen address. JACCL: device matrix of RDMA device names.
--rank
MLX_RANK
(required)
Rank of this process (0 = gRPC server + ring participant, >0 = worker only)
--backend
MLX_DISTRIBUTED_BACKEND
ring
ring (TCP pipeline parallelism) or jaccl (RDMA tensor parallelism)
--addr
MLX_DISTRIBUTED_ADDR
localhost:50051
gRPC API listen address (rank 0 only, for LocalAI or external access)
--coordinator
MLX_JACCL_COORDINATOR
JACCL coordinator ip:port - rank 0’s address for RDMA setup (all ranks must use the same value)
worker p2p-mlx
P2P mode - auto-discovers peers and generates hostfile.
Flag
Env
Default
Description
--token
TOKEN
(required)
P2P network token
--mlx-listen-port
MLX_LISTEN_PORT
5555
Port for MLX communication
--mlx-backend
MLX_DISTRIBUTED_BACKEND
ring
Backend type: ring or jaccl
Troubleshooting
All ranks download the model independently. Each node auto-downloads from Hugging Face on first use via mlx_lm.load(). On rank 0 (started by LocalAI), models are downloaded to LocalAI’s model directory (HF_HOME is set automatically). On workers, models go to the default HF cache (~/.cache/huggingface/hub) unless you set HF_HOME yourself.
Timeout errors: If ranks can’t connect, check firewall rules. The Ring backend uses TCP on the ports listed in the hostfile. Start workers before loading the model.
Rank assignment: In P2P mode, rank 0 is always the LocalAI server. Worker ranks are assigned by sorting node IDs.
Performance: Pipeline parallelism adds latency proportional to the number of ranks. For best results, use the fewest ranks needed to fit your model in memory.
Acknowledgements
The MLX distributed auto-parallel sharding implementation is based on exo.
GPU Acceleration
This page covers how to use LocalAI with GPU acceleration across different hardware vendors. For container image tags and registry details, see Container Images. For memory management with multiple GPU-accelerated models, see VRAM Management.
Automatic Backend Detection
When you install a model from the gallery (or a YAML file), LocalAI intelligently detects the required backend and your system’s capabilities, then downloads the correct version for you. Whether you’re running on a standard CPU, an NVIDIA GPU, an AMD GPU, or an Intel GPU, LocalAI handles it automatically.
For advanced use cases or to override auto-detection, you can use the LOCALAI_FORCE_META_BACKEND_CAPABILITY environment variable. Here are the available options:
default: Forces CPU-only backend. This is the fallback if no specific hardware is detected.
nvidia: Forces backends compiled with CUDA support for NVIDIA GPUs.
amd: Forces backends compiled with ROCm support for AMD GPUs.
intel: Forces backends compiled with SYCL/oneAPI support for Intel GPUs.
Model configuration
Depending on the model architecture and backend used, there might be different ways to enable GPU acceleration. It is required to configure the model you intend to use with a YAML config file. For example, for llama.cpp workloads a configuration file might look like this (where gpu_layers is the number of layers to offload to the GPU):
name: my-model-nameparameters:
# Relative to the models pathmodel: llama.cpp-model.ggmlv3.q5_K_M.bincontext_size: 1024threads: 1f16: true# enable with GPU accelerationgpu_layers: 22# GPU Layers (only used when built with cublas)
For diffusers instead, it might look like this instead:
For llama.cpp models, you can control which GPU layers are offloaded using gpu_layers. When multiple NVIDIA GPUs are present, llama.cpp distributes layers across available devices automatically. You can control GPU visibility with the CUDA_VISIBLE_DEVICES environment variable:
# Use only GPU 0 and GPU 1docker run --gpus all -e CUDA_VISIBLE_DEVICES=0,1 ...
For AMD GPUs, use HIP_VISIBLE_DEVICES instead:
docker run --device /dev/dri --device /dev/kfd -e HIP_VISIBLE_DEVICES=0,1 ...
diffusers
For multi-GPU support with diffusers, configure the model with tensor_parallel_size set to the number of GPUs you want to use.
name: stable-diffusion-multigpumodel: stabilityai/stable-diffusion-xl-base-1.0backend: diffusersparameters:
tensor_parallel_size: 2# Number of GPUs to use
The tensor_parallel_size parameter is set in the gRPC proto configuration (in ModelOptions message, field 55). When this is set to a value greater than 1, the diffusers backend automatically enables device_map="auto" to distribute the model across multiple GPUs.
Tips
For optimal performance, use GPUs of the same type and memory capacity.
Ensure you have sufficient GPU memory across all devices.
When running multiple models concurrently, consider using VRAM Management to automatically unload idle models.
CUDA 11 tags: master-gpu-nvidia-cuda-11, v1.40.0-gpu-nvidia-cuda-11, …
CUDA 12 tags: master-gpu-nvidia-cuda-12, v1.40.0-gpu-nvidia-cuda-12, …
CUDA 13 tags: master-gpu-nvidia-cuda-13, v1.40.0-gpu-nvidia-cuda-13, …
In addition to the commands to run LocalAI normally, you need to specify --gpus all to docker, for example:
docker run --rm -ti --gpus all -p 8080:8080 -e DEBUG=true -e MODELS_PATH=/models -e THREADS=1 -v $PWD/models:/models quay.io/go-skynet/local-ai:v1.40.0-gpu-nvidia-cuda12
If the GPU inferencing is working, you should be able to see something like:
5:22PM DBG Loading model in memory from file: /models/open-llama-7b-q4_0.bin
ggml_init_cublas: found 1 CUDA devices:
Device 0: Tesla T4
llama.cpp: loading model from /models/open-llama-7b-q4_0.bin
llama_model_load_internal: format = ggjt v3 (latest)
llama_model_load_internal: n_vocab = 32000
llama_model_load_internal: n_ctx = 1024
llama_model_load_internal: n_embd = 4096
llama_model_load_internal: n_mult = 256
llama_model_load_internal: n_head = 32
llama_model_load_internal: n_layer = 32
llama_model_load_internal: n_rot = 128
llama_model_load_internal: ftype = 2 (mostly Q4_0)
llama_model_load_internal: n_ff = 11008
llama_model_load_internal: n_parts = 1
llama_model_load_internal: model size = 7B
llama_model_load_internal: ggml ctx size = 0.07 MB
llama_model_load_internal: using CUDA for GPU acceleration
llama_model_load_internal: mem required = 4321.77 MB (+ 1026.00 MB per state)
llama_model_load_internal: allocating batch_size x 1 MB = 512 MB VRAM for the scratch buffer
llama_model_load_internal: offloading 10 repeating layers to GPU
llama_model_load_internal: offloaded 10/35 layers to GPU
llama_model_load_internal: total VRAM used: 1598 MB
...................................................................................................
llama_init_from_file: kv self size = 512.00 MB
ROCM(AMD) acceleration
There are a limited number of tested configurations for ROCm systems however most newer dedicated GPU consumer grade devices seem to be supported under the current ROCm 7 implementation.
Due to the nature of ROCm it is best to run all implementations in containers as this limits the number of packages required for installation on host system, compatibility and package versions for dependencies across all variations of OS must be tested independently if desired, please refer to the build documentation.
Installed to host: amdgpu-dkms and rocm >=7.0.0 as per ROCm documentation.
Recommendations
Make sure to do not use GPU assigned for compute for desktop rendering.
Ensure at least 100GB of free space on disk hosting container runtime and storing images prior to installation.
Limitations
Ongoing verification testing of ROCm compatibility with integrated backends.
Please note the following list of verified backends and devices.
LocalAI hipblas images are built against the following targets: gfx908, gfx90a, gfx942, gfx950, gfx1030, gfx1100, gfx1101, gfx1102, gfx1200, gfx1201
Note: Starting with ROCm 6.4, AMD removed rocBLAS kernel support for older architectures (gfx803, gfx900, gfx906). Since llama.cpp and other backends depend on rocBLAS for matrix operations, these GPUs (e.g. Radeon VII) are no longer supported in pre-built images.
If your device is not one of the above targets, you must specify the corresponding GPU_TARGETS and specify REBUILD=true. However, rebuilding will not help for architectures that lack rocBLAS kernel support in your ROCm version.
Verified
The devices in the following list have been tested with hipblas images.
Backend
Verified
Devices
llama.cpp
yes
MI100 (gfx908), MI210/250 (gfx90a)
diffusers
yes
MI100 (gfx908), MI210/250 (gfx90a)
whisper
no
none
coqui
no
none
transformers
no
none
vllm
no
none
You can help by expanding this list.
System Prep
Check your GPU LLVM target is compatible with the version of ROCm. This can be found in the LLVM Docs.
Check which ROCm version is compatible with your LLVM target and your chosen OS (pay special attention to supported kernel versions). See the ROCm compatibility matrix.
Install your chosen version of the dkms and rocm (it is recommended that the native package manager be used for this process for any OS as version changes are executed more easily via this method if updates are required). Take care to restart after installing amdgpu-dkms and before installing rocm, for details regarding this see the ROCm installation documentation.
Deploy. Yes it’s that easy.
Setup Example (Docker/containerd)
The following are examples of the ROCm specific configuration elements required.
# For full functionality select a non-'core' image, version locking the image is recommended for debug purposes.image: quay.io/go-skynet/local-ai:master-gpu-hipblasenvironment:
- DEBUG=true# If your gpu is not already included in the current list of default targets the following build details are required. - REBUILD=true - BUILD_TYPE=hipblas - GPU_TARGETS=gfx1100# Example for RX 7900 XTXdevices:
# AMD GPU only require the following devices be passed through to the container for offloading to occur. - /dev/dri - /dev/kfd
The same can also be executed as a run for your container runtime
Please ensure to add all other required environment variables, port forwardings, etc to your compose file or run command.
Example (k8s) (Advanced Deployment/WIP)
For k8s deployments there is an additional step required before deployment, this is the deployment of the ROCm/k8s-device-plugin.
For any k8s environment the documentation provided by AMD from the ROCm project should be successful. It is recommended that if you use rke2 or OpenShift that you deploy the SUSE or RedHat provided version of this resource to ensure compatibility.
After this has been completed the helm chart from go-skynet can be configured and deployed mostly un-edited.
The following are details of the changes that should be made to ensure proper function.
While these details may be configurable in the values.yaml development of this Helm chart is ongoing and is subject to change.
The following details indicate the final state of the localai deployment relevant to GPU function.
apiVersion: apps/v1kind: Deploymentmetadata:
name: {NAME}-local-ai...
spec:
...template:
...spec:
containers:
- env:
- name: HIP_VISIBLE_DEVICESvalue: '0'# This variable indicates the devices available to container (0:device1 1:device2 2:device3) etc.# For multiple devices (say device 1 and 3) the value would be equivalent to HIP_VISIBLE_DEVICES="0,2"# Please take note of this when an iGPU is present in host system as compatibility is not assured....resources:
limits:
amd.com/gpu: '1'requests:
amd.com/gpu: '1'
This configuration has been tested on a ‘custom’ cluster managed by SUSE Rancher that was deployed on top of Ubuntu 22.04.4, certification of other configuration is ongoing and compatibility is not guaranteed.
Notes
When installing the ROCM kernel driver on your system ensure that you are installing an equal or newer version that that which is currently implemented in LocalAI (6.0.0 at time of writing).
AMD documentation indicates that this will ensure functionality however your mileage may vary depending on the GPU and distro you are using.
If you encounter an Error 413 on attempting to upload an audio file or image for whisper or llava/bakllava on a k8s deployment, note that the ingress for your deployment may require the annotation nginx.ingress.kubernetes.io/proxy-body-size: "25m" to allow larger uploads. This may be included in future versions of the helm chart.
Intel acceleration (sycl)
Requirements
If building from source, you need to install Intel oneAPI Base Toolkit and have the Intel drivers available in the system.
Container images
To use SYCL, use the images with gpu-intel in the tag, for example v4.7.1-gpu-intel, …
LocalAI supports NVIDIA ARM64 devices including Jetson Nano, Jetson Xavier NX, Jetson AGX Orin, and DGX Spark. Pre-built container images are available for both CUDA 12 and CUDA 13.
For detailed setup instructions, platform compatibility, and build commands, see the dedicated Running on Nvidia ARM64 page.
Quick start
# Jetson AGX Orin (CUDA 12)docker run -e DEBUG=true -p 8080:8080 -v $PWD/models:/models \
--runtime nvidia --gpus all \
quay.io/go-skynet/local-ai:latest-nvidia-l4t-arm64
# DGX Spark (CUDA 13)docker run -e DEBUG=true -p 8080:8080 -v $PWD/models:/models \
--runtime nvidia --gpus all \
quay.io/go-skynet/local-ai:latest-nvidia-l4t-arm64-cuda-13
GPU monitoring
Use these vendor-specific tools to verify that LocalAI is using your GPU and to monitor resource usage during inference.
NVIDIA
# Real-time GPU utilization, memory, temperaturenvidia-smi
# Continuous monitoring (updates every 1 second)nvidia-smi --loop=1# Inside a containerdocker run --rm --gpus all nvidia/cuda:12.8.0-base-ubuntu24.04 nvidia-smi
Look for non-zero GPU-Util and Memory-Usage values while running inference to confirm GPU acceleration is active.
AMD
# ROCm System Management Interfacerocm-smi
# Continuous monitoringwatch -n1 rocm-smi
# Show detailed GPU inforocm-smi --showallinfo
Intel
# Intel GPU top (part of intel-gpu-tools)sudo intel_gpu_top
# List available Intel GPUssycl-ls
Troubleshooting
GPU not detected in container
NVIDIA: Ensure nvidia-container-toolkit is installed and the Docker runtime is configured. Test with docker run --rm --gpus all nvidia/cuda:12.8.0-base-ubuntu24.04 nvidia-smi.
AMD: Ensure /dev/dri and /dev/kfd are passed to the container and that amdgpu-dkms is installed on the host.
Intel: Ensure /dev/dri is passed to the container and Intel GPU drivers are installed on the host.
Model loads on CPU instead of GPU
Check that gpu_layers is set in your model YAML configuration. Setting it to a high number (e.g., 999) offloads all possible layers to GPU.
Verify you are using a GPU-enabled container image (tags containing gpu-nvidia-cuda, gpu-hipblas, gpu-intel, etc.).
Enable DEBUG=true and check the logs for GPU initialization messages.
Out of memory (OOM) errors
Reduce gpu_layers to offload fewer layers, keeping some on CPU.
Lower context_size to reduce VRAM usage.
Use VRAM Management to automatically unload idle models when running multiple models.
Use quantized models (e.g., Q4_K_M) which require less memory than full-precision models.
ROCm: unsupported GPU target
If your AMD GPU is not in the default target list, set REBUILD=true and GPU_TARGETS to your device’s gfx target:
SYCL has a known issue where models hang when mmap: true is set. Ensure mmap is disabled in the model configuration:
mmap: false
Slow performance or unexpected CPU fallback
Ensure f16: true is set in the model YAML for GPU-accelerated backends.
Set threads: 1 when using full GPU offloading to avoid CPU thread contention.
Verify the correct BUILD_TYPE matches your hardware (e.g., cublas for NVIDIA, hipblas for AMD).
Backends
LocalAI supports a variety of backends that can be used to run different types of AI models. There are core Backends which are included, and there are containerized applications that provide the runtime environment for specific model types, such as LLMs, diffusion models, or text-to-speech models.
Available Backends
LocalAI ships 60+ backends covering text generation, speech-to-text, text-to-speech, music and sound generation, image and video generation, vision and object detection, audio processing, reranking, fine-tuning, and more. Each one is published as an on-demand OCI image with the appropriate acceleration variants (CPU, CUDA 12/13, ROCm, Intel SYCL, Vulkan, Metal, Jetson L4T).
For the complete list of backends, the model families they support, and their acceleration targets, see the Backend & Model Compatibility Table. The authoritative source is backend/index.yaml, and the same catalog is browsable in the web UI under the Backends section.
Managing Backends in the UI
The LocalAI web interface provides an intuitive way to manage your backends:
Navigate to the “Backends” section in the navigation menu
Browse available backends from configured galleries
Use the search bar to find specific backends by name, description, or type
Filter backends by type using the quick filter buttons (LLM, Diffusion, TTS, Whisper)
Install or delete backends with a single click
Monitor installation progress in real-time
Each backend card displays:
Backend name and description
Type of models it supports
Installation status
Action buttons (Install/Delete)
Additional information via the info button
Backend Galleries
Backend galleries are repositories that contain backend definitions. They work similarly to model galleries but are specifically for backends.
Adding a Backend Gallery
You can add backend galleries by specifying the Environment VariableLOCALAI_BACKEND_GALLERIES:
The model gallery is a curated collection of models configurations for LocalAI that enables one-click install of models directly from the LocalAI Web interface.
LocalAI to ease out installations of models provide a way to preload models on start and downloading and installing them in runtime. You can install models manually by copying them over the models directory, or use the API or the Web interface to configure, download and verify the model assets for you.
Note
The models in this gallery are not directly maintained by LocalAI. If you find a model that is not working, please open an issue on the main LocalAI repository.
Note
GPT and text generation models might have a license which is not permissive for commercial use or might be questionable or without any license at all. Please check the model license before using it. The official gallery contains only open licensed models.
Useful Links and resources
Open LLM Leaderboard - here you can find a list of the most performing models on the Open LLM benchmark. Keep in mind models compatible with LocalAI must be quantized in the gguf format.
How it works
Navigate the WebUI interface in the “Models” section from the navbar at the top. Here you can find a list of models that can be installed, and you can install them by clicking the “Install” button.
VRAM and download size estimates
When browsing the gallery or importing a model by URI, LocalAI can show estimated download size and estimated VRAM for models.
Where they appear: In the model gallery table (Size / VRAM column), in the model detail modal, and after starting an import from URI (in the success message).
How they are computed: GGUF models use file size (HTTP HEAD or local stat) and optional GGUF metadata (HTTP Range) for KV cache and overhead; other formats use Hugging Face file sizes and optional config when available. If metadata is unavailable, a size-only heuristic is used.
Hardware fit indicator: When your system reports GPU or RAM capacity, the gallery shows whether the estimated VRAM fits (green) or may not fit (red) using a 95% headroom rule.
Estimates are best-effort and may be missing if the server does not support HEAD/Range or the request times out.
Add other galleries
You can add other galleries by:
Using the Web UI: Navigate to the Runtime Settings page and configure galleries through the interface.
Using Environment Variables: Set the GALLERIES environment variable. The GALLERIES environment variable is a list of JSON objects, where each object has a name and a url field. The name field is the name of the gallery, and the url field is the URL of the gallery’s index file, for example:
where github:mudler/localai/gallery/index.yaml will be expanded automatically to https://raw.githubusercontent.com/mudler/LocalAI/main/index.yaml.
Note: the url are expanded automatically for github and huggingface, however https:// and http:// prefix works as well.
Using Local Gallery Files
You can also use local gallery index files by using the file:// prefix. For security reasons, local gallery files must be located within your models directory (the directory specified by MODELS_PATH or the default models/ directory).
If you want to build your own gallery, there is no documentation yet. However you can find the source of the default gallery in the LocalAI repository.
List Models
To list all the available models, use the /models/available endpoint:
Models can be installed by passing the full URL of the YAML config file, or either an identifier of the model in the gallery. The gallery is a repository of models that can be installed by passing the model name.
To install a model from the gallery repository, you can pass the model name in the id field. For instance, to install the bert-embeddings model, you can use the following command:
localai is the repository. It is optional and can be omitted. If the repository is omitted LocalAI will search the model by name in all the repositories. In the case the same model name is present in both galleries the first match wins.
bert-embeddings is the model name in the gallery
(read its config here).
Model variants
Some gallery entries offer several builds of the same model: different
quantizations, or the same weights served by a different engine. Such an entry
carries a variants list, and installing it normally lets LocalAI choose:
variants whose backend cannot run on this machine are dropped;
variants that do not fit the available memory are dropped. That budget is
VRAM on a discrete-GPU host, and system RAM otherwise — including on
unified-memory machines such as Apple Silicon, where the GPU shares system
RAM and reports no separate VRAM pool;
the entry’s own build is never dropped. It competes with whatever survived
rather than waiting for everything else to fail, so an entry that is itself
the largest build that fits keeps its own payload;
among the remaining builds the engine this machine prefers wins first: a vLLM
build on an NVIDIA or AMD host, an MLX build on Apple Silicon, llama.cpp
otherwise. The native accelerated runtime is worth more than a bigger
download, so preference is settled before size;
the largest build on the preferred engine then wins, because a bigger
footprint means a higher quality build of the same model. A machine with no
preferred engine picks purely by size;
a build whose size could not be measured ranks below the entry’s own build,
so an unreadable size never quietly displaces the payload the entry ships;
if nothing else survives, the entry’s own build is installed. The entry is
always installable, on any machine.
Because the entry’s own build competes like every other candidate, the order of
the list means nothing and a variants list may offer smaller builds, larger
ones, or both.
Sizes are measured from the model’s weights rather than downloaded, and cached.
The gallery listing only flags which entries offer variants, with a
has_variants field. It deliberately does not describe them: measuring a
variant is a network round trip per referenced build, so describing every
entry inline would make one listing request cost as many round trips as the
whole page has variants.
By default the listing returns every entry, including the individual builds a
parent entry offers as variants, so one model can occupy several rows. Pass
collapse_variants=true for the deduplicated view: every entry that is
installable in its own right, with nothing shown twice.
An entry is hidden only when another entry already offers it as a variant, so
it stays reachable by installing that entry. Entries that declare variants are
always kept, and so is any entry nobody references. The filter is applied
before pagination, so page counts stay correct.
Searching respects the collapse.term is matched against every entry the
gallery holds, builds another entry offers included, so nothing becomes
unfindable. The collapse then decides how a match is reported: a hit on a build
another entry offers comes back as that entry, since that is the row installable
in its own right. Looking a model up by name must not answer “not found” for an
entry the gallery holds, and must not answer with a row the requested view has
no place for either. A term that is empty or only whitespace does not count as a
search:
# Collapsed: the parent stands in for the build it offers.curl 'http://localhost:8080/api/models?collapse_variants=true'# Collapsed, searching a build the parent offers: the parent comes back.curl 'http://localhost:8080/api/models?collapse_variants=true&term=nanbeige4.1-3b-q8'# Uncollapsed, same term: the build itself comes back.curl 'http://localhost:8080/api/models?term=nanbeige4.1-3b-q8'
A parent appears once however many of its builds match, and once when it matches
in its own right as well. The substitution runs before the count and the page
math, so both describe the rows actually handed out.
term, tag and backend are all applied before the substitution, so each is
judged against the build that really carries the name, tag or backend rather
than against a parent that merely offers it. The consequence is worth knowing:
filtering by a backend only one variant declares returns that variant’s parent,
whose own backend field may say something else. The alternative would be to
claim the gallery holds no such build.
The web UI requests the collapsed view by default and has a toggle for the other
one. The parameter stays on the API, off by default, for clients that want
either view.
Ask for the description one entry at a time, as the web UI does when you open
a model’s variant menu:
auto_selected is what installing without a choice would pick right now. fits
is whether auto-selection would consider that variant on this machine, and
is_base marks the entry’s own build. memory_bytes is omitted entirely, as on
the second entry above, when the size could not be measured; read a missing
memory_bytes as unknown rather than as a free build.
An entry that declares no variants carries no has_variants field and answers
this endpoint with an empty list, so a client never has to ask about it.
To install a specific one, pass its name as variant:
An explicit choice is honored even when the machine looks too small for it, so
you can deliberately install a build LocalAI would not have picked. A variant
the entry does not declare fails the install and names what was requested; it
never quietly falls back to auto-selection. The choice is recorded, so a later
reinstall or upgrade of the same model stays on the variant you picked.
The admin Operations Bar and GET /api/operations expose currentBytes and
totalBytes as raw transport bytes. Cancelling an active download leaves its
partial files in place so a retry can resume. A verification failure never
exposes a completed snapshot, while a retry or another installation reuses an
already verified content-addressed snapshot.
Deleting a model configuration does not delete its content-addressed snapshot
bytes. This allows another configuration or a later reinstall to reuse the
cache; safe cache garbage collection is deferred.
How to install a model not part of a gallery
If you don’t want to set any gallery repository, you can still install models by loading a model configuration file.
In the body of the request you must specify the model configuration file URL (url), optionally a name to install the model (name), extra files to install (files), and configuration overrides (overrides). When calling the API endpoint, LocalAI will download the models files and write the configuration to the folder used to store models.
To preload models on start instead you can use the PRELOAD_MODELS environment variable.
To preload models on start, use the PRELOAD_MODELS environment variable by setting it to a JSON array of model uri:
PRELOAD_MODELS='[{"url": "<MODEL_URL>"}]'
Note: url or id must be specified. url is used to a url to a model gallery configuration, while an id is used to refer to models inside repositories. If both are specified, the id will be used.
While the API is running, you can install the model by using the /models/apply endpoint and point it to the stablediffusion model in the models-gallery:
LocalAI will create a batch process that downloads the required files from a model definition and automatically reload itself to include the new model.
Input: url or id (required), name (optional), files (optional)
An optional, list of additional files can be specified to be downloaded within files. The name allows to override the model name. Finally it is possible to override the model config file with override.
The url is a full URL, or a github url (github:org/repo/file.yaml), or a local file (file:///path/to/file.yaml).
Warning
Local file security restriction: When using file:// URLs, the file path must be within your models directory (specified by MODELS_PATH). Files outside this directory will be rejected for security reasons.
The id is a string in the form <GALLERY>@<MODEL_NAME>, where <GALLERY> is the name of the gallery, and <MODEL_NAME> is the name of the model in the gallery. Galleries can be specified during startup with the GALLERIES environment variable.
Returns an uuid and an url to follow up the state of the process:
Installations are processed one at a time. A job submitted while another install
is still running is reported as queued until the installer picks it up:
A job ID is queryable from the moment /models/apply returns it, so a 404/500
from this endpoint means the ID is genuinely unknown rather than merely waiting
its turn.
Runtime Settings
LocalAI provides a web-based interface for managing application settings at runtime. These settings can be configured through the web UI and are automatically persisted to a configuration file, allowing changes to take effect immediately without requiring a restart.
Accessing Runtime Settings
Navigate to the Settings page from the management interface at http://localhost:8080/manage. The settings page provides a comprehensive interface for configuring various aspects of LocalAI.
Available Settings
Watchdog Settings
The watchdog monitors backend activity and can automatically stop idle or overly busy models to free up resources.
Watchdog Enabled: Master switch to enable/disable the watchdog
Watchdog Idle Enabled: Enable stopping backends that are idle longer than the idle timeout
Watchdog Busy Enabled: Enable stopping backends that are busy longer than the busy timeout
Watchdog Idle Timeout: Duration threshold for idle backends (default: 15m)
Watchdog Busy Timeout: Duration threshold for busy backends (default: 5m)
Changes to watchdog settings are applied immediately by restarting the watchdog service.
Backend Configuration
Max Active Backends: Maximum number of active backends (loaded models). When exceeded, the least recently used model is automatically evicted. Set to 0 for unlimited, 1 for single-backend mode
Force Eviction When Busy: Allow evicting models even when they have active API calls (default: disabled for safety). Warning: Enabling this can interrupt active requests
LRU Eviction Max Retries: Maximum number of retries when waiting for busy models to become idle before eviction (default: 30)
LRU Eviction Retry Interval: Interval between retries when waiting for busy models (default: 1s)
Note: The “Single Backend” setting is deprecated. Use “Max Active Backends” set to 1 for single-backend behavior.
LRU Eviction Behavior
By default, LocalAI will skip evicting models that have active API calls to prevent interrupting ongoing requests. When all models are busy and eviction is needed:
The system will wait for models to become idle
It will retry eviction up to the configured maximum number of retries
The retry interval determines how long to wait between attempts
If all retries are exhausted, the system will proceed (which may cause out-of-memory errors if resources are truly exhausted)
You can configure these settings via the web UI or through environment variables. See VRAM Management for more details.
Performance Settings
Threads: Number of threads used for parallel computation (recommended: number of physical cores)
Context Size: Default context size for models (default: 512)
F16: Enable GPU acceleration using 16-bit floating point
VRAM Budget: Cap on VRAM used for model allocation (for example 80% or 12GB; empty means no cap). See VRAM Management
Debug and Logging
Debug Mode: Enable debug logging (deprecated, use log-level instead)
API Security
CORS: Enable Cross-Origin Resource Sharing
CORS Allow Origins: Comma-separated list of allowed CORS origins
CSRF: Enable CSRF protection middleware
API Keys: Manage API keys for authentication (one per line or comma-separated)
Configure peer-to-peer networking for distributed inference:
P2P Token: Authentication token for P2P network
P2P Network ID: Network identifier for P2P connections
Federated Mode: Enable federated mode for P2P network
Changes to P2P settings automatically restart the P2P stack with the new configuration.
Gallery Settings
Manage model and backend galleries:
Model Galleries: JSON array of gallery objects with url and name fields
Backend Galleries: JSON array of backend gallery objects
Autoload Galleries: Automatically load model galleries on startup
Autoload Backend Galleries: Automatically load backend galleries on startup
Agent Pool Settings
Configure the built-in agent platform (see Agents for full documentation):
Agent Pool Enabled: Enable or disable the agent pool feature
Default Model: Default LLM model for new agents
Embedding Model: Model used for knowledge base embeddings (default: granite-embedding-107m-multilingual)
Max Chunking Size: Maximum chunk size for document ingestion (default: 400)
Chunk Overlap: Overlap between document chunks (default: 0)
Enable Logs: Enable detailed agent logging
Collection DB Path: Custom path for the collections database
Note: Most agent pool settings require a restart to take effect.
Configuration Persistence
All settings are automatically saved to runtime_settings.json in the LOCALAI_CONFIG_DIR directory (default: BASEPATH/configuration). This file is watched for changes, so modifications made directly to the file will also be applied at runtime.
Settings Precedence
Every runtime setting follows a single precedence rule:
Environment variables and CLI flags (highest priority)
The same rule is applied identically in all three places where settings can change:
At boot: values persisted in runtime_settings.json fill in every setting that was not explicitly set via an environment variable or CLI flag.
On POST /api/settings (the web UI Settings page): if a setting is controlled by an environment variable, it cannot be modified through the web interface. The settings page will indicate when a setting is controlled by an environment variable.
On manual file edits: the configuration watcher hot-applies edits to runtime_settings.json with the same env-over-file semantics as boot, so editing the file by hand behaves like restarting with that file. For example, hand-editing vram_budget installs the new VRAM allocation cap live, without a restart.
Known Limitations
An environment variable explicitly set to its default value is indistinguishable from an unset one, so the value from runtime_settings.json wins in that case. In particular, an explicit LOCALAI_THREADS=0 behaves like an unset LOCALAI_THREADS.
A field previously changed via the API (or the web UI) looks environment-set to the file watcher, so a manual file edit of that same field is not hot-applied: it takes effect on the next restart.
Example Configuration
The runtime_settings.json file follows this structure:
API keys can be managed through the runtime settings interface. Keys can be entered one per line or comma-separated.
Important Notes:
API keys from environment variables are always included and cannot be removed via the UI
Runtime API keys are stored in runtime_settings.json
For backward compatibility, API keys can also be managed via api_keys.json
Empty arrays will clear all runtime API keys (but preserve environment variable keys)
Dynamic Configuration
The runtime settings system supports dynamic configuration file watching. When LOCALAI_CONFIG_DIR is set, LocalAI monitors the following files for changes:
runtime_settings.json - Unified runtime settings
api_keys.json - API keys (for backward compatibility)
Changes to these files are automatically detected and applied without requiring a restart, using the same precedence rule described in Settings Precedence.
Best Practices
Use Environment Variables for Production: For production deployments, use environment variables for critical settings to ensure they cannot be accidentally changed via the web UI.
Backup Configuration Files: Before making significant changes, consider backing up your runtime_settings.json file.
Monitor Resource Usage: When enabling watchdog features, monitor your system to ensure the timeout values are appropriate for your workload.
Secure API Keys: API keys are sensitive information. Ensure proper file permissions on configuration files (they should be readable only by the LocalAI process).
Test Changes: Some settings (like watchdog timeouts) may require testing to find optimal values for your specific use case.
Troubleshooting
Settings Not Applying
If settings are not being applied:
Check if the setting is controlled by an environment variable
Verify the LOCALAI_CONFIG_DIR is set correctly
Check file permissions on runtime_settings.json
Review application logs for configuration errors
Watchdog Not Working
If the watchdog is not functioning:
Ensure “Watchdog Enabled” is turned on
Verify at least one of the idle or busy watchdogs is enabled
Check that timeout values are reasonable for your workload
Review logs for watchdog-related messages
P2P Not Starting
If P2P is not starting:
Verify the P2P token is set (non-empty)
Check network connectivity
Ensure the P2P network ID matches across nodes (if using federated mode)
Review logs for P2P-related errors
Model Quantization
LocalAI supports model quantization directly through the API and Web UI. Quantization converts HuggingFace models to GGUF format and compresses them to smaller sizes for efficient inference with llama.cpp.
Note
This feature is experimental and may change in future releases.
Supported Backends
Backend
Description
Quantization Types
Platforms
llama-cpp-quantization
Downloads HF models, converts to GGUF, and quantizes using llama.cpp
LocalAI supports fine-tuning LLMs directly through the API and Web UI. Fine-tuning is powered by pluggable backends that implement a generic gRPC interface, allowing support for different training frameworks and model types.
Supported Backends
Backend
Domain
GPU Required
Training Methods
Adapter Types
trl
LLM fine-tuning
No (CPU or GPU)
SFT, DPO, GRPO, RLOO, Reward, KTO, ORPO
LoRA, Full
Availability
Fine-tuning is always enabled. When authentication is enabled, fine-tuning is a per-user feature (default OFF). Admins can enable it for specific users via the user management API.
Note
This feature is experimental and may change in future releases.
HuggingFace dataset ID or local file path (required)
adapter_rank
int
LoRA rank (default: 16)
adapter_alpha
int
LoRA alpha (default: 16)
num_epochs
int
Number of training epochs (default: 3)
batch_size
int
Per-device batch size (default: 2)
learning_rate
float
Learning rate (default: 2e-4)
gradient_accumulation_steps
int
Gradient accumulation (default: 4)
warmup_steps
int
Warmup steps (default: 5)
optimizer
string
adamw_torch, adamw_8bit, sgd, adafactor, prodigy
extra_options
map
Backend-specific options (see below)
Backend-Specific Options (extra_options)
TRL
Key
Description
Default
max_seq_length
Maximum sequence length
512
packing
Enable sequence packing
false
trust_remote_code
Trust remote code in model
false
load_in_4bit
Enable 4-bit quantization (GPU only)
false
DPO-specific (training_method=dpo)
Key
Description
Default
beta
KL penalty coefficient
0.1
loss_type
Loss type: sigmoid, hinge, ipo
sigmoid
max_length
Maximum sequence length
512
GRPO-specific (training_method=grpo)
Key
Description
Default
num_generations
Number of generations per prompt
4
max_completion_length
Max completion token length
256
GRPO Reward Functions
GRPO training requires reward functions to evaluate model completions. Specify them via the reward_functions field (a typed array) or via extra_options["reward_funcs"] (a JSON string).
Built-in Reward Functions
Name
Description
Parameters
format_reward
Checks <think>...</think> then answer format (1.0/0.0)
-
reasoning_accuracy_reward
Extracts <answer> content, compares to dataset’s answer column
-
length_reward
Score based on proximity to target length [0, 1]
target_length (default: 200)
xml_tag_reward
Scores properly opened/closed <think> and <answer> tags
You can provide custom reward function code as a Python function body. The function receives completions (list of strings) and **kwargs, and must return list[float].
Warning
Inline reward code executes arbitrary Python and is disabled by default.
Inline code is compiled and run in the backend process. The restricted-builtins allowlist is not a security sandbox — trivial expressions can escape it to reach the host (arbitrary code execution). Because the fine-tuning endpoint is unauthenticated by default, inline reward functions are refused unless the operator explicitly opts in by setting LOCALAI_TRL_ALLOW_INLINE_REWARD=true on the backend.
Only enable it on a trusted, access-controlled instance where every caller of the fine-tuning API is authorized to run code on the host. Otherwise use the builtin reward functions above.
The function is given the reduced builtin set (len, int, float, str, list, dict, range, enumerate, zip, map, filter, sorted, min, max, sum, abs, round, any, all, isinstance, print) plus the re, math, json, and string modules, and is compiled and validated at job start (fail-fast on syntax errors). Treat these as ergonomics, not as an isolation boundary.
Example API Request
curl -X POST http://localhost:8080/api/fine-tuning/jobs \
-H "Content-Type: application/json"\
-d '{
"model": "Qwen/Qwen2.5-1.5B-Instruct",
"backend": "trl",
"training_method": "grpo",
"training_type": "lora",
"dataset_source": "my-reasoning-dataset",
"num_epochs": 1,
"batch_size": 2,
"learning_rate": 5e-6,
"reward_functions": [
{"type": "builtin", "name": "reasoning_accuracy_reward"},
{"type": "builtin", "name": "format_reward"},
{"type": "builtin", "name": "length_reward", "params": {"target_length": "200"}},
{"type": "inline", "name": "think_presence", "code": "return [1.0 if \"<think>\" in c else 0.0 for c in completions]"}
],
"extra_options": {
"num_generations": "4",
"max_completion_length": "256"
}
}'
Export Formats
Format
Description
Notes
lora
LoRA adapter files
Smallest, requires base model
merged_16bit
Full model in 16-bit
Large but standalone
merged_4bit
Full model in 4-bit
Smaller, standalone
gguf
GGUF format
For llama.cpp, requires quantization_method
GGUF Quantization Methods
q4_k_m, q5_k_m, q8_0, f16, q4_0, q5_0
Web UI
When fine-tuning is enabled, a “Fine-Tune” page appears in the sidebar under the Agents section. The UI provides:
Job Configuration - Select backend, model, training method, adapter type, and hyperparameters
Dataset Upload - Upload local datasets or reference HuggingFace datasets
Training Monitor - Real-time loss chart, progress bar, metrics display
Export - Export trained models in various formats
Dataset Formats
Datasets should follow standard HuggingFace formats:
SFT: Alpaca format (instruction, input, output fields) or ChatML/ShareGPT
Fine-tuning uses the same gRPC backend architecture as inference:
Proto layer: FineTuneRequest, FineTuneProgress (streaming), StopFineTune, ListCheckpoints, ExportModel
Python backends: Each backend implements the gRPC interface with its specific training framework
Go service: Manages job lifecycle, routes API requests to backends
REST API: HTTP endpoints with SSE progress streaming
React UI: Configuration form, real-time training monitor, export panel
Authentication & Authorization
LocalAI supports two authentication modes: legacy API key authentication (simple shared keys) and a full user authentication system with roles, sessions, OAuth, and per-user usage tracking.
Legacy API Key Authentication
The simplest way to protect your LocalAI instance is with API keys. Set one or more keys via environment variable or CLI flag:
# Single keyLOCALAI_API_KEY=sk-my-secret-key localai run
# Multiple keys (comma-separated)LOCALAI_API_KEY=key1,key2,key3 localai run
Clients provide the key via any of these methods:
Authorization: Bearer <key> header
x-api-key: <key> header
xi-api-key: <key> header
token cookie
Legacy API keys grant full admin access - there is no role separation. For multi-user deployments with role-based access, use the user authentication system instead.
API keys can also be managed at runtime through the Runtime Settings interface.
User Authentication System
The user authentication system provides:
User accounts with email, name, and avatar
Role-based access control (admin vs. user)
Session-based authentication with secure cookies
OAuth login (GitHub) and OIDC single sign-on (Keycloak, Google, Okta, Authentik, etc.)
Per-user API keys for programmatic access
Admin route gating - management endpoints are restricted to admins
Per-user usage tracking with token consumption metrics
Enabling Authentication
Set LOCALAI_AUTH=true or provide a GitHub OAuth Client ID or OIDC Client ID (which auto-enables auth):
# Enable with SQLite (default, stored at {DataPath}/database.db)LOCALAI_AUTH=true localai run
# Enable with GitHub OAuthGITHUB_CLIENT_ID=your-client-id \
GITHUB_CLIENT_SECRET=your-client-secret \
LOCALAI_BASE_URL=http://localhost:8080 \
localai run
# Enable with OIDC provider (e.g. Keycloak)LOCALAI_OIDC_ISSUER=https://keycloak.example.com/realms/myrealm \
LOCALAI_OIDC_CLIENT_ID=your-client-id \
LOCALAI_OIDC_CLIENT_SECRET=your-client-secret \
LOCALAI_BASE_URL=http://localhost:8080 \
localai run
# Enable with PostgreSQLLOCALAI_AUTH=true \
LOCALAI_AUTH_DATABASE_URL=postgres://user:pass@host/dbname \
localai run
Configuration Reference
Environment Variable
Default
Description
LOCALAI_AUTH
false
Enable user authentication and authorization
LOCALAI_AUTH_DATABASE_URL
{DataPath}/database.db
Database URL - postgres://... for PostgreSQL, or a file path for SQLite
GITHUB_CLIENT_ID
GitHub OAuth App Client ID (auto-enables auth when set)
GITHUB_CLIENT_SECRET
GitHub OAuth App Client Secret
LOCALAI_OIDC_ISSUER
OIDC issuer URL for auto-discovery (e.g. https://accounts.google.com)
LOCALAI_OIDC_CLIENT_ID
OIDC Client ID (auto-enables auth when set)
LOCALAI_OIDC_CLIENT_SECRET
OIDC Client Secret
LOCALAI_BASE_URL
Base URL for OAuth callbacks (e.g. http://localhost:8080)
LOCALAI_ADMIN_EMAIL
Email address to auto-promote to admin role on login
LOCALAI_REGISTRATION_MODE
approval
Registration mode: open, approval, or invite
LOCALAI_DISABLE_LOCAL_AUTH
false
Disable local email/password registration and login (for OAuth/OIDC-only deployments)
Note: network-backed storage. File-based SQLite relies on POSIX file locking, which is unreliable over network filesystems (SMB/CIFS/NFS, e.g. Azure Files / Azure Container Apps shared volumes). On such storage the auth DB can fail to migrate with database is locked. Use PostgreSQL (LOCALAI_AUTH_DATABASE_URL=postgres://...) when the data directory lives on shared or network storage, or place database.db on a local volume.
Disabling Local Authentication
If you want to enforce OAuth/OIDC-only login and prevent users from registering or logging in with email/password, set LOCALAI_DISABLE_LOCAL_AUTH=true (or pass --disable-local-auth):
# OAuth-only setup (no email/password)LOCALAI_DISABLE_LOCAL_AUTH=true \
GITHUB_CLIENT_ID=your-client-id \
GITHUB_CLIENT_SECRET=your-client-secret \
LOCALAI_BASE_URL=http://localhost:8080 \
localai run
When disabled:
The login page will not show email/password forms (the UI checks the providers list from /api/auth/status)
POST /api/auth/register returns 403 Forbidden
POST /api/auth/login returns 403 Forbidden
OAuth/OIDC login continues to work normally
Roles
There are two roles:
Admin: Full access to all endpoints, including model management, backend configuration, system settings, traces, agents, and user management.
User: Access to inference endpoints only - chat completions, embeddings, image/video/audio generation, TTS, MCP chat, and their own usage statistics.
The first user to sign in is automatically assigned the admin role. Additional users can be promoted to admin via the admin user management API or by setting LOCALAI_ADMIN_EMAIL to their email address.
Registration Modes
Mode
Description
open
Anyone can register and is immediately active
approval
New users land in “pending” status until an admin approves them. If a valid invite code is provided during registration, the user is activated immediately (skipping the approval wait). (default)
invite
Registration requires a valid invite link generated by an admin. Without one, registration is rejected.
Invite Links
Admins can generate single-use, time-limited invite links from the Users → Invites tab in the web UI, or via the API:
# Create an invite link (default: expires in 7 days)curl -X POST http://localhost:8080/api/auth/admin/invites \
-H "Authorization: Bearer <admin-key>"\
-H "Content-Type: application/json"\
-d '{"expiresInHours": 168}'# List all invitescurl http://localhost:8080/api/auth/admin/invites \
-H "Authorization: Bearer <admin-key>"# Revoke an unused invitecurl -X DELETE http://localhost:8080/api/auth/admin/invites/<invite-id> \
-H "Authorization: Bearer <admin-key>"# Check if an invite code is valid (public, no auth required)curl http://localhost:8080/api/auth/invite/<code>/check
Share the invite URL (/invite/<code>) with the user. When they open it, the registration form is pre-filled with the invite code. Invite codes are single-use - once consumed, they cannot be reused. Expired or used invites are rejected.
For GitHub OAuth, the invite code is passed as a query parameter to the login URL (/api/auth/github/login?invite_code=<code>) and stored in a cookie during the OAuth flow.
Admin-Only Endpoints
When authentication is enabled, the following endpoints require admin role:
Model & Backend Management:
GET /api/models, POST /api/models/install/*, POST /api/models/delete/*
GET /api/backends, POST /api/backends/install/*, POST /api/backends/delete/*
GET /api/operations, POST /api/operations/*/cancel
GET /models/available, GET /models/galleries, GET /models/jobs/*
GET /backends, GET /backends/available, GET /backends/galleries
System & Monitoring:
GET /api/traces, GET /api/traces/{id}, POST /api/traces/clear
GET /api/backend-traces, GET /api/backend-traces/{id}, POST /api/backend-traces/clear
GET /api/backend-logs/*, POST /api/backend-logs/*/clear
GET /api/resources, GET /api/settings, POST /api/settings
GET /system, GET /backend/monitor, POST /backend/shutdown, POST /backend/load
P2P:
GET /api/p2p/*
Agents & Jobs:
All /api/agents/* endpoints
All /api/agent/tasks/* and /api/agent/jobs/* endpoints
For OIDC, invite codes work the same way as GitHub OAuth - the invite code is passed as a query parameter to the login URL (/api/auth/oidc/login?invite_code=<code>) and stored in a cookie during the OAuth flow.
User API Keys
Authenticated users can create personal API keys for programmatic access:
# Create an API key (requires session auth)curl -X POST http://localhost:8080/api/auth/api-keys \
-H "Cookie: session=<session-id>"\
-H "Content-Type: application/json"\
-d '{"name": "My Script Key"}'
User API keys inherit the creating user’s role. Admin keys grant admin access; user keys grant user-level access.
Auth API Endpoints
Method
Endpoint
Description
Auth Required
GET
/api/auth/status
Auth state, current user, providers
No
POST
/api/auth/logout
End session
Yes
GET
/api/auth/me
Current user info
Yes
POST
/api/auth/api-keys
Create API key
Yes
GET
/api/auth/api-keys
List user’s API keys
Yes
DELETE
/api/auth/api-keys/:id
Revoke API key
Yes
GET
/api/auth/usage
User’s own usage stats
Yes
GET
/api/auth/usage/sources
User’s own per-API-key / per-source breakdown
Yes
GET
/api/auth/admin/users
List all users
Admin
PUT
/api/auth/admin/users/:id/role
Change user role
Admin
DELETE
/api/auth/admin/users/:id
Delete user
Admin
GET
/api/auth/admin/usage
All users’ usage stats
Admin
GET
/api/auth/admin/usage/sources
All users’ per-API-key / per-source breakdown
Admin
POST
/api/auth/admin/invites
Create invite link
Admin
GET
/api/auth/admin/invites
List all invites
Admin
DELETE
/api/auth/admin/invites/:id
Revoke unused invite
Admin
GET
/api/auth/invite/:code/check
Check if invite code is valid
No
GET
/api/auth/github/login
Start GitHub OAuth
No
GET
/api/auth/github/callback
GitHub OAuth callback (internal)
No
GET
/api/auth/oidc/login
Start OIDC login
No
GET
/api/auth/oidc/callback
OIDC callback (internal)
No
Usage Tracking
When authentication is enabled, LocalAI automatically tracks per-user token usage for inference endpoints. Usage data includes:
Prompt tokens, completion tokens, and total tokens per request
Model used and endpoint called
Request duration
Timestamp for time-series aggregation
Viewing Usage
Usage is accessible through the Usage page in the web UI (visible to all authenticated users) or via the API:
# Get your own usage (default: last 30 days)curl http://localhost:8080/api/auth/usage?period=month \
-H "Authorization: Bearer <key>"# Admin: get all users' usagecurl http://localhost:8080/api/auth/admin/usage?period=week \
-H "Authorization: Bearer <admin-key>"# Admin: filter by specific usercurl "http://localhost:8080/api/auth/admin/usage?period=month&user_id=<user-id>"\
-H "Authorization: Bearer <admin-key>"
Period selector - switch between day, week, month, and all-time views
Summary cards - total requests, prompt tokens, completion tokens, total tokens
By Model table - per-model breakdown with visual usage bars
By User table (admin only) - per-user breakdown across all models
Sources tab - per-API-key and per-source breakdown (described below)
Per-API-key Breakdown
The Sources tab on the Usage page surfaces a third dimension of the same data: traffic broken down by API key and by request source. Three source classes are tracked:
API key - request authenticated with a named user API key (Authorization: Bearer lai-..., x-api-key, or token cookie). Each key shows up with its label (snapshotted at write time, so revoked keys still display the original name).
Web UI - request authenticated with a browser session cookie.
Legacy - request authenticated with an env-configured LOCALAI_API_KEY. Visible to admins only.
The Sources tab is visible to every authenticated user. Non-admins see only their own keys plus their own Web UI traffic (legacy is filtered server-side). Admins see every key from every user.
The tab is laid out as:
A source mix ribbon showing the percentage split across the three classes.
A top-N + Other stacked time chart (top 7 sources by total tokens; the rest roll up).
A searchable, sortable table of every key plus the Web UI and Legacy pseudo-rows. Click a row to filter the chart to that source.
Endpoints
Method
Path
Auth
Description
GET
/api/auth/usage/sources
Self
Caller’s per-source breakdown. Excludes legacy.
GET
/api/auth/admin/usage/sources
Admin
All users’ per-source breakdown. Accepts user_id and api_key_id filters. Includes legacy.
Both endpoints accept the same period parameter (day, week, month, all) as /api/auth/usage.
# Your own per-source usage for the last weekcurl "http://localhost:8080/api/auth/usage/sources?period=week"\
-H "Authorization: Bearer <key>"# Admin: filter to a single API key across all userscurl "http://localhost:8080/api/auth/admin/usage/sources?period=month&api_key_id=<key-id>"\
-H "Authorization: Bearer <admin-key>"
The by_key list is server-sorted by tokens descending and capped at 200 entries. When more keys would qualify, the response sets "truncated": true so the UI can show a notice.
Migration of pre-feature data
Usage rows recorded before this feature have no source column. On startup, InitDB backfills them as legacy when the synthetic legacy-api-key user_id was used, and web for everything else. The migration is idempotent; existing aggregations remain correct after the upgrade.
Combining Auth Modes
Legacy API keys and user authentication can be used simultaneously. When both are configured:
User sessions and user API keys are checked first
Legacy API keys are checked as fallback - they grant admin-level access
This allows a gradual migration from shared API keys to per-user accounts
Build Requirements
The user authentication system requires CGO for SQLite support. It is enabled with the auth build tag, which is included by default in Docker builds.
# Building from source with auth supportGO_TAGS=auth make build
# Or directly with go buildgo build -tags auth ./...
The default Dockerfile includes GO_TAGS="auth", so all Docker images ship with auth support. When building from source without the auth tag, setting LOCALAI_AUTH=true has no effect - the system operates without authentication.