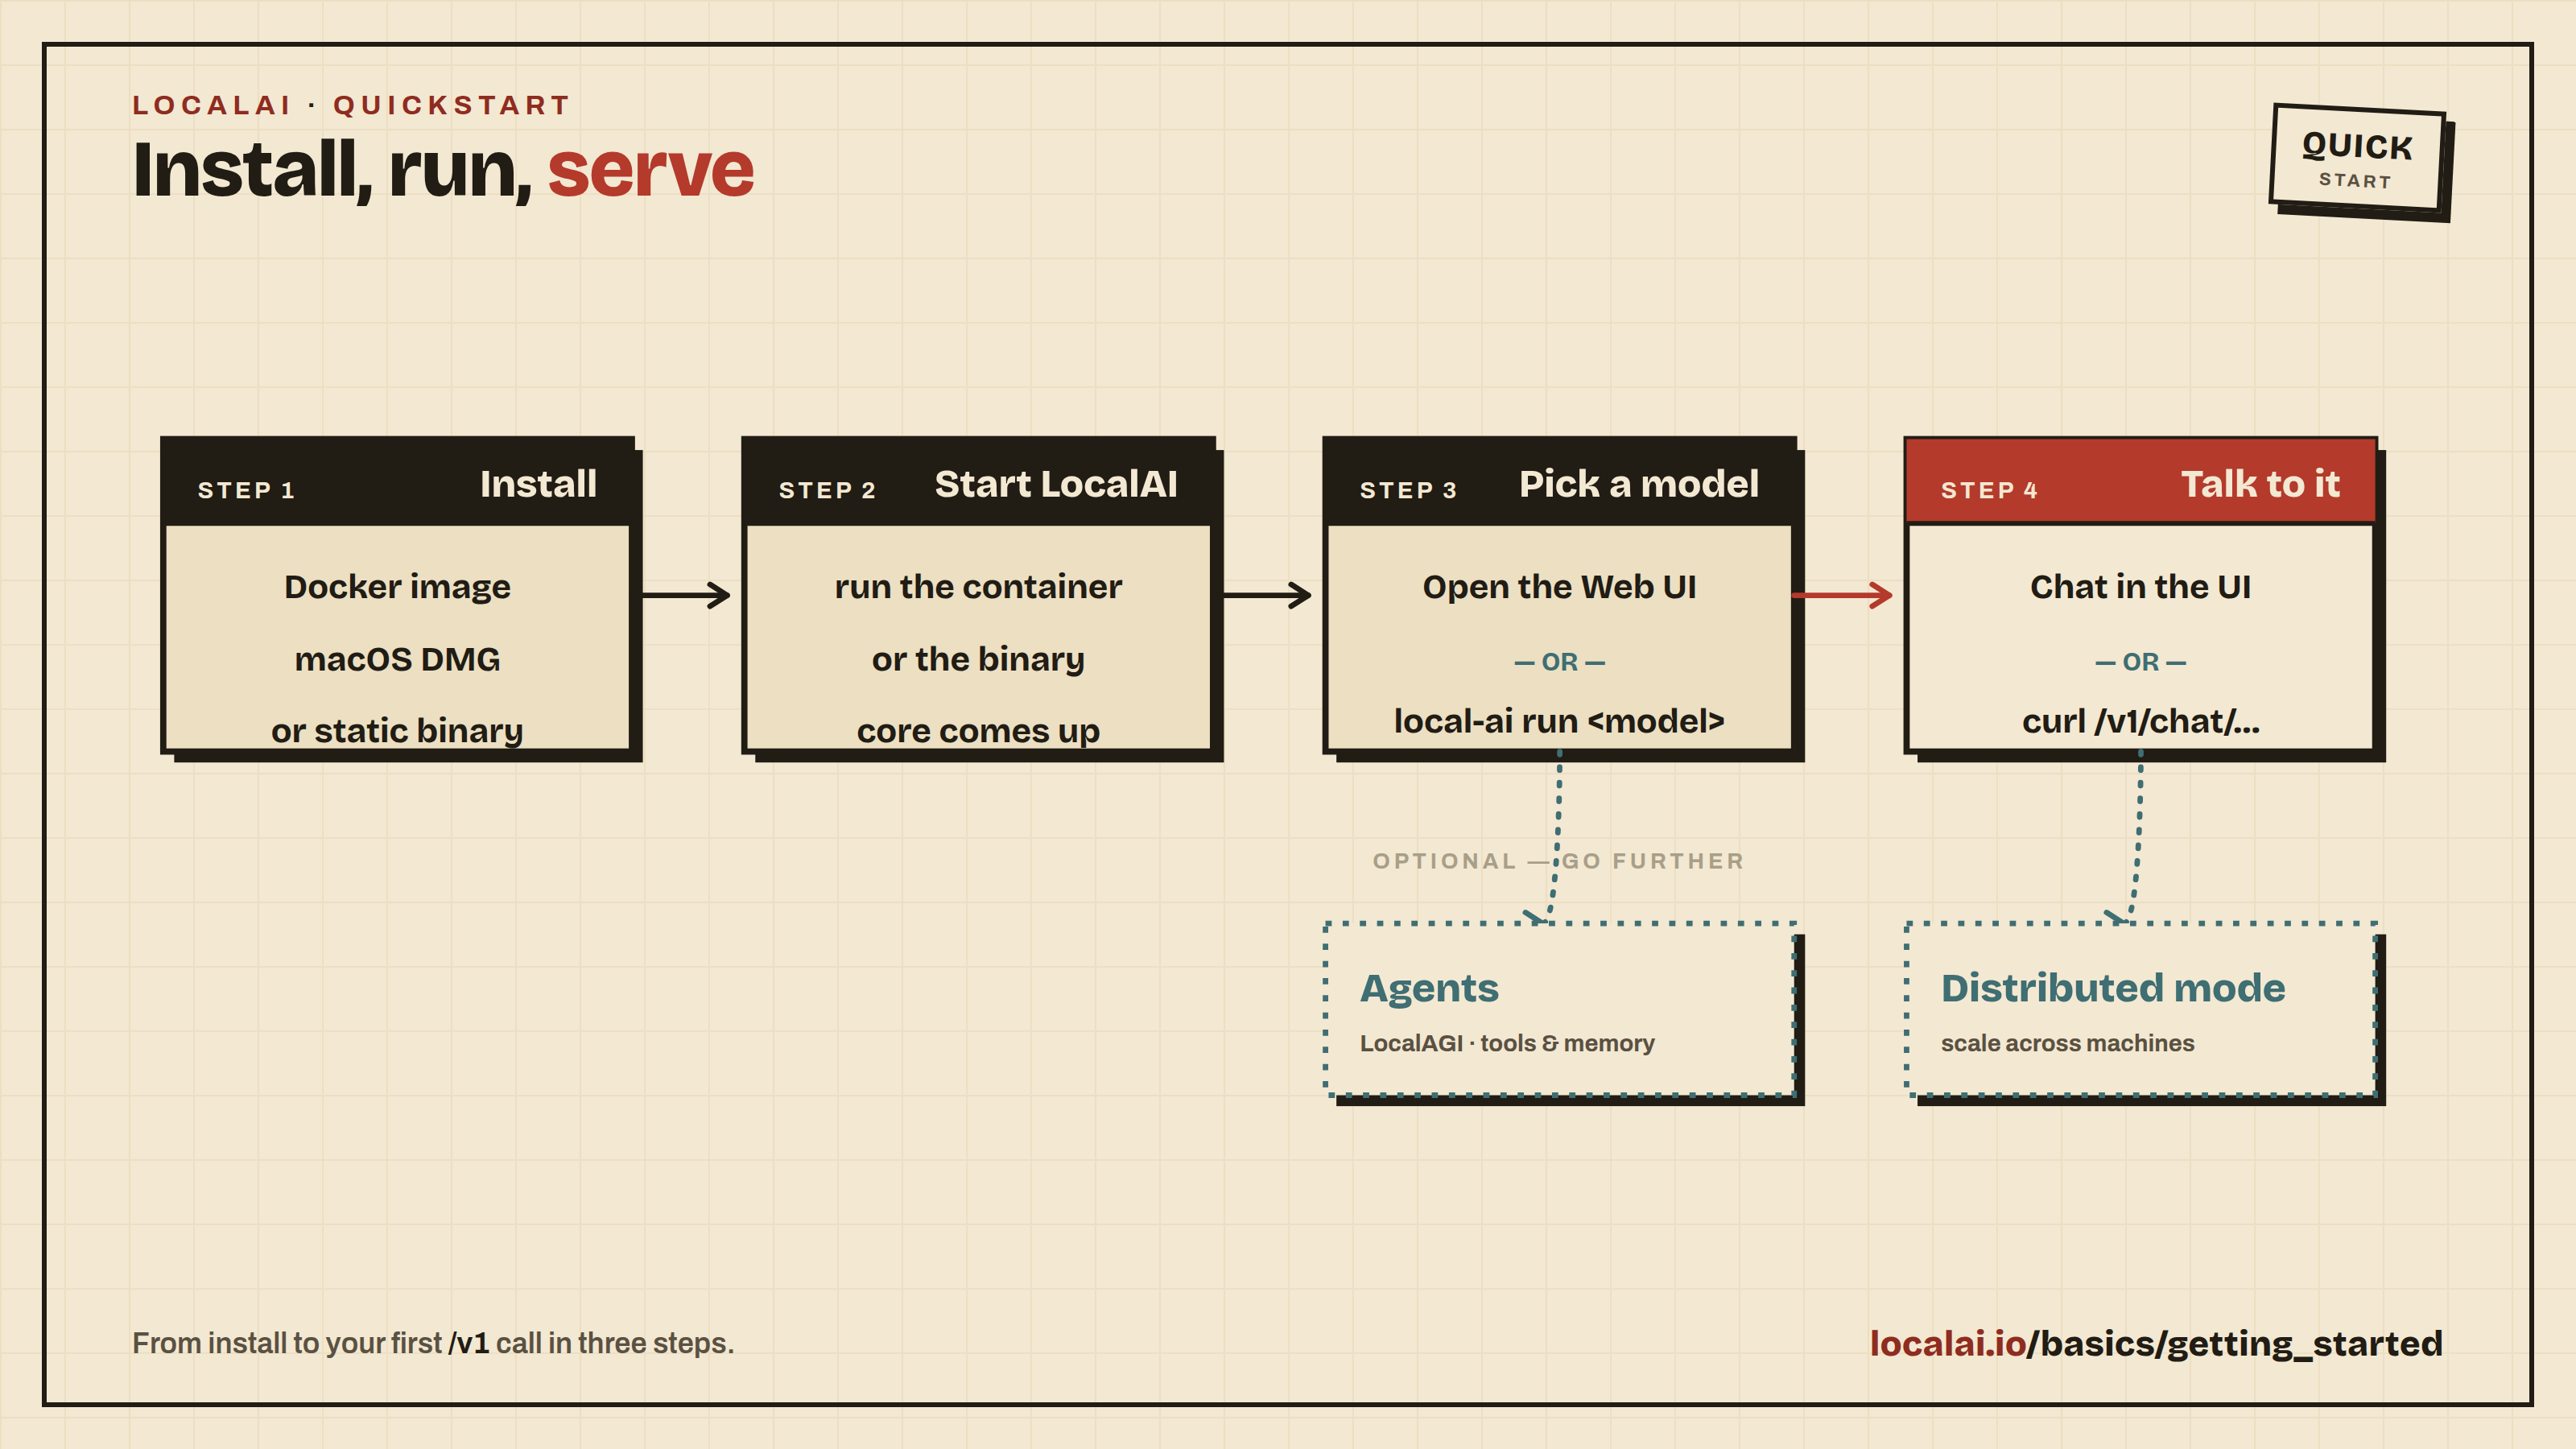
Welcome to LocalAI! This section takes you from a fresh install to a working chat, a working API call, and your first customized model. Follow the pages in order the first time through; each one builds on the previous.
Tip
Haven’t installed LocalAI yet?
See the Installation guide first. Docker is the recommended installation method for most users.
# With Dockerdocker run -p 8080:8080 --name local-ai -ti localai/localai:latest
# Or with Podmanpodman run -p 8080:8080 --name local-ai -ti localai/localai:latest
This will start LocalAI. The API will be available at http://localhost:8080.
LocalAI is a free, open-source alternative to OpenAI (Anthropic, etc.), functioning as a drop-in replacement REST API for local inferencing. It allows you to run LLMs, generate images, and produce audio, all locally or on-premises with consumer-grade hardware, supporting multiple model families and architectures.
LocalAI comes with a built-in web interface for chatting with models, managing installations, configuring AI agents, and more, with no extra tools needed.
Tip
Security considerations
If you are exposing LocalAI remotely, make sure you protect the API endpoints adequately. You have two options:
Simple API keys: Run with LOCALAI_API_KEY=your-key to gate access. API keys grant full admin access with no role separation.
User authentication: Run with LOCALAI_AUTH=true for multi-user support with admin/user roles, OAuth login, per-user API keys, and usage tracking. See Authentication & Authorization for details.
Once installed, start LocalAI. For Docker installations:
docker run -p 8080:8080 --name local-ai -ti localai/localai:latest
For GPU acceleration, choose the image that matches your hardware:
Hardware
Docker image
CPU only
localai/localai:latest
NVIDIA CUDA
localai/localai:latest-gpu-nvidia-cuda-12
AMD (ROCm)
localai/localai:latest-gpu-hipblas
Intel GPU
localai/localai:latest-gpu-intel
Vulkan
localai/localai:latest-gpu-vulkan
For NVIDIA GPUs, add --gpus all. For AMD/Intel/Vulkan, add the appropriate --device flags. See Container images for the full reference.
Using the Web Interface
Open http://localhost:8080 in your browser. The web interface lets you:
Chat with any installed model
Install models from the built-in gallery (Models page)
Generate images, audio, and more
Create and manage AI agents with MCP tool support
Monitor system resources and loaded models
Configure settings including GPU acceleration
To get your first chat working:
Open the Models page and search for qwen3-4b. Click Install on the qwen3-4b entry and wait for the download to finish. (qwen3-4b is a small, CPU-friendly Qwen3 model that also supports tool calling, so you can reuse it later in the Build your first agent walkthrough.)
Open the Chat page, select qwen3-4b from the model dropdown, type a message, and send it. You should get a reply within a few seconds.
Downloading models from the CLI
When starting LocalAI (either via Docker or via CLI) you can specify as argument a list of models to install automatically before starting the API, for example:
local-ai run qwen3-4b
local-ai run huggingface://TheBloke/phi-2-GGUF/phi-2.Q8_0.gguf
local-ai run ollama://gemma:2b
local-ai run https://gist.githubusercontent.com/.../phi-2.yaml
local-ai run oci://localai/phi-2:latest
You can also manage models with the CLI:
local-ai models list # List available models in the gallerylocal-ai models install <name> # Install a model
Tip
Automatic Backend Detection: When you install models from the gallery or YAML files, LocalAI automatically detects your system’s GPU capabilities (NVIDIA, AMD, Intel) and downloads the appropriate backend. For advanced configuration options, see GPU Acceleration.
LocalAI also supports the Anthropic Messages API, the Open Responses API, and more. See Try it out for examples of all supported endpoints.
Built-in AI Agents
LocalAI includes a built-in AI agent platform with support for the Model Context Protocol (MCP). You can create agents that use tools, browse the web, execute code, and interact with external services, all from the web interface.
To get started with agents:
Install a model that supports tool calling (most modern LLMs do)
Navigate to the Agents page in the web interface
Create a new agent, configure its tools and system prompt
Start chatting; the agent will use tools autonomously
No separate installation required: agents are part of LocalAI. For a full step-by-step walkthrough, see Build your first agent.
Scaling with Distributed Mode
For production deployments or when you need more compute, LocalAI supports distributed mode with horizontal scaling:
Distributed nodes: Add GPU worker nodes that self-register with a frontend coordinator
P2P federation: Connect multiple LocalAI instances for load-balanced inference
Model sharding: Split large models across multiple machines
This section covers everything you need to know about installing and configuring models in LocalAI. You’ll learn multiple methods to get models running.
Prerequisites
LocalAI installed and running (see Quickstart if you haven’t set it up yet)
Basic understanding of command line usage
Method 1: Using the Model Gallery (Easiest)
The Model Gallery is the simplest way to install models. It provides pre-configured models ready to use.
# List available modelslocal-ai models list
# Install a specific modellocal-ai models install llama-3.2-1b-instruct:q4_k_m
# Start LocalAI with a model from the gallerylocal-ai run llama-3.2-1b-instruct:q4_k_m
To run models available in the LocalAI gallery, you can use the model name as the URI. For example, to run LocalAI with the Hermes model, execute:
local-ai run hermes-2-theta-llama-3-8b
To install only the model, use:
local-ai models install hermes-2-theta-llama-3-8b
Note: The galleries available in LocalAI can be customized to point to a different URL or a local directory. For more information on how to setup your own gallery, see the Gallery Documentation.
Browse Online
Visit models.localai.io to browse all available models in your browser.
Method 1.5: Import Models via WebUI
The WebUI provides a powerful model import interface that supports both simple and advanced configuration:
Simple Import Mode
Open the LocalAI WebUI at http://localhost:8080
Click “Import Model”
Enter the model URI (e.g., https://huggingface.co/Qwen/Qwen3-VL-8B-Instruct-GGUF)
Optionally configure preferences:
Backend selection
Model name
Description
Quantizations
Embeddings support
Custom preferences
Click “Import Model” to start the import process
Advanced Import Mode
For full control over model configuration:
In the WebUI, click “Import Model”
Toggle to “Advanced Mode”
Edit the YAML configuration directly in the code editor
Use the “Validate” button to check your configuration
Click “Create” or “Update” to save
The advanced editor includes:
Syntax highlighting
YAML validation
Format and copy tools
Full configuration options
This is especially useful for:
Custom model configurations
Fine-tuning model parameters
Setting up complex model setups
Editing existing model configurations
Method 2: Installing from Hugging Face
LocalAI can directly install models from Hugging Face:
# Install and run a model from Hugging Facelocal-ai run huggingface://TheBloke/phi-2-GGUF
The format is: huggingface://<repository>/<model-file> ( is optional)
Examples
local-ai run huggingface://TheBloke/phi-2-GGUF/phi-2.Q8_0.gguf
Method 3: Installing from OCI Registries
Ollama Registry
local-ai run ollama://gemma:2b
Standard OCI Registry
local-ai run oci://localai/phi-2:latest
Note
When pulling models from Ollama or OCI registries, LocalAI identifies itself with a LocalAI/<version>User-Agent header so registry operators can attribute usage to LocalAI.
Run Models via URI
To run models via URI, specify a URI to a model file or a configuration file when starting LocalAI. Valid syntax includes:
file://path/to/model (absolute path to a file within your models directory)
From OCIs: oci://container_image:tag, ollama://model_id:tag
From configuration files: https://gist.githubusercontent.com/.../phi-2.yaml
Note
When using file:// URLs, the path must point to a file within your models directory (specified by MODELS_PATH). Files outside this directory are rejected for security reasons.
Configuration files can be used to customize the model defaults and settings. For advanced configurations, refer to the Customize Models section.
Examples
local-ai run huggingface://TheBloke/phi-2-GGUF/phi-2.Q8_0.gguf
local-ai run ollama://gemma:2b
local-ai run https://gist.githubusercontent.com/.../phi-2.yaml
local-ai run oci://localai/phi-2:latest
Method 4: Manual Installation
For full control, you can manually download and configure models.
If running on Apple Silicon (ARM), it is not recommended to run on Docker due to emulation. Follow the build instructions to use Metal acceleration for full GPU support.
If you are running on Apple x86_64, you can use Docker without additional gain from building it from source.
git clone https://github.com/go-skynet/LocalAI

cd LocalAI

cp your-model.gguf models/

docker compose up -d --pull always

curl http://localhost:8080/v1/models

curl http://localhost:8080/v1/completions -H "Content-Type: application/json" -d '{
     "model": "your-model.gguf",
     "prompt": "A long time ago in a galaxy far, far away",
     "temperature": 0.7
   }'
Tip
Other Docker Images:
For other Docker images, please refer to the table in Getting Started.
Note: If you are on Windows, ensure the project is on the Linux filesystem to avoid slow model loading. For more information, see the Microsoft Docs.
# Via APIcurl http://localhost:8080/v1/models
# Via CLIlocal-ai models list
Remove Models
Simply delete the model file and configuration from your models directory:
rm models/model-name.gguf
rm models/model-name.yaml  # if exists
Troubleshooting
Model Not Loading
Check backend: Ensure the required backend is installed
local-ai backends list
local-ai backends install llama-cpp  # if needed
Check logs: Enable debug mode
DEBUG=true local-ai
Verify file: Ensure the model file is not corrupted
Out of Memory
Use a smaller quantization (Q4_K_S or Q2_K)
Reduce context_size in configuration
Close other applications to free RAM
Wrong Backend
Check the Compatibility Table to ensure you’re using the correct backend for your model.
Best Practices
Start small: Begin with smaller models to test your setup
Use quantized models: Q4_K_M is a good balance for most use cases
Organize models: Keep your models directory organized
Backup configurations: Save your YAML configurations
Monitor resources: Watch RAM and disk usage
Try it out
Once LocalAI is installed, you can start it (either by using docker, or the cli, or the systemd service).
By default the LocalAI WebUI should be accessible from http://localhost:8080. You can also use 3rd party projects to interact with LocalAI as you would use OpenAI (see also Integrations ).
After installation, install new models by navigating the model gallery, or by using the local-ai CLI.
Tip
To install models with the WebUI, see the Models section.
With the CLI you can list the models with local-ai models list and install them with local-ai models install <model-name>.
You can also run models manually by copying files into the models directory.
You can test chat models from the CLI without keeping a separate curl command around:
# Terminal 1local-ai run
# Terminal 2local-ai chat --model qwen3-4b
local-ai chat connects to a running LocalAI server, opens an interactive chat prompt, and exits when you type /exit, /quit, or /bye. Use /models to list installed models, /model <name> to switch models, and /clear to reset the current conversation. If the server exposes exactly one model, LocalAI uses that model automatically:
# Terminal 1local-ai run qwen3-4b
# Terminal 2local-ai chat
When more than one model is configured, pass --model with the installed model name to avoid ambiguity. Use --endpoint to connect to a non-default server, for example local-ai chat --endpoint http://127.0.0.1:8081 --model qwen3-4b.
You can also test out the API endpoints using curl. A few examples are listed below.
Note
Each example assumes you have already installed the model it names. The chat and function-calling examples below use qwen3-4b (install it from the Models page or with local-ai run qwen3-4b). The other examples name a model for the task they show (gpt-4-vision-preview for vision, tts-1 for text to speech, whisper-1 for transcription, text-embedding-ada-002 for embeddings); replace each with the name of a model you have installed for that task.
LocalAI supports the Open Responses API specification with support for background processing, streaming, and advanced features. Open Responses documentation.
curl http://localhost:8080/v1/responses \
-H "Content-Type: application/json"\
-d '{
"model": "gpt-4",
"input": "Say this is a test!",
"max_output_tokens": 1024,
"temperature": 0.7
}'
For background processing:
curl http://localhost:8080/v1/responses \
-H "Content-Type: application/json"\
-d '{
"model": "gpt-4",
"input": "Generate a long story",
"max_output_tokens": 4096,
"background": true
}'
curl http://localhost:8080/v1/audio/speech \
-H "Content-Type: application/json"\
-d '{
"model": "tts-1",
"input": "The quick brown fox jumped over the lazy dog.",
"voice": "alloy"
}'\
--output speech.mp3
Get a vector representation of a given input that can be easily consumed by machine learning models and algorithms. OpenAI Embeddings.
curl http://localhost:8080/embeddings \
-X POST -H "Content-Type: application/json"\
-d '{
"input": "Your text string goes here",
"model": "text-embedding-ada-002"
}'
Tip
Don’t use the model file as model in the request unless you want to handle the prompt template for yourself.
Use the installed model’s own name as the model value, the same way you would pass a model name to OpenAI. For instance qwen3-4b for chat, or gpt-4-vision-preview for a vision model you have installed under that name.
Customizing the Model
To customize the prompt template or the default settings of the model, a configuration file is utilized. This file must adhere to the LocalAI YAML configuration standards. For comprehensive syntax details, refer to the advanced documentation. The configuration file can be located either remotely (such as in a Github Gist) or within the local filesystem or a remote URL.
LocalAI can be initiated using either its container image or binary, with a command that includes URLs of model config files or utilizes a shorthand format (like huggingface:// or github://), which is then expanded into complete URLs.
The configuration can also be set via an environment variable. For instance:
name: phi-2context_size: 2048f16: truethreads: 11gpu_layers: 90mmap: trueparameters:
# Reference any HF model or a local file heremodel: huggingface://TheBloke/phi-2-GGUF/phi-2.Q8_0.gguftemperature: 0.2top_k: 40top_p: 0.95template:
chat: &template | Instruct: {{.Input}}
Output:# Modify the prompt template here ^^^ as per your requirementscompletion: *template
Then, launch LocalAI using your gist’s URL:
## Important! Substitute with your gist's URL!docker run -p 8080:8080 localai/localai:v4.7.1 https://gist.githubusercontent.com/xxxx/phi-2.yaml
Next Steps
Visit the advanced section for more insights on prompt templates and configuration files.
This guide covers common issues you may encounter when using LocalAI, organized by category. For each issue, diagnostic steps and solutions are provided.
Quick Diagnostics
Before diving into specific issues, run these commands to gather diagnostic information:
# Check LocalAI is running and responsivecurl http://localhost:8080/readyz
# List loaded modelscurl http://localhost:8080/v1/models
# Check LocalAI versionlocal-ai --version
# Enable debug logging for detailed outputDEBUG=true local-ai run
# orlocal-ai run --log-level=debug
For Docker deployments:
# View container logsdocker logs local-ai
# Check container statusdocker ps -a | grep local-ai
# Test GPU access (NVIDIA)docker run --rm --gpus all nvidia/cuda:12.8.0-base-ubuntu24.04 nvidia-smi
Installation Issues
Binary Won’t Execute on Linux
Symptoms: Permission denied or “cannot execute binary file” errors.
Solution:
chmod +x local-ai-*
./local-ai-Linux-x86_64 run
If you see “cannot execute binary file: Exec format error”, you downloaded the wrong architecture. Verify with:
uname -m
# x86_64 → download the x86_64 binary# aarch64 → download the arm64 binary
macOS: Application Is Quarantined
Symptoms: macOS blocks LocalAI from running because the DMG is not signed by Apple.
Symptoms: API returns 404 or "model not found" error.
Diagnostic steps:
Check the model exists in your models directory:
ls -la /path/to/models/
Verify your models path is correct:
# Check what path LocalAI is usinglocal-ai run --models-path /path/to/models --log-level=debug
Confirm the model name matches your request:
# List available modelscurl http://localhost:8080/v1/models | jq '.data[].id'
Model Fails to Load (Backend Error)
Symptoms: Model is found but fails to load, with backend errors in the logs.
Common causes and fixes:
Wrong backend: Ensure the backend in your model YAML matches the model format. GGUF models use llama-cpp, diffusion models use diffusers, etc. See the compatibility table for details.
Backend not installed: Check installed backends:
local-ai backends list
# Install a missing backend:local-ai backends install llama-cpp
Corrupt model file: Re-download the model. Partial downloads or disk errors can corrupt files.
Wrong model format: LocalAI uses GGUF format for llama.cpp models. Older GGML format is deprecated.
Model Configuration Issues
Symptoms: Model loads but produces unexpected results or errors during inference.
Check your model YAML configuration:
# Example model configname: my-modelbackend: llama-cppparameters:
model: my-model.gguf # Relative to models directorycontext_size: 2048threads: 4# Should match physical CPU cores
Common mistakes:
model path must be relative to the models directory, not an absolute path
threads set higher than physical CPU cores causes contention
context_size too large for available RAM causes OOM errors
GPU and Memory Issues
GPU Not Detected
NVIDIA (CUDA):
# Verify CUDA is availablenvidia-smi
# For Docker, verify GPU passthroughdocker run --rm --gpus all nvidia/cuda:12.8.0-base-ubuntu24.04 nvidia-smi
When working correctly, LocalAI logs should show: ggml_init_cublas: found X CUDA devices.
Ensure you are using a CUDA-enabled container image (tags containing cuda11, cuda12, or cuda13). CPU-only images cannot use NVIDIA GPUs.
If your GPU is not in the default target list, open up an Issue. Supported targets include: gfx908, gfx90a, gfx942, gfx950, gfx1030, gfx1100, gfx1101, gfx1102, gfx1200, gfx1201.
Intel (SYCL):
# Docker requires device passthroughdocker run --device /dev/dri ...
Use container images with gpu-intel in the tag. Known issue: SYCL hangs when mmap: true is set - disable it in your model config:
mmap: false
Overriding backend auto-detection:
If LocalAI picks the wrong GPU backend, override it:
LOCALAI_FORCE_META_BACKEND_CAPABILITY=nvidia local-ai run
# Options: default, nvidia, amd, intel
Out of Memory (OOM)
Symptoms: Model loading fails or the process is killed by the OS.
Solutions:
Use smaller quantizations: Q4_K_S or Q2_K use significantly less memory than Q8_0 or Q6_K
Reduce context size: Lower context_size in your model YAML
Enable low VRAM mode: Add low_vram: true to your model config
Limit active models: Only keep one model loaded at a time:
By default, models remain loaded in memory after first use. This can exhaust VRAM when switching between models.
Configure LRU eviction:
# Keep at most 2 models loaded; evict least recently usedlocal-ai run --max-active-backends=2
Configure watchdog auto-unload:
local-ai run \
  --enable-watchdog-idle --watchdog-idle-timeout=15m \
  --enable-watchdog-busy --watchdog-busy-timeout=5m
These can also be set via environment variables (LOCALAI_WATCHDOG_IDLE=true, LOCALAI_WATCHDOG_IDLE_TIMEOUT=15m) or in the Web UI under Settings → Watchdog Settings.
Search existing issues: Check the GitHub Issues for similar problems
Enable debug logging: Run with DEBUG=true or --log-level=debug and include the logs when reporting
Open a new issue: Include your OS, hardware (CPU/GPU), LocalAI version, model being used, full error logs, and steps to reproduce
Community help: Join the LocalAI Discord for community support
Build your first agent
LocalAGI is embedded in LocalAI. There is nothing separate to install or run.
The agent platform ships inside the LocalAI binary and container image, and it is enabled by default. If you already have LocalAI running and a model installed, you have everything you need to build an agent. This page walks you from an empty Agents page to an agent that answers a message and uses one tool.
Before you start: install a tool-calling model
An agent is a loop around a chat model, so it needs a model that supports tool (function) calling. This guide uses qwen3-4b, a small CPU-friendly Qwen3 model that supports tool calling. It is the same model used in the Quickstart, so if you followed that page you already have it.
Install it either from the web interface or from the CLI:
Web interface: open the Models page at http://localhost:8080, search for qwen3-4b, and click Install.
CLI:
local-ai run qwen3-4b
For other ways to install models (Hugging Face, OCI, local files), see the model gallery.
Give the agent a model
An agent with no model set cannot answer. The agent has nothing to send your message to, so it will fail to respond until you assign it a model. You can set the model in two ways:
Per agent: choose qwen3-4b in the agent’s Model field when you create or edit it (covered below). This is the usual choice.
As a default for every new agent: start LocalAI with an environment variable so new agents are created with that model already selected:
LOCALAI_AGENT_POOL_DEFAULT_MODEL=qwen3-4b
Setting a per-agent model always overrides the default.
Create the agent
Open the Agents page in the web interface.
Click Create Agent.
Fill in the form:
Name: for example helper.
Model: select qwen3-4b.
System prompt: a short instruction that sets the agent’s behavior, for example You are a concise, helpful assistant.
Action: add one simple action so the agent has a tool to call. A search action is a good first choice. Some actions need credentials (for example an API key); pick one whose requirements you can satisfy, or start with an action that needs none.
Save the agent.
Send a message
Open the new agent from the Agents page and type a message in its chat box, for example Hello, what can you do?. The agent replies in the chat panel within a few seconds. When the agent decides to use the action you configured, you will see the tool call and its result appear inline before the final answer, streamed live as the agent works.
That is a complete agent: a model, a system prompt, and one tool, all running inside your LocalAI process.
If your imported agent will not run
If you imported an agent from the Agent Hub or a JSON file and it does not respond, work through this checklist. Each symptom maps to a fix:
The agent does not answer at all: the model it references is not installed. Open the Models page and install the model named in the agent’s configuration (or change the agent’s model to one you have, such as qwen3-4b).
An action always fails: the action is missing its API keys or other credentials. Open the agent’s action configuration and supply the required keys.
A tool times out or is unavailable: the MCP server that provides it is unreachable. Confirm the MCP server is running and that the agent points at the correct address.
A skill the agent expects is not available: skills are disabled by default. Start LocalAI with LOCALAI_AGENT_POOL_ENABLE_SKILLS=true to turn the skills service on (the default is LOCALAI_AGENT_POOL_ENABLE_SKILLS=false).
Next steps
Model gallery - install more models, including larger tool-calling models for more capable agents.
Agent actions catalog - the full list of built-in actions an agent can use and how to configure them.
Agent-scoped MCP - connect an agent to external Model Context Protocol servers to give it more tools.
Containers
LocalAI supports Docker, Podman, and other OCI-compatible container engines. This guide covers the common aspects of running LocalAI in containers.
Prerequisites
Before you begin, ensure you have a container engine installed:
The fastest way to get started is with the CPU image:
docker run -p 8080:8080 --name local-ai -ti localai/localai:latest
# Or with Podman:podman run -p 8080:8080 --name local-ai -ti localai/localai:latest
This will:
Start LocalAI (you’ll need to install models separately)
Make the API available at http://localhost:8080
Image Types
LocalAI provides several image types to suit different needs. These images work with both Docker and Podman.
Standard Images
Standard images don’t include pre-configured models. Use these if you want to configure models manually.
CPU Image
docker run -ti --name local-ai -p 8080:8080 localai/localai:latest
# Or with Podman:podman run -ti --name local-ai -p 8080:8080 localai/localai:latest
GPU Images
NVIDIA CUDA 13:
docker run -ti --name local-ai -p 8080:8080 --gpus all localai/localai:latest-gpu-nvidia-cuda-13
# Or with Podman:podman run -ti --name local-ai -p 8080:8080 --device nvidia.com/gpu=all localai/localai:latest-gpu-nvidia-cuda-13
NVIDIA CUDA 12:
docker run -ti --name local-ai -p 8080:8080 --gpus all localai/localai:latest-gpu-nvidia-cuda-12
# Or with Podman:podman run -ti --name local-ai -p 8080:8080 --device nvidia.com/gpu=all localai/localai:latest-gpu-nvidia-cuda-12
AMD GPU (ROCm):
docker run -ti --name local-ai -p 8080:8080 --device=/dev/kfd --device=/dev/dri --group-add=video localai/localai:latest-gpu-hipblas
# Or with Podman:podman run -ti --name local-ai -p 8080:8080 --device rocm.com/gpu=all localai/localai:latest-gpu-hipblas
Intel GPU:
docker run -ti --name local-ai -p 8080:8080 localai/localai:latest-gpu-intel
# Or with Podman:podman run -ti --name local-ai -p 8080:8080 --device gpu.intel.com/all localai/localai:latest-gpu-intel
Vulkan:
docker run -ti --name local-ai -p 8080:8080 localai/localai:latest-gpu-vulkan
# Or with Podman:podman run -ti --name local-ai -p 8080:8080 localai/localai:latest-gpu-vulkan
NVIDIA Jetson (L4T ARM64):
CUDA 12 (for Nvidia AGX Orin and similar platforms):
docker run -ti --name local-ai -p 8080:8080 --runtime nvidia --gpus all localai/localai:latest-nvidia-l4t-arm64
CUDA 13 (for Nvidia DGX Spark):
docker run -ti --name local-ai -p 8080:8080 --runtime nvidia --gpus all localai/localai:latest-nvidia-l4t-arm64-cuda-13
Using Compose
For a more manageable setup, especially with persistent volumes, use Docker Compose or Podman Compose:
Using CDI (Container Device Interface) - Recommended for NVIDIA Container Toolkit 1.14+
The CDI approach is recommended for newer versions of the NVIDIA Container Toolkit (1.14 and later). It provides better compatibility and is the future-proof method:
version: "3.9"services:
api:
image: localai/localai:latest-gpu-nvidia-cuda-12# For CUDA 13, use: localai/localai:latest-gpu-nvidia-cuda-13healthcheck:
test: ["CMD", "curl", "-f", "http://localhost:8080/readyz"]
interval: 1mtimeout: 20mretries: 5ports:
- 8080:8080environment:
- DEBUG=falsevolumes:
- ./models:/models:cached# CDI driver configuration (recommended for NVIDIA Container Toolkit 1.14+)# This uses the nvidia.com/gpu resource APIdeploy:
resources:
reservations:
devices:
- driver: nvidia.com/gpucount: allcapabilities: [gpu]
Save this as compose.yaml and run:
docker compose up -d
# Or with Podman:podman-compose up -d
Using Legacy NVIDIA Driver - For Older NVIDIA Container Toolkit
If you are using an older version of the NVIDIA Container Toolkit (before 1.14), or need backward compatibility, use the legacy approach:
For AMD: Ensure devices are accessible: ls -la /dev/kfd /dev/dri
NVIDIA Container fails to start with “Auto-detected mode as ’legacy’” error
If you encounter this error:
Error response from daemon: failed to create task for container: failed to create shim task: OCI runtime create failed: runc create failed: unable to start container process: error during container init: error running prestart hook #0: exit status 1, stdout: , stderr: Auto-detected mode as 'legacy'
nvidia-container-cli: requirement error: invalid expression
This indicates a Docker/NVIDIA Container Toolkit configuration issue. The container runtime’s prestart hook fails before LocalAI starts. This is not a LocalAI code bug.
Solutions:
Use CDI mode (recommended): Update your docker-compose.yaml to use the CDI driver configuration:
Upgrade NVIDIA Container Toolkit: Ensure you have version 1.14 or later, which has better CDI support.
Check NVIDIA Container Toolkit configuration: Run nvidia-container-cli --query-gpu to verify your installation is working correctly outside of containers.
Verify Docker GPU access: Test with docker run --rm --gpus all nvidia/cuda:12.0.0-base-ubuntu22.04 nvidia-smi
Models not downloading
Check internet connection
Verify disk space: df -h
Check container logs for errors: docker logs local-ai or podman logs local-ai
Full image reference
The quick-start examples above use the Docker Hub image names. Every image is published to both Docker Hub and Quay. The tables below map the Docker Hub tag to its Quay equivalent for each variant. Replace v4.7.1 with a released version to pin a specific build.
These images are compatible with Nvidia ARM64 devices with CUDA 12, such as the Jetson Nano, Jetson Xavier NX, and Jetson AGX Orin. For more information, see the Nvidia L4T guide.
Download the binary for your architecture (amd64, arm64, etc.)
Make it executable:
chmod +x local-ai-*
Run LocalAI:
./local-ai-*
Run your first model
Starting the binary on its own gives you an empty server. To get a working chat right away, run LocalAI with a model name and it will download and serve it from the gallery:
./local-ai-* run qwen3-4b
Once it is ready, open the WebUI at http://localhost:8080 or send a request to the API:
The easiest way to install LocalAI on macOS is using the DMG application.
Download
Download the latest DMG from GitHub releases:
Installation Steps
Download the LocalAI.dmg file from the link above
Open the downloaded DMG file
Drag the LocalAI application to your Applications folder
Launch LocalAI from your Applications folder
Verification
The LocalAI.dmg (and the app inside it) and the local-ai server binary are
signed with an Apple Developer ID and notarized by Apple, so they launch with no
quarantine prompt or workaround. To inspect the signature yourself:
LocalAI can be built as a container image or as a single, portable binary. Note that some model architectures might require Python libraries, which are not included in the binary.
LocalAI’s extensible architecture allows you to add your own backends, which can be written in any language, and as such the container images contains also the Python dependencies to run all the available backends (for example, in order to run backends like Diffusers that allows to generate images and videos from text).
This section contains instructions on how to build LocalAI from source.
Build LocalAI locally
Requirements
In order to build LocalAI locally, you need the following requirements:
Golang >= 1.21
GCC
GRPC
To install the dependencies follow the instructions below:
Install xcode from the App Store
brew install go protobuf protoc-gen-go protoc-gen-go-grpc wget
apt install golang make protobuf-compiler-grpc
After you have golang installed and working, you can install the required binaries for compiling the golang protobuf components via the following commands
go install google.golang.org/protobuf/cmd/protoc-gen-go@v1.34.2
go install google.golang.org/grpc/cmd/protoc-gen-go-grpc@1958fcbe2ca8bd93af633f11e97d44e567e945af
make build
Build
To build LocalAI with make:
git clone https://github.com/go-skynet/LocalAI
cd LocalAI
make build
This should produce the binary local-ai
Container image
Requirements:
Docker or podman, or a container engine
In order to build the LocalAI container image locally you can use docker, for example:
docker build -t localai .
docker run localai
Example: Build on mac
Building on Mac (M1, M2 or M3) works, but you may need to install some prerequisites using brew.
The below has been tested by one mac user and found to work. Note that this doesn’t use Docker to run the server:
Install xcode from the Apps Store (needed for metalkit)
If you encounter errors regarding a missing utility metal, install Xcode from the App Store.
After the installation of Xcode, if you receive a xcrun error 'xcrun: error: unable to find utility "metal", not a developer tool or in PATH'. You might have installed the Xcode command line tools before installing Xcode, the former one is pointing to an incomplete SDK.
If completions are slow, ensure that gpu-layers in your model yaml matches the number of layers from the model in use (or simply use a high number such as 256).
If you get a compile error: error: only virtual member functions can be marked 'final', reinstall all the necessary brew packages, clean the build, and try again.
brew reinstall go grpc protobuf wget

make clean

make build
Build backends
LocalAI have several backends available for installation in the backend gallery. The backends can be also built by source. As backends might vary from language and dependencies that they require, the documentation will provide generic guidance for few of the backends, which can be applied with some slight modifications also to the others.
Manually
Typically each backend include a Makefile which allow to package the backend.
In the LocalAI repository, for instance you can build a backend by doing:
git clone https://github.com/go-skynet/LocalAI.git

make -C LocalAI/backend/python/vllm
With Docker
Building with docker is simpler as abstracts away all the requirement, and focuses on building the final OCI images that are available in the gallery. This allows for instance also to build locally a backend and install it with LocalAI. You can refer to Backends for general guidance on how to install and develop backends.
In the LocalAI repository, you can build a backend by doing:
git clone https://github.com/go-skynet/LocalAI.git

make docker-build-<backend-name>
Note that make is only by convenience, in reality it just runs a simple docker command as: